![]()
OpenStack is a free and open source cloud computing platform developed as a joint project of Rackspace Hosting and NASA. Users primarily deploy it as an Infrastructure as a Service (IaaS) solution. OpenStack cloud consists of many well know technologies like: Linux KVM, LVM, iSCSI, MariaDB (MySQL), RabbitMQ or Python Django.
OpenStack architecture overview:
- Horizon: web browser user interface (dashboard) based on Python Django for creating and managing instances (virtual machines)
- Keystone: authentication and authorization framework
- Neutron: network connectivity as a service
- Cinder: persistent block storage for instances based on LVM
- Nova: instances management system based on Linux KVM
- Glance: registry for instance images
- Swift: file storage for cloud
- Ceilometer: metering engine for collecting billable data and analysis.
- Heat: orchestration service for template-based instance deployment
In this tutorial we will install OpenStack Juno release from RDO repository on two nodes (controller node & compute node) based on CentOS 7 / RHEL 7.
Environment used:
public network (Floating IP network): 192.168.2.0/24
internal network: no IP space, physical connection only (eth1)
public controller IP: 192.168.2.4 (eth0)
public compute IP: 192.168.2.5 (eth0)
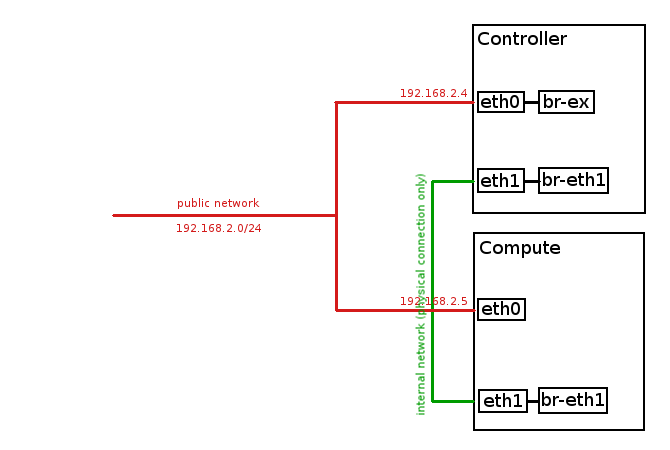
Controller node network interfaces configuration before OpenStack installation:
[root@controller ~]# ip a
1: lo:  mtu 65536 qdisc noqueue state UNKNOWN
    link/loopback 00:00:00:00:00:00 brd 00:00:00:00:00:00
    inet 127.0.0.1/8 scope host lo
       valid_lft forever preferred_lft forever
    inet6 ::1/128 scope host
       valid_lft forever preferred_lft forever
2: eth0:  mtu 1500 qdisc pfifo_fast state UP qlen 1000
    link/ether 52:54:00:cf:f6:ef brd ff:ff:ff:ff:ff:ff
    inet 192.168.2.4/24 brd 192.168.2.255 scope global dynamic eth0
       valid_lft 42065sec preferred_lft 42065sec
    inet6 fe80::5054:ff:fecf:f6ef/64 scope link
       valid_lft forever preferred_lft forever
3: eth1:  mtu 1500 qdisc noop state DOWN qlen 1000
    link/ether 52:54:00:c6:92:ee brd ff:ff:ff:ff:ff:ff
Compute node network interfaces configuration before OpenStack installation:
[root@compute ~]# ip a
1: lo:  mtu 65536 qdisc noqueue state UNKNOWN
    link/loopback 00:00:00:00:00:00 brd 00:00:00:00:00:00
    inet 127.0.0.1/8 scope host lo
       valid_lft forever preferred_lft forever
    inet6 ::1/128 scope host
       valid_lft forever preferred_lft forever
2: eth0:  mtu 1500 qdisc pfifo_fast state UP qlen 1000
    link/ether 52:54:00:4d:fa:06 brd ff:ff:ff:ff:ff:ff
    inet 192.168.2.5/24 brd 192.168.2.255 scope global dynamic eth0
       valid_lft 42039sec preferred_lft 42039sec
    inet6 fe80::5054:ff:fe4d:fa06/64 scope link
       valid_lft forever preferred_lft forever
3: eth1:  mtu 1500 qdisc noop state DOWN qlen 1000
    link/ether 52:54:00:fe:a6:c8 brd ff:ff:ff:ff:ff:ff
First of all, stop and disable NetworkManager on both nodes (controller and compute):
systemctl stop NetworkManager
systemctl disable NetworkManager
systemctl enable network
Update your system on both nodes (controller and compute):
yum updateInstall RDO repository (controller node):
yum install https://repos.fedorapeople.org/repos/openstack/EOL/openstack-juno/rdo-release-juno-1.noarch.rpmInstall packstack automated installer (controller node):
yum install openstack-packstackGenerate answer file for packstack automated installation (controller node):
packstack --gen-answer-file=/root/answers.txtEdit answer file (/root/answers.txt) and modify below parameters (controller node):
CONFIG_NTP_SERVERS=0.pool.ntp.org,1.pool.ntp.org,2.pool.ntp.org
CONFIG_COMPUTE_HOSTS=192.168.2.5
CONFIG_KEYSTONE_ADMIN_PW=password
CONFIG_NEUTRON_ML2_MECHANISM_DRIVERS=openvswitch
CONFIG_NEUTRON_ML2_TYPE_DRIVERS=vlan
CONFIG_NEUTRON_ML2_TENANT_NETWORK_TYPES=vlan
CONFIG_NEUTRON_ML2_VLAN_RANGES=physnet1:1000:2000
CONFIG_NEUTRON_OVS_BRIDGE_MAPPINGS=physnet1:br-eth1
Here attached: answers.txt file used during our installation.
Launch packstack automated installation (controller node):
packstack --answer-file=/root/answers.txtInstallation will take about 1-1,5h, we will be prompted for root password for all nodes (in our case: controller and compute):
Welcome to the Packstack setup utility

The installation log file is available at: /var/tmp/packstack/20150412-171545-6LJ0WP/openstack-setup.log

Installing:
Clean Up                                             [ DONE ]
root@192.168.2.4's password:
root@192.168.2.5's password:
Setting up ssh keys                                  [ DONE ]
Discovering hosts' details                           [ DONE ]
Adding pre install manifest entries                  [ DONE ]
Installing time synchronization via NTP              [ DONE ]
Preparing servers                                    [ DONE ]
...
After successful installation we should get the output similar to the below:
...
Finalizing [ DONE ]
**** Installation completed successfully ******
Additional information:
* File /root/keystonerc_admin has been created on OpenStack client host 192.168.2.4. To use the command line tools you need to source the file.
* To access the OpenStack Dashboard browse to http://192.168.2.4/dashboard .
Please, find your login credentials stored in the keystonerc_admin in your home directory.
* To use Nagios, browse to http://192.168.2.4/nagios username: nagiosadmin, password: 72659a0e75ee4f48
* The installation log file is available at: /var/tmp/packstack/20150412-171545-6LJ0WP/openstack-setup.log
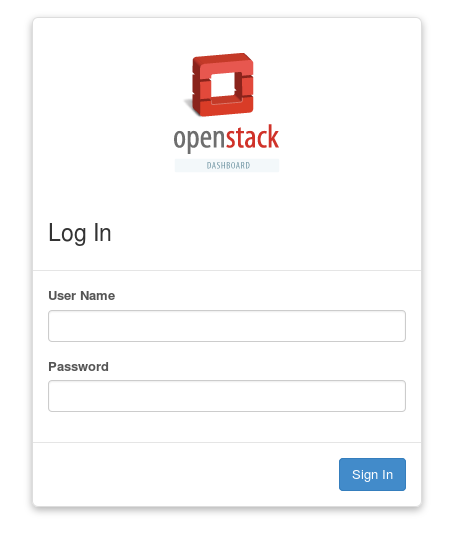
* The generated manifests are available at: /var/tmp/packstack/20150412-171545-6LJ0WP/manifestsTest your installation – login to the Horizon (OpenStack Dashboard), type the following in your web browser:
http://192.168.2.4/dashboardYou should see dashboard login screen, type login and password (in our case: admin/password):
Let’s go back to the console, create OVS (openvswitch) bridges and bind them to physical network interfaces on both nodes
After OpenStack installation we have following network interfaces on controller node:
[root@controller ~]# ip a
1: lo:  mtu 65536 qdisc noqueue state UNKNOWN
    link/loopback 00:00:00:00:00:00 brd 00:00:00:00:00:00
    inet 127.0.0.1/8 scope host lo
       valid_lft forever preferred_lft forever
    inet6 ::1/128 scope host
       valid_lft forever preferred_lft forever
2: eth0:  mtu 1500 qdisc pfifo_fast state UP qlen 1000
    link/ether 52:54:00:cf:f6:ef brd ff:ff:ff:ff:ff:ff
    inet 192.168.2.4/24 brd 192.168.2.255 scope global dynamic eth0
       valid_lft 41134sec preferred_lft 41134sec
    inet6 fe80::5054:ff:fecf:f6ef/64 scope link
       valid_lft forever preferred_lft forever
3: eth1:  mtu 1500 qdisc noop state DOWN qlen 1000
    link/ether 52:54:00:c6:92:ee brd ff:ff:ff:ff:ff:ff
4: ovs-system:  mtu 1500 qdisc noop state DOWN
    link/ether 72:b8:b8:de:3a:f7 brd ff:ff:ff:ff:ff:ff
5: br-int:  mtu 1500 qdisc noqueue state UNKNOWN
    link/ether 0e:f7:ad:b9:21:48 brd ff:ff:ff:ff:ff:ff
    inet6 fe80::cf7:adff:feb9:2148/64 scope link
       valid_lft forever preferred_lft forever
6: br-eth1:  mtu 1500 qdisc noqueue state UNKNOWN
    link/ether f2:d0:68:22:b2:46 brd ff:ff:ff:ff:ff:ff
    inet6 fe80::f0d0:68ff:fe22:b246/64 scope link
       valid_lft forever preferred_lft forever
7: br-ex:  mtu 1500 qdisc noqueue state UNKNOWN
    link/ether 76:7a:de:52:ec:42 brd ff:ff:ff:ff:ff:ff
    inet6 fe80::747a:deff:fe52:ec42/64 scope link
       valid_lft forever preferred_lft forever
…and on compute node:
[root@compute ~]# ip a
1: lo:  mtu 65536 qdisc noqueue state UNKNOWN
    link/loopback 00:00:00:00:00:00 brd 00:00:00:00:00:00
    inet 127.0.0.1/8 scope host lo
       valid_lft forever preferred_lft forever
    inet6 ::1/128 scope host
       valid_lft forever preferred_lft forever
2: eth0:  mtu 1500 qdisc pfifo_fast state UP qlen 1000
    link/ether 52:54:00:4d:fa:06 brd ff:ff:ff:ff:ff:ff
    inet 192.168.2.5/24 brd 192.168.2.255 scope global dynamic eth0
       valid_lft 40548sec preferred_lft 40548sec
    inet6 fe80::5054:ff:fe4d:fa06/64 scope link
       valid_lft forever preferred_lft forever
3: eth1:  mtu 1500 qdisc noop state DOWN qlen 1000
    link/ether 52:54:00:fe:a6:c8 brd ff:ff:ff:ff:ff:ff
6: ovs-system:  mtu 1500 qdisc noop state DOWN
    link/ether 2e:11:a9:be:7b:cc brd ff:ff:ff:ff:ff:ff
7: br-int:  mtu 1500 qdisc noqueue state UNKNOWN
    link/ether a2:b9:7e:04:cd:48 brd ff:ff:ff:ff:ff:ff
    inet6 fe80::a0b9:7eff:fe04:cd48/64 scope link
       valid_lft forever preferred_lft forever
8: br-eth1:  mtu 1500 qdisc noqueue state UNKNOWN
    link/ether 36:8c:69:06:42:4b brd ff:ff:ff:ff:ff:ff
    inet6 fe80::348c:69ff:fe06:424b/64 scope link
       valid_lft forever preferred_lft forever
Type following commands on controller node:
cp /etc/sysconfig/network-scripts/ifcfg-eth0 /root/ifcfg-eth0.backup
cp /etc/sysconfig/network-scripts/ifcfg-eth0 /etc/sysconfig/network-scripts/ifcfg-br-ex
cp /etc/sysconfig/network-scripts/ifcfg-eth1 /root/ifcfg-eth1.backup
Modify ifcfg-eth0 file on controller node to look like:
DEVICE=eth0
HWADDR=52:54:00:CF:F6:EF
ONBOOT=yes
Modify ifcfg-br-ex file on controller node to look like:
DEVICE=br-ex
TYPE=Ethernet
BOOTPROTO=static
ONBOOT=yes
NM_CONTROLLED=no
IPADDR=192.168.2.4
PREFIX=24
Modify ifcfg-eth1 file on controller node to look like:
DEVICE=eth1
HWADDR=52:54:00:C6:92:EE
TYPE=Ethernet
BOOTPROTO=none
NM_CONTROLLED=no
ONBOOT=yes
Connect eth0 interface to br-ex bridge on controller node.
Below command will trigger network restart, so you will lose network connection for a while! The connection should be brought up again, if you modified ifcfg-eth0 and ifcfg-br-ex files correctly.
ovs-vsctl add-port br-ex eth0; systemctl restart networkNow let’s connect eth1 interface to br-eth1 bridge (this will restart network too):
ovs-vsctl add-port br-eth1 eth1; systemctl restart networkNow your network interfaces configuration on controller node should look like below (public IP is now assigned to br-ex interface):
[root@controller ~]# ip a
1: lo:  mtu 65536 qdisc noqueue state UNKNOWN
    link/loopback 00:00:00:00:00:00 brd 00:00:00:00:00:00
    inet 127.0.0.1/8 scope host lo
       valid_lft forever preferred_lft forever
    inet6 ::1/128 scope host
       valid_lft forever preferred_lft forever
2: eth0:  mtu 1500 qdisc pfifo_fast master ovs-system state UP qlen 1000
    link/ether 52:54:00:cf:f6:ef brd ff:ff:ff:ff:ff:ff
    inet6 fe80::5054:ff:fecf:f6ef/64 scope link
       valid_lft forever preferred_lft forever
3: eth1:  mtu 1500 qdisc pfifo_fast master ovs-system state UP qlen 1000
    link/ether 52:54:00:c6:92:ee brd ff:ff:ff:ff:ff:ff
    inet6 fe80::5054:ff:fec6:92ee/64 scope link
       valid_lft forever preferred_lft forever
4: ovs-system:  mtu 1500 qdisc noop state DOWN
    link/ether ea:c6:b3:ff:17:ba brd ff:ff:ff:ff:ff:ff
5: br-eth1:  mtu 1500 qdisc noop state DOWN
    link/ether f2:d0:68:22:b2:46 brd ff:ff:ff:ff:ff:ff
6: br-ex:  mtu 1500 qdisc noqueue state UNKNOWN
    link/ether 76:7a:de:52:ec:42 brd ff:ff:ff:ff:ff:ff
    inet 192.168.2.4/24 brd 192.168.2.255 scope global br-ex
       valid_lft forever preferred_lft forever
    inet6 fe80::747a:deff:fe52:ec42/64 scope link
       valid_lft forever preferred_lft forever
7: br-int:  mtu 1500 qdisc noop state DOWN
    link/ether 0e:f7:ad:b9:21:48 brd ff:ff:ff:ff:ff:ff
Check OVS configuration on controller node. Now port eth0 should be assigned to br-ex and port eth1 should be assigned to br-eth1:
[root@controller ~]# ovs-vsctl show
0dcba8a0-bebe-4785-82d6-7c67619874cd
    Bridge "br-eth1"
        Port "phy-br-eth1"
            Interface "phy-br-eth1"
                type: patch
                options: {peer="int-br-eth1"}
        Port "eth1"
            Interface "eth1"
        Port "br-eth1"
            Interface "br-eth1"
                type: internal
    Bridge br-ex
        Port br-ex
            Interface br-ex
                type: internal
        Port "eth0"
            Interface "eth0"
    Bridge br-int
        fail_mode: secure
        Port br-int
            Interface br-int
                type: internal
        Port "int-br-eth1"
            Interface "int-br-eth1"
                type: patch
                options: {peer="phy-br-eth1"}
    ovs_version: "2.1.3"
Modify ifcfg-eth1 file on compute node to look like:
DEVICE=eth1
HWADDR=52:54:00:FE:A6:C8
TYPE=Ethernet
BOOTPROTO=none
NM_CONTROLLED=no
ONBOOT=yes
Now on compute node connect eth1 interface to br-eth1 bridge (this will restart network):
ovs-vsctl add-port br-eth1 eth1; systemctl restart networkCheck OVS configuration on compute node. Now port eth1 should be assigned to br-eth1:
[root@compute ~]# ovs-vsctl show
cc9e8eff-ea10-40dc-adeb-2d6ee6fc9ed9
    Bridge br-int
        fail_mode: secure
        Port "int-br-eth1"
            Interface "int-br-eth1"
                type: patch
                options: {peer="phy-br-eth1"}
        Port br-int
            Interface br-int
                type: internal
    Bridge "br-eth1"
        Port "phy-br-eth1"
            Interface "phy-br-eth1"
                type: patch
                options: {peer="int-br-eth1"}
        Port "eth1"
            Interface "eth1"
        Port "br-eth1"
            Interface "br-eth1"
                type: internal
    ovs_version: "2.1.3"
Time to check our new OpenStack cloud status and functionality.
After each OpenStack installation a file /root/keystonerc_admin is created on controller node. This file contains admin credentials and other authentication parameters needed to operate and maintain our cloud. It looks like below:
[root@controller ~]# cat /root/keystonerc_admin
export OS_USERNAME=admin
export OS_TENANT_NAME=admin
export OS_PASSWORD=password
export OS_AUTH_URL=http://192.168.2.4:5000/v2.0/
export OS_REGION_NAME=RegionOne
export PS1='[\u@\h \W(keystone_admin)]\$ '
Let’s source this file to import OpenStack admin credentials into Linux system variables, to avoid being prompted for password each time we want to invoke OpenStack command:
[root@controller ~]# source /root/keystonerc_admin
[root@controller ~(keystone_admin)]#
Check OpenStack status on controller node to ensure mandatory services are running:
[root@controller ~(keystone_admin)]# openstack-status
== Nova services ==
openstack-nova-api:                     active
openstack-nova-cert:                    active
openstack-nova-compute:                 inactive  (disabled on boot)
openstack-nova-network:                 inactive  (disabled on boot)
openstack-nova-scheduler:               active
openstack-nova-conductor:               active
== Glance services ==
openstack-glance-api:                   active
...
Verify hosts list on controller node:
[root@controller ~(keystone_admin)]# nova-manage host list
host                     	zone
controller               	internal
compute                  	nova
Verify services on cloud hosts (execute on controller node):
[root@controller ~(keystone_admin)]# nova-manage service list
Binary           Host                                 Zone             Status     State Updated_At
nova-consoleauth controller                           internal         enabled    :-)   2015-04-12 22:27:24
nova-scheduler   controller                           internal         enabled    :-)   2015-04-12 22:27:25
nova-conductor   controller                           internal         enabled    :-)   2015-04-12 22:27:24
nova-cert        controller                           internal         enabled    :-)   2015-04-12 22:27:21
nova-compute     compute                              nova             enabled    :-)   2015-04-12 22:27:24
Our OpenStack cloud is now installed and ready to work 🙂
Find out, how to Create project tenant in OpenStack and launch instances.
Let’s say I don’t have two network interfaces on my Compute Node. Could I assign an address to br-eth1 on the Controller and another IP on the same network to br-eth1 on the Compute? This way, the services on the Compute Node would be listening on this address, but the bridge would still exist. Do you think this world work?
Hi Joao, I never tried such configuration, I have always used separate network interfaces for external and internal traffic.
But if you have problem with getting hardware, you can try to install OpenStack on KVM:
http://tuxfixer.com/install-openstack-on-kvm-how-to-configure-kvm-for-openstack/
…from my side I can assure this is the fastest way of testing OpenStack.
You have explained it very well. Can you explain us configure two controller nodes and with one keystone service and multiple compute hosts.
Hi Khan, I will try to prepare such tutorial, but it will take a while, since I am busy right now.
Thank you for your suggestions, they are important for me.
I’m not clear about this openstack architecture. I beleive you have deployed legacy network(nova network). i.e.., most capability of network node is implemented in compute node. so my network host should be compute node right… “May be I’m wrong”
If that is the way, I can infer from your answer.txt file the network functionality you have declared as controller node. Could you please explain
#The list of IP addresses of the server on which to install the
# network service such as Nova network or Neutron
CONFIG_NETWORK_HOSTS=192.168.2.4
Hi Raj
In two node configuration (Controller, Compute) the network services (Neutron services) are running on Controller node, in three node configuration (Network, Controller, Compute), the majority of neutron network services are running on network node:
[root@network ~]# systemctl list-unit-files | grep neutron
neutron-dhcp-agent.service enabled
neutron-l3-agent.service enabled
neutron-metadata-agent.service enabled
neutron-netns-cleanup.service disabled
neutron-openvswitch-agent.service enabled
neutron-ovs-cleanup.service enabled
neutron-server.service disabled
…only neutron-server is running on Controller node:
[root@controller ~]# systemctl list-unit-files | grep neutron
neutron-dhcp-agent.service disabled
neutron-l3-agent.service disabled
neutron-metadata-agent.service disabled
neutron-netns-cleanup.service disabled
neutron-ovs-cleanup.service disabled
neutron-server.service enabled
…this is how packstack distributes services between nodes according to answer file.
For 3 node installation, check the following article, I presented here, what service is running on which node:
OpenStack Kilo 3 Node Installation (Controller, Network, Compute) on CentOS 7
Thank you got a clear picture now.
HI,
I just installed packstack on the following configuration:
two physical servers used as :
one compute node and one controller/compute node
“ip a ” result on the controller node looks O.K. :
…..
8: br-int: mtu 1500 qdisc noop state DOWN
link/ether c6:42:21:b3:64:43 brd ff:ff:ff:ff:ff:ff
….
10: br-em2: mtu 1500 qdisc noqueue state UNKNOWN
link/ether ce:14:4f:e9:89:43 brd ff:ff:ff:ff:ff:ff
inet6 fe80::cc14:4fff:fee9:8943/64 scope link
valid_lft forever preferred_lft forever
11: br-ex: mtu 1500 qdisc noqueue state UNKNOWN
link/ether 42:83:6f:35:17:4a brd ff:ff:ff:ff:ff:ff
inet 172.24.4.225/28 scope global br-ex
valid_lft forever preferred_lft forever
inet6 fe80::4083:6fff:fe35:174a/64 scope link
….
but, on the compute node,the br-eth1 is missing :
….
7: ovs-system: mtu 1500 qdisc noop state DOWN
link/ether a2:a3:9d:78:b4:cd brd ff:ff:ff:ff:ff:ff
8: br-int: mtu 1500 qdisc noop state DOWN
link/ether c2:63:8d:d8:6b:4b brd ff:ff:ff:ff:ff:ff
…
Here are the only modifications I’ve done on the standard answer.txt :
CONFIG_COMPUTE_HOSTS=10.128.59.97,10.128.59.96
CONFIG_NEUTRON_ML2_MECHANISM_DRIVERS=openvswitch
CONFIG_NEUTRON_ML2_TYPE_DRIVERS=vlan
CONFIG_NEUTRON_ML2_TENANT_NETWORK_TYPES=vlan
CONFIG_NEUTRON_ML2_VLAN_RANGES=physnet1:1000:2000
CONFIG_NEUTRON_OVS_BRIDGE_MAPPINGS=physnet1:br-em2
em2 is the physical interface between the two nodes.
is “physnet1” useable in my case ? or it doesn’t matter ?
Is it something I missed ?
Thanks for help
Regards,
J.P.
Hi
I wonder what version of OpenStack do you install?
I had similar issue to yours on Liberty, here is bug description:
https://bugzilla.redhat.com/show_bug.cgi?id=1315725
…if this is Liberty, then try another version.
Your configuration looks O.K. for me.
Hi,
Thx for prompt answer .
Yes I’m using Liberty release.
As it is if I try to run an instance on the “faulty” compute node , I got following error in neutron logs :
…
Failed to bind port e3167852-2ff6-4b33-8cad-a901b29d23d8 on host lptxopsvnode01
…
AFAYK , could it be related to this bug ?
On the controller/compute node , no problem to start an instance.
Regards,
J.P.
Yes, this is related to that BUG, that’s why I recommend you either install once again with another OpenStack version or create bridge manually using OVS commands. First option should be faster for you.
Hi,
In order to fix this issue , what’s your hint : Kilo or Mitaka ?
Thx.
Reagrds,
J.P.
Hi
Kilo will work for sure, because I made 3 node installation on Kilo (incl. Compute node):
http://tuxfixer.com/openstack-kilo-3-node-installation-controller-network-compute-on-centos-7/
Using Mitaka I have installed only all-in-one so far, so I can’t guarantee, it’s Bug free, but you can also try, if you have enough time for testing Mitaka 🙂
If you choose Mitaka, please let me know, if it worked for you with Compute node.
Thx.
Hi,
As an info , here are the errors that Neutron log shows :
2016-06-30 12:49:04.066 127031 DEBUG neutron.plugins.ml2.drivers.mech_agent [req-7c1955b9-1d3d-47d1-b18c-e1faebb7a622 588c15d9ef1747d2b6eb6deead60ee63 99b03464a5194fe78b53efeac75eb215 – – -] Checking segment: {‘segmentation_id’: 1013, ‘physical_network’: u’physnet1′, ‘id’: u’8b1a455b-c26d-4408-b137-5830f23e10da’, ‘network_type’: u’vlan’} for mappings: {} with network types: [‘local’, ‘flat’, ‘vlan’] check_segment_for_agent /usr/lib/python2.7/site-packages/neutron/plugins/ml2/drivers/mech_agent.py:183
2016-06-30 12:49:04.066 127031 DEBUG neutron.plugins.ml2.drivers.mech_agent [req-7c1955b9-1d3d-47d1-b18c-e1faebb7a622 588c15d9ef1747d2b6eb6deead60ee63 99b03464a5194fe78b53efeac75eb215 – – -] Network 8b1a455b-c26d-4408-b137-5830f23e10da is connected to physical network physnet1, but agent lptxopsvnode01 reported physical networks {}. The physical network must be configured on the agent if binding is to succeed. check_segment_for_agent /usr/lib/python2.7/site-packages/neutron/plugins/ml2/drivers/mech_agent.py:209
For you it is the same problem as the one described in the RedHat bugzilla ?
Regards,
J.P.
Hi,
I’ve tried to apply the change described here :
https://review.openstack.org/#/c/305649/1/packstack/plugins/neutron_350.py
on the neutron_350.py .
Then restart packstack to reinstall only the compute node ….
Bingo !!!
I’m able to start an instance on the “faulty” compute node.
If I well understand, I may now apply your post :
“Create tenant in OpenStack and launch instances”
in order to set public and private networks and launch instance by using floating IP stuff ?
An additional question : traffic in/out towards the instance hosted on the compute node will use the “no IP” private link eth1 ?
Thx for help.
Regards,
J.P.
Hi
Yes, you can now proceed with:
http://tuxfixer.com/create-project-tenant-in-openstack-and-launch-instances/
Internal traffic uses eth1 interface.
Hi Grzegorz,
Did you try connect eth1 for more than 3nodes together? How did you do that if you did?
I connected eth1 directly according to your diagram for 2nodes (controller and compute); everything was okay; and I can ping every IP. But when I added one more compute (controller+2compute), then I can’t connect eth1 ports directly, so I used anther switch (one exist switch was used for connecting all eth0 ports together) for connecting these 3 eth1 ports together. Finally I found I can’t ping instances IP (floating IP) but I can ping virtual router IP.
But, if I recovered the connection of eth1 ports directly each other for 2nodes, I can ping everything: instance IP, router IP, either private IP.
Can you suggest how to connect eth1 ports for over 3 nodes according to your professional experience?
Thank you very much in advance!
Helen
Hi Helen
I tried it few times and it worked for me. But usually I test different OpenStack multinode configurations on KVM environment:
http://www.tuxfixer.com/install-openstack-on-kvm-how-to-configure-kvm-for-openstack/
By the way for internal traffic connection you don’t need IP assigned to eth1 interfaces.
Check if eth1 interface is UP on the new compute node after adding it – this was common error I used to encounter many times.
This procedure doesn’t create bridge on the compute node. br-ens33 in my case is created only on network node and not one compute node as mentioned in this blog. Only br-ex is created by default on compute. Could you please clarify?
[root@computevm network-scripts]# ovs-vsctl show
be4d06dd-b77f-44da-947f-b1093261420b
Manager “ptcp:6640:127.0.0.1”
is_connected: true
Bridge br-int
Controller “tcp:127.0.0.1:6633”
is_connected: true
fail_mode: secure
Port br-int
Interface br-int
type: internal
ovs_version: “2.6.1”
By the way I am using Newton release and its not creating the additional bridge.
Hi Rob
This should clarify your issue:
https://bugzilla.redhat.com/show_bug.cgi?id=1363589