The administration of the large-scale production cloud environments requires the management of dozens of customer’s virtual servers (OpenStack Instances) in the cloud on the daily basis. Manual configuration of the multiple newly created Instances in the OpenStack cloud at a time would be problematic for cloud administrators. Luckily, OpenStack is equipped with metadata service cooperating with the so-called cloud-init script, which together do the magic of automated Instances’ mass configuration.
Metadata service runs usually on Controller node in multi-node environment and is accessible by the Instances running on Compute nodes to let them retrieve instance-specific data, like IP address or hostname. Instances access metadata service at http://169.254.169.254. The HTTP request from Instance either hits the router or DHCP namespace depending on the route in the Instance. The metadata proxy service adds Instance IP address and Router ID information to the request. The metadata proxy service sends this request to neutron-metadata-agent. The neutron-metadata-agent service forwards the request to the nova-api-metadata server, by adding some new headers, i.e. Instance ID, to the request. The metadata service supports two sets of APIs: an OpenStack metadata API and an EC2-compatible API.
Retrieving a list of supported versions for the OpenStack metadata API from the running Instance:
$ curl http://169.254.169.254/openstack
2012-08-10
2013-04-04
2013-10-17
2015-10-15
2016-06-30
2016-10-06
2017-02-22
Retrieving a list of supported versions for the EC2-compatible metadata API:
$ curl http://169.254.169.254
1.0
2007-01-19
2007-03-01
2007-08-29
2007-10-10
2007-12-15
2008-02-01
2008-09-01
2009-04-04
Cloud-init is a package installed on Instance, which contains utilities for its early initialization based on processing the Instance data. Instance data is a collection of configuration data which is usually provided to Instance by metadata service. It can be also provided by user-data script or by configuration drive attached to the Instance during its creation.
# Getting the image with cloud-init
Assuming that we already have an access to the tenant in OpenStack environment, we can easily download a ready-to-use OpenStack qcow2 image including cloud-init package from the official image repository website:
https://docs.openstack.org/image-guide/obtain-images.htmlAll the images from the official OpenStack website have cloud-init package installed and the corresponding service enabled, so that it will start upon Instance boot and fetch Instance data from metadata service provided that the service is available in the cloud. Once launched and running, the Instances can be accessed via SSH using their default login, given on the website, and passwordless key based authentication.
Let’s download CentOS 7 qcow2 image to our Controller node:
[root@controller ~]# wget http://cloud.centos.org/centos/7/images/CentOS-7-x86_64-GenericCloud-1808.qcow2Since we are going to use our image in our tenant only, we can upload it as a private image available exclusively in our project. First we need to import our tenant/project credentials by means of sourcing a Keystone file to our environment variables in order to gain access to our project resources:
[root@controller ~]# source keystonerc_gjuszczak
[root@controller ~(keystone_gjuszczak)]#
Now we should import our previously downloaded qcow2 image to Glance in order to be available for Instances launching within our project:
[root@controller ~(keystone_gjuszczak)]# openstack image create --private --disk-format qcow2 --container-format bare --file CentOS-7-x86_64-GenericCloud-1808.qcow2 CentOS_7_cloud_init# Launching the Instance with cloud-init
Now create CentOS_7_CI Instance based on our CentOS_7_cloud_init qcow2 image:
[root@controller ~(keystone_gjuszczak)]# openstack server create --flavor m2.tiny --image CentOS_7_cloud_init --nic net-id=int_net --key-name cloud --security-group default CentOS_7_CIAssign Floating IP to the Instance in order to be able to access it from external/public network:
[root@controller ~(keystone_gjuszczak)]# openstack server add floating ip CentOS_7_CI 192.168.2.235As mentioned before the default user for this particular image, called centos, has no password set and root access for the image is restricted, so we need to access the Instance using cloud.key from the key pair used upon Instance creation:
$ ssh -i ~/.ssh/cloud.key centos@192.168.2.235First of all, after accessing the Instance it’s vital to check if cloud-init service is running:
[centos@centos-7-ci ~]$ sudo systemctl status cloud-initNow we should analyze cloud-init.log to verify what modules were run during upon Instance start:
[centos@centos-7-ci ~]$ sudo cat /var/log/cloud-init.logBelow an example snippet from cloud-init.log presenting some modules, that were executed during boot:
...
2018-10-09 20:42:56,669 - handlers.py[DEBUG]: finish: init-network/config-growpart: SUCCESS: config-growpart ran successfully
2018-10-09 20:42:57,666 - handlers.py[DEBUG]: finish: init-network/config-resizefs: SUCCESS: config-resizefs ran successfully
2018-10-09 20:43:00,261 - handlers.py[DEBUG]: finish: init-network/config-set_hostname: SUCCESS: config-set_hostname ran successfully
...
From above listing we can find out, that cloud-init has adjusted the Instance partition size to the flavor’s storage capacity, resized filesystem to fit the partition, and set hostname based on the Instance name in the cloud.
There is one thing worth mentioning here, a centos-7-ci hostname, visible in the command prompt, is a copy of an Instance name CentOS_7_CI, that we set upon Instance creation. This is the typical example of how metadata service works – the hostname has been delivered to the Instance’s OS based on the Instance name in OpenStack. The typical metadata based datasources exposed to virtual hosts in OpenStack are: hostname, instance ID, display name, etc…, and this is one of those improvements that metadata service offers. While creating hundreds of Instances in the tenant, we don’t need to set the hostname for each one separately, OpenStack does it for us automatically, saving our time.
# cloud-init config file
There are five stages of cloud-init integrated in the boot procedure:
1. Generator – in this stage cloud-init service is enabled by systemd unit generator.
2. Local – the purpose of this stage is to locate local data sources, that is user data config files and scripts, and apply networking configuration to the system, including possible fallback to DHCP discovery
3. Network – this stage requires networking to be configured on Instance, it then runs disk_setup and mounts modules and configures mount points
4. Config – this stage runs modules included in cloud_final_modules section of cloud.cfg file only
5. Final – this stage is executed as late as possible and runs package installations and user-scripts
The main cloud-init configuration is included in /etc/cloud/cloud.cfg file, which by default consists of the following sections:
-
cloud_init_modules (incl.: growpart, resizefs, set_hostname, ssh, etc…)
-
cloud_config_modules (incl.: mounts, set-passwords, package-update-upgrade-install, etc…)
-
cloud_final_modules (incl.: scripts-per-instance, scripts-user, power-state-change, etc…)
-
system_info (incl.: default_user, distro, paths, etc…)
As you have probably noticed, the names of the module sections largely correspond to the mentioned cloud-init boot stages. That, what’s most important for us here is that cloud_final_modules section contains scripts-user task, which enables us to inject a customized configuration user data to the Instance during the last final stage of cloud-init.
# Passing user-data to the Instance
User-data can be passed to the Instance in the file, added as a parameter during Instance launch. There is a number of supported file types:
-
gzip compressed content
-
mime multi-part archive
-
user-data script
-
cloud-config data
-
upstart job
-
cloud boothooks
-
part handler (contains custom code for new mime-types in multi-part user data)
In this article we would like to present the most common file types used in OpenStack for user-data injection, that is: cloud-config file and user-data script.
# cloud-config data
Cloud-config file is most likely the fastest and easiest way to pass user-data to the Instance. It has a clear and human readable format and basically the same syntax as cloud.cfg config file. Below we present example cloud-config file, which creates additional user, executes a command on the first boot, upgrades OS and finally installs additional packages:
#cloud-config
# create additional user
users:
 - default
 - name: test
 gecos: Test User
 sudo: ALL=(ALL) NOPASSWD:ALL
# run command on first boot
bootcmd:
 - echo 192.168.2.99 myhost >> /etc/hosts
# upgrade OS on first boot
package_upgrade: true
# install additional packages
packages:
 - vim
 - epel-release
Please note, that cloud-config must be a valid YAML syntax, and must begin with #cloud-config, otherwise the file won’t be readable by cloud-init script.
To launch Instance including cloud-config user data, we need to slightly modify our command, adding user-data parameter:
[root@controller ~(keystone_gjuszczak)]# openstack server create --flavor m2.tiny --image CentOS_7_cloud_init --nic net-id=int_net --key-name cloud --security-group default --user-data cloud-config CentOS_7_CI_CCAs soon as the Instance is up and running and Floating IP is assigned, we can log in and monitor cloud-init log, while some tasks from cloud-config are probably still running:
[centos@centos-7-ci-cc ~]$ sudo tail -f /var/log/cloud-init.log
...
2018-10-17 21:54:06,826 - helpers.py[DEBUG]: Running config-package-update-upgrade-install using lock (<FileLock using file '/var/lib/cloud/instances/21697d2c-fcdd-4c36-ba88-275b78e546a7/sem/config_package_update_upgrade_install'>)
...
2018-10-17 21:54:06,988 - helpers.py[DEBUG]: Running update-sources using lock (<FileLock using file '/var/lib/cloud/instances/21697d2c-fcdd-4c36-ba88-275b78e546a7/sem/update_sources'>)
...
2018-10-17 21:54:07,006 - util.py[DEBUG]: Running command ['yum', '-t', '-y', 'makecache'] with allowed return codes [0] (shell=False, capture=False)
...
2018-10-17 22:00:06,125 - util.py[DEBUG]: Running command ['yum', '-t', '-y', 'upgrade'] with allowed return codes [0] (shell=False, capture=False)
If we are not sure what kind of user-data has been injected to the Instance, we can always display the contents of /var/lib/lib/cloud/instance directory which includes actual user data in user-data.txt file as well as the time of final stage ending, stored in boot-finished file.
# user-data script
Bash script is another common way to inject user-data to the Instance. The file must be a valid Bash script, so it must begin with #!/bin/bash line. Below we presents an example user_data.sh script, which installs two RPM packages, enables Apache http service, and creates index.html file in server’s root directory:
#!/bin/bash
# install additional packages
sudo yum install -y httpd vim
# enable httpd service
sudo systemctl enable httpd
sudo systemctl start httpd
# create file in http document root
sudo echo "<p>hello world</p>" > /var/www/html/index.html
Our command to launch Instance with user-data Bash script should now look like below:
[root@controller ~(keystone_gjuszczak)]# openstack server create --flavor m2.tiny --image CentOS_7_cloud_init --nic net-id=int_net --key-name cloud --security-group default --user-data user_data.sh CentOS_7_CI_UD# Image metadata properties
It is worth mentioning, that also images can contain metadata properties that determine the purpose and nature of the particular image. OpenStack offers a variety of image properties that can be set for the image to define it’s purpose, like CPU pinning, Compute CPU architecture or Cinder Volume type required by the image.
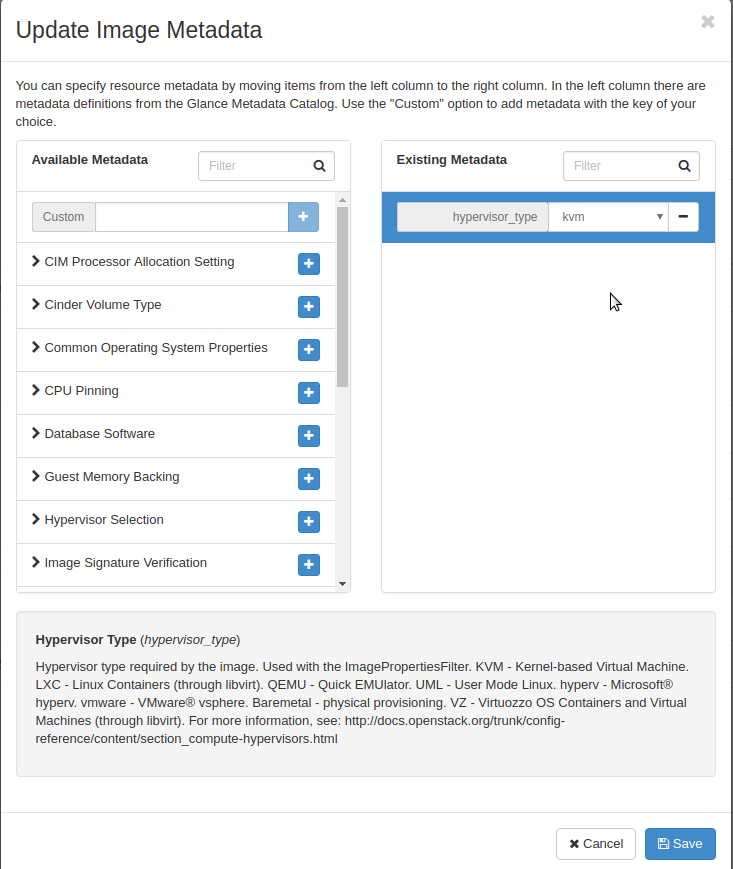
Below picture presents image properties configuration screen with Hypervisor Type parameter set as kvm, which means that launching an Instance from this particular image requires using KVM based Compute node, otherwise the Instance won’t boot. In other words, booting the Instance on Computes other than KVM, i.e. LXC or XEN based Computes, will result in error.

We can also set an image property from command line using —property key=value parameter:
[root@controller ~(keystone_admin)]# openstack image set --property hypervisor_type=kvm cirros-0.4.0# Passing metadata to Instance using config-drive
It is also possible to force OpenStack to write Instance metadata to a special drive, called configuration drive, or simply config-drive, which is attached to the Instance during boot process.
Thanks to the cloud-init script, config-drive is automatically mounted on Instance’s OS and its files can be easily read like they were coming from metadata service. Using config-drive we can pass to the Instance different user-data formats, as well as ordinary files. The main requirement to use config-drive is passing –config-drive true parameter in openstack server create command. We can also configure the Compute node to always use config-drive by setting the following parameter in /etc/nova/nova.conf:
force_config_drive = trueThe following example command enables config-drive, passes previously created user-data script and two files to the Instance upon boot. First file replaces original /etc/hosts with the file including new content, and the second file is copied to /tmp directory on the Instance:
[root@controller ~(keystone_gjuszczak)]# openstack server create --config-drive true --flavor m2.tiny --image CentOS_7_cloud_init --nic net-id=int_net --key-name cloud --security-group default --user-data user_data.sh --file /etc/hosts=/root/hosts --file /tmp/example_file.txt=/root/example_file.txt CentOS_7_CI_CD
I’m curious to find out what blog system you happen to be
utilizing? I’m having some small security problems with my latest site
and I’d like to find something more safeguarded.
Do you have any solutions?
Hello, excellent tutorial! You mentioned at the beginning about cloud config files as another method of injecting configuration during boot time, can you give an example of cloud-init using a cloud-config,yml file? Interested in puppet or chef module example. Thanks.
Hello
Examples of cloud-config yaml files:
https://cloudinit.readthedocs.io/en/latest/topics/examples.html#yaml-examples
For puppet check below link:
https://cloudinit.readthedocs.io/en/latest/topics/examples.html#setup-and-run-puppet
For chef I found the below:
https://cloudinit.readthedocs.io/en/latest/topics/examples.html#install-and-run-chef-recipes