![]()
In this tutorial we will show you, how to create project tenant in OpenStack Juno and launch instances accessible from external public network.
Note: this tutorial is a continuation of OpenStack Installation on CentOS7 / RHEL7 and we assume that you already have working installation of OpenStack.
Environment used:
cloud version: OpenStack Juno on CentOS7 (2 nodes: controller, compute)
public network (Floating IP network): 192.168.2.0/24
private network (inside Project Tenant): 192.168.20.0/24
public controller IP: 192.168.2.4 (eth0)
public compute IP: 192.168.2.5 (eth0)
1. Create project tenant and assign tenant user
Login as admin to Horizon (dashboard) on controller node using web browser:
http://192.168.2.4/dashboard
Note: After each OpenStack installation a file /root/keystonerc_admin is created on controller node. This file contains admin credentials, like password in clear text. If you ever forget the password, check above file.
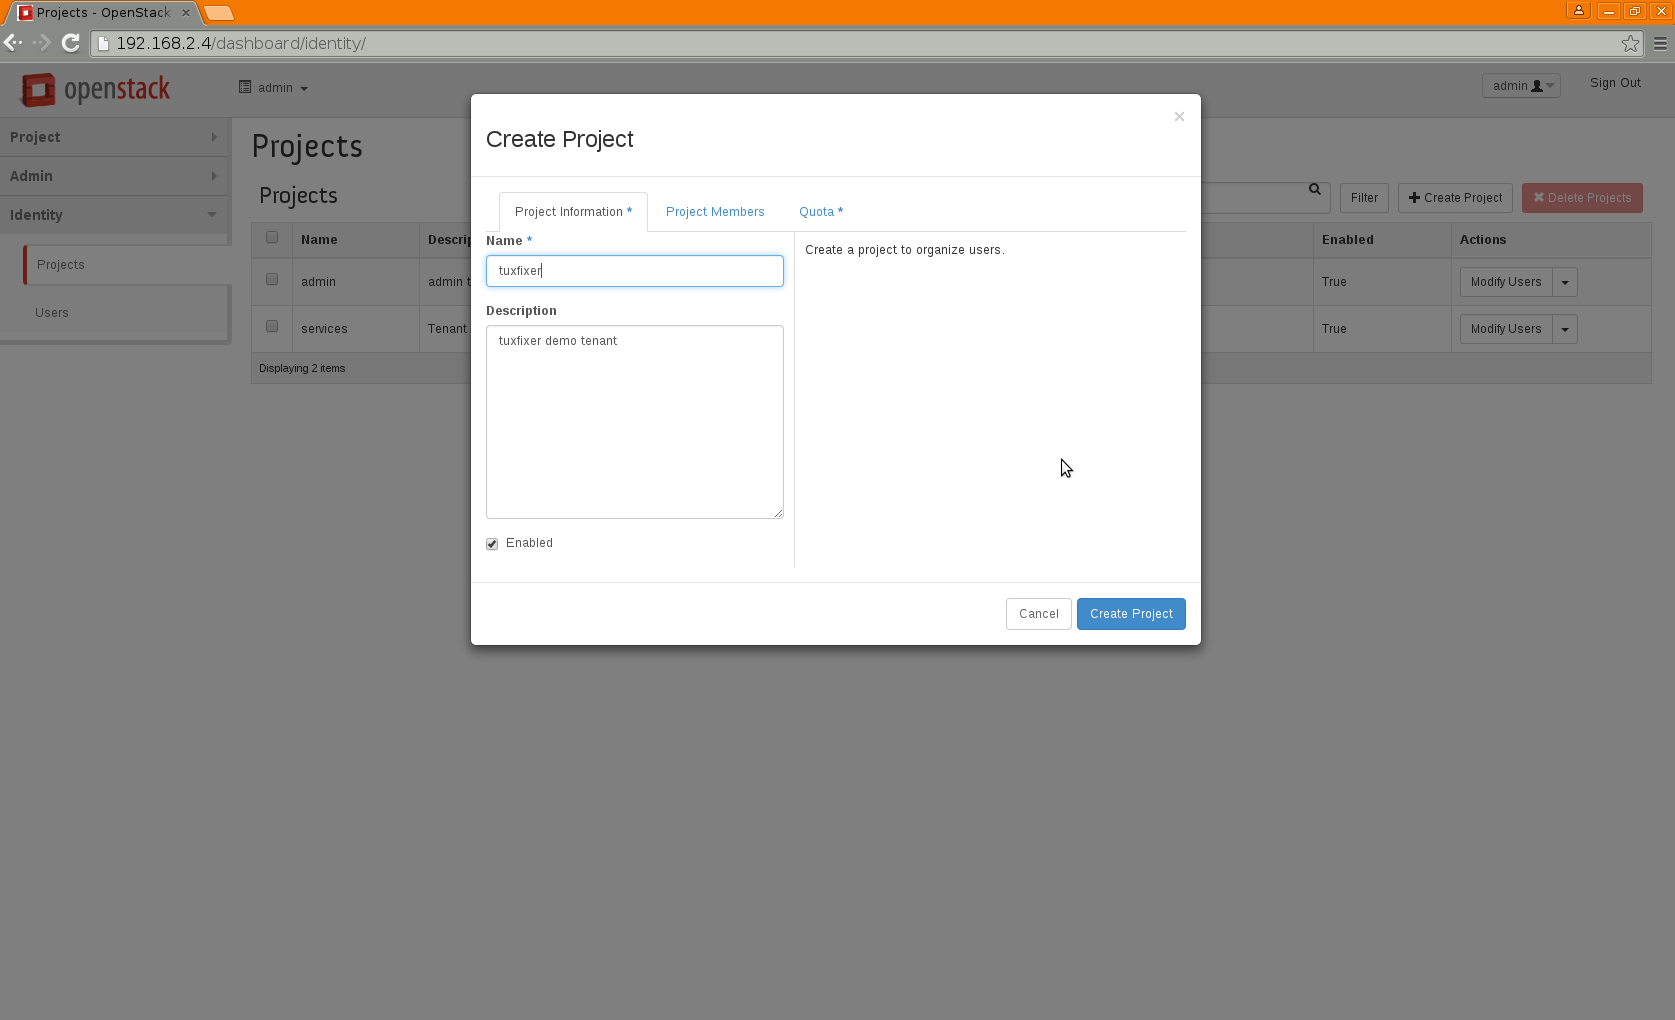
In the dashboard menu go to: Identity -> Projects -> Create Project: type name (i.e. tuxfixer) and description, set project quota (cloud resource limit), if needed:
2. Create new user and assign him to the newly created project tenant
Go to: Identity -> Users -> Create User: assign user (i.e. tuxfixer) as _member_ of the newly created project tenant (tuxfixer):

You can now log out from admin account, for typical tenant maintenance tasks we will use regular account (tuxfixer).
3. Create networks and routers
Login to dashboard as tuxfixer.
First configure the private network, in the dashboard menu go to: Project -> Networks -> Create Network:
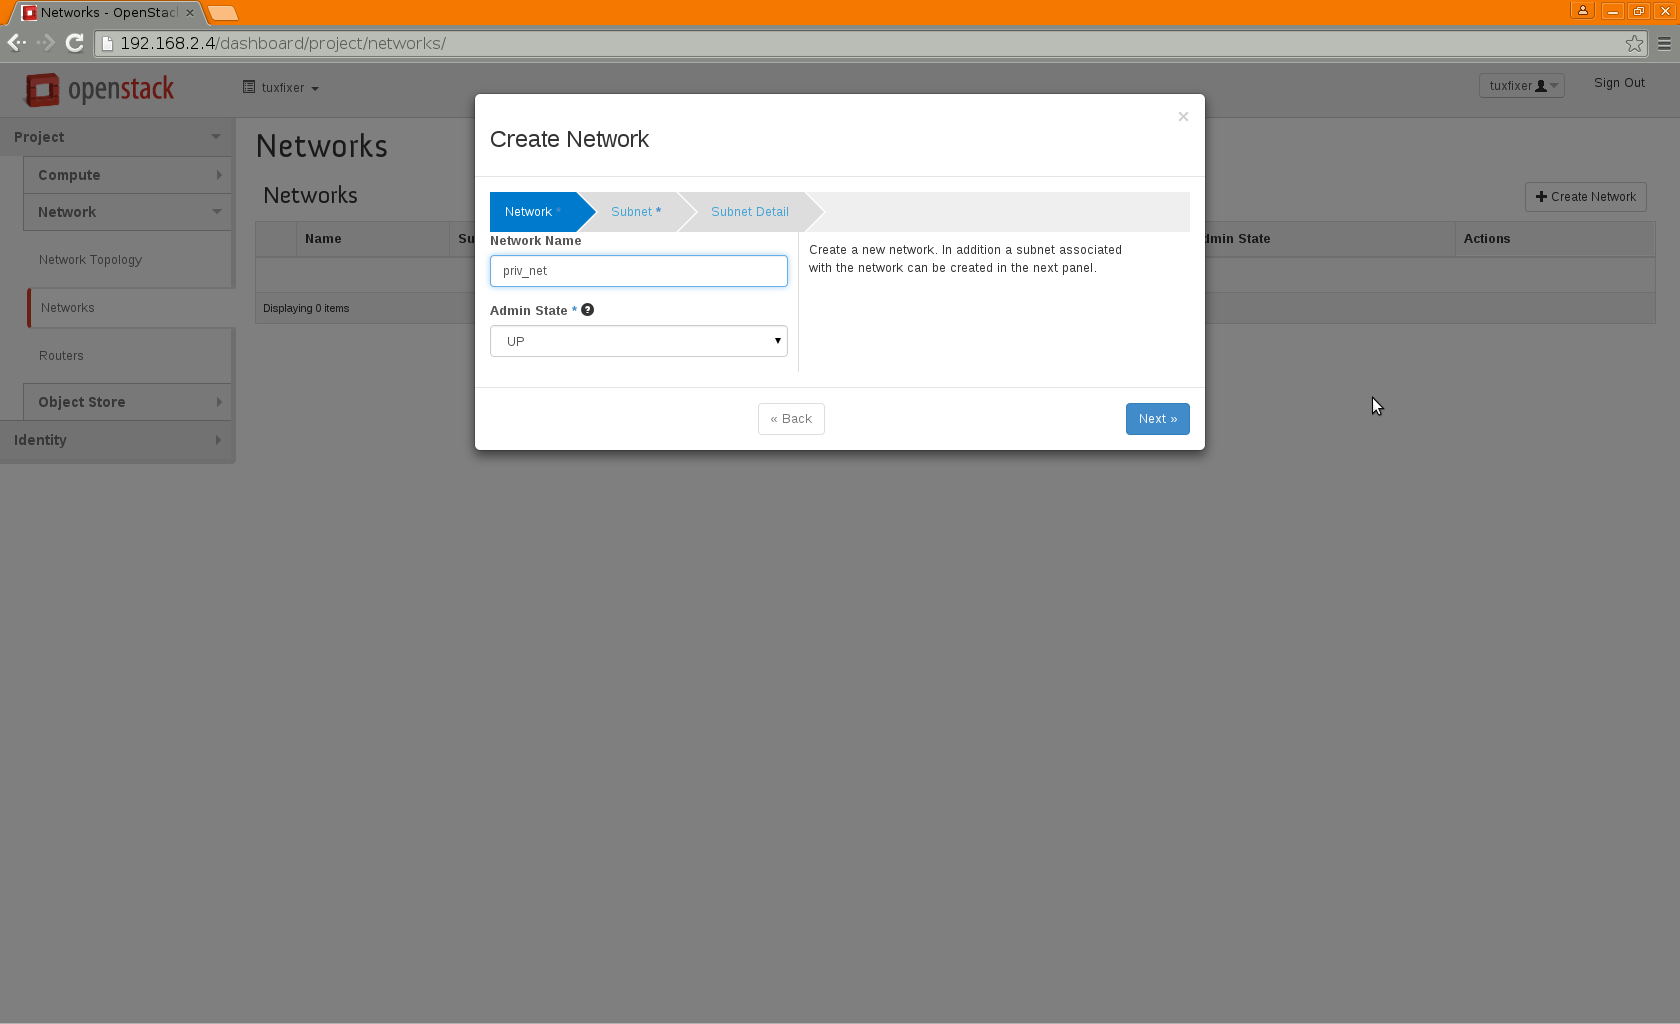
Create following net:
Network Name: priv_net
Admin State: UP
Create following subnet:
Subnet Name: priv_subnet
Network Address: 192.168.20.0/24
IP Version: IPv4
Gateway IP: 192.168.20.1
DHCP: Enable
Now let’s create public network. Click the Create Network button once again:
Create following net:
Network Name: pub_net
Admin State: UP
Create following subnet:
Subnet Name: pub_subnet
Network Address: 192.168.2.0/24
IP Version: IPv4
Gateway IP: 192.168.2.1
DHCP: Disable
Allocation Pools: 192.168.2.6 – 192.168.2.10
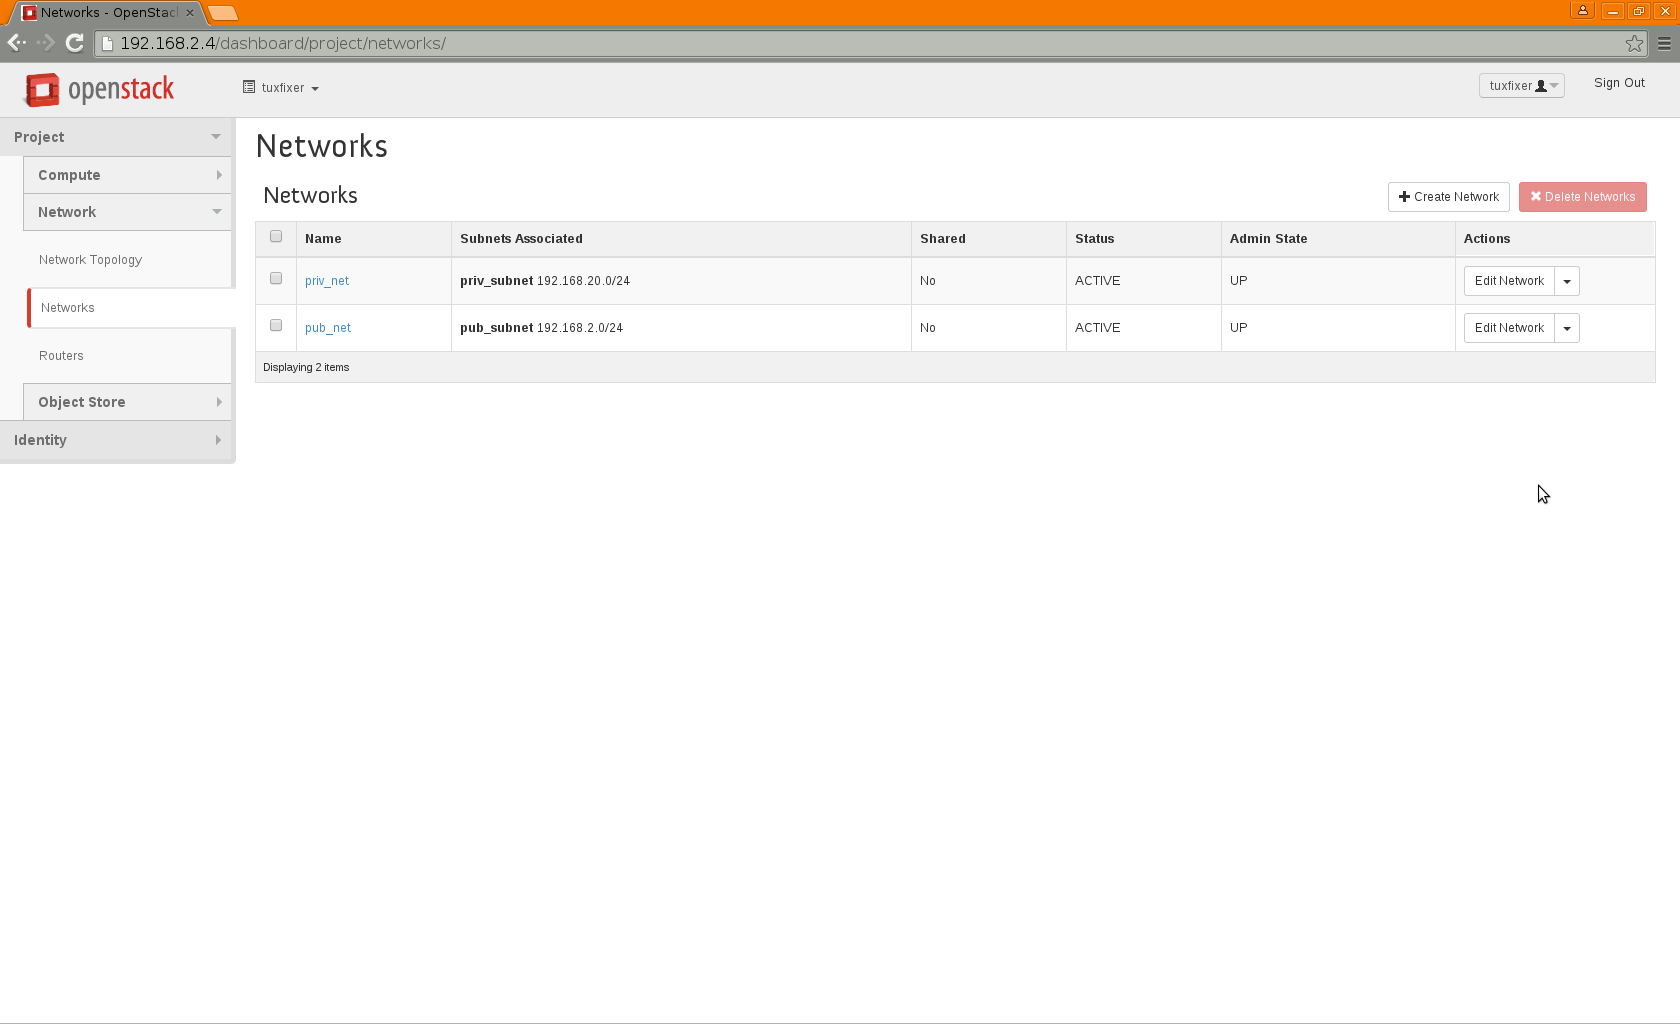
We should have now 2 networks (priv_net and pub_net) in our dashboard:
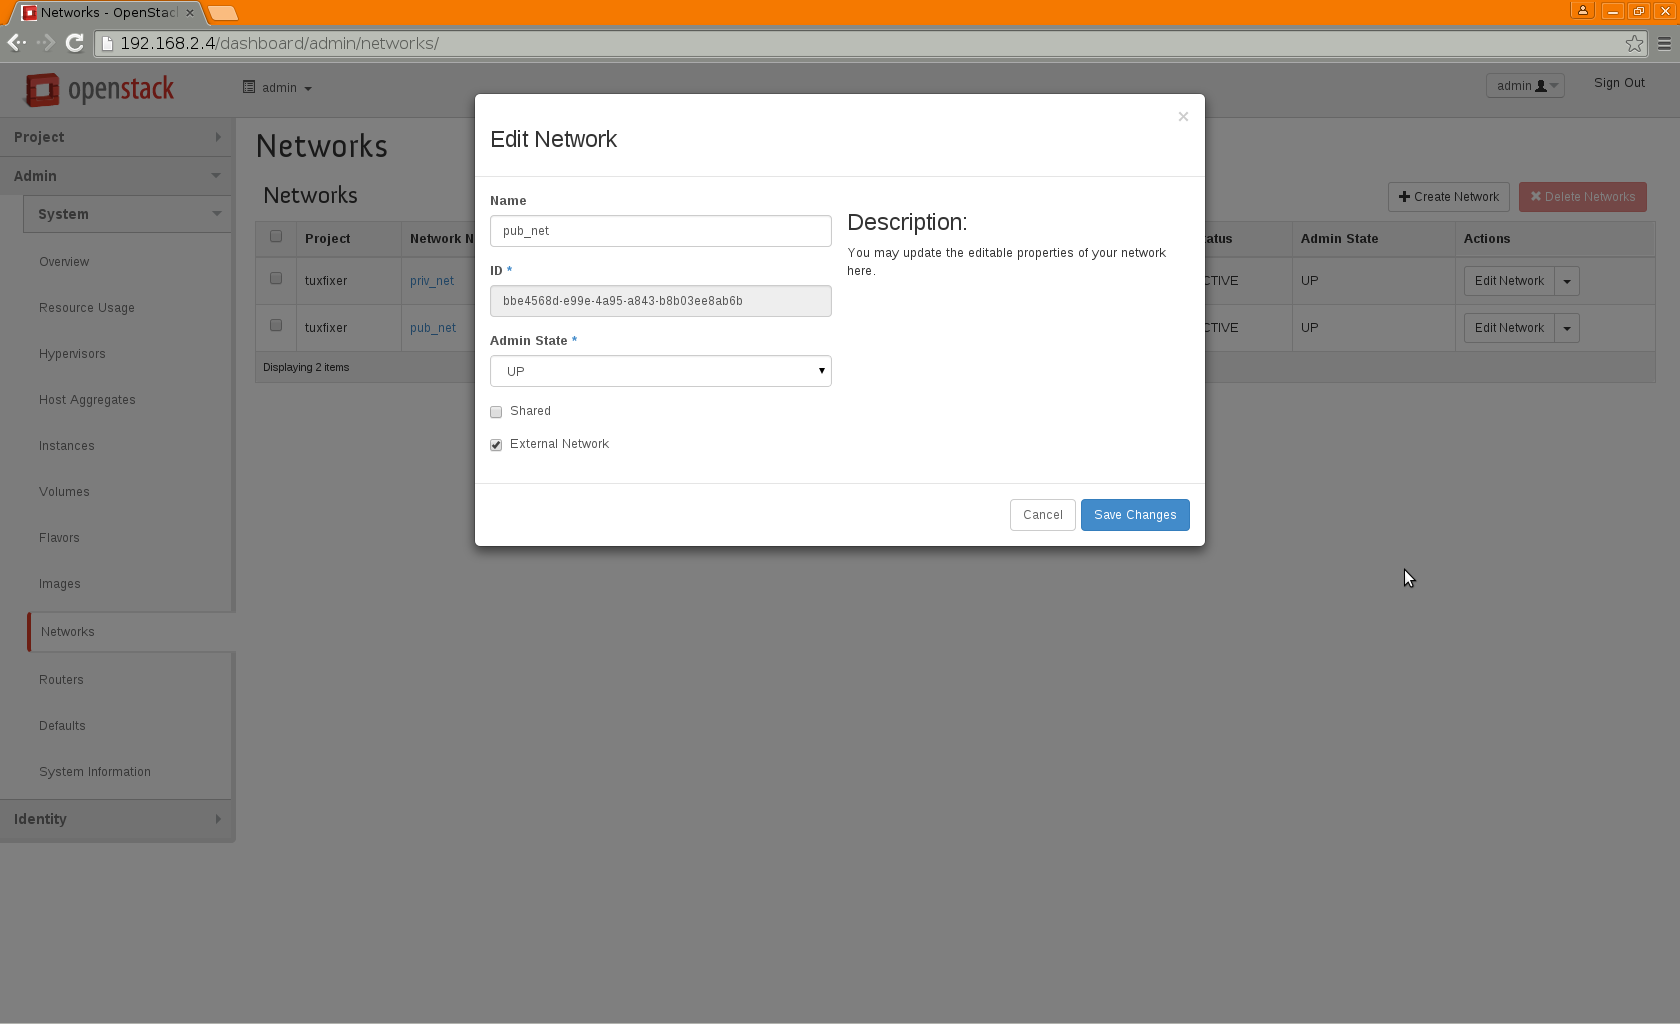
We have to mark pub_net as External Network in OpenStack installation. Setting the External Network can only be done by admin, so we have to temporarily log out as tuxfixer and log in as admin. In admin dashboard go to: Admin -> Networks. Click the Edit Network button in the pub_net network row. Select the External Network checkbox and click the Save Changes button:
Log out as admin and log in as tuxfixer.
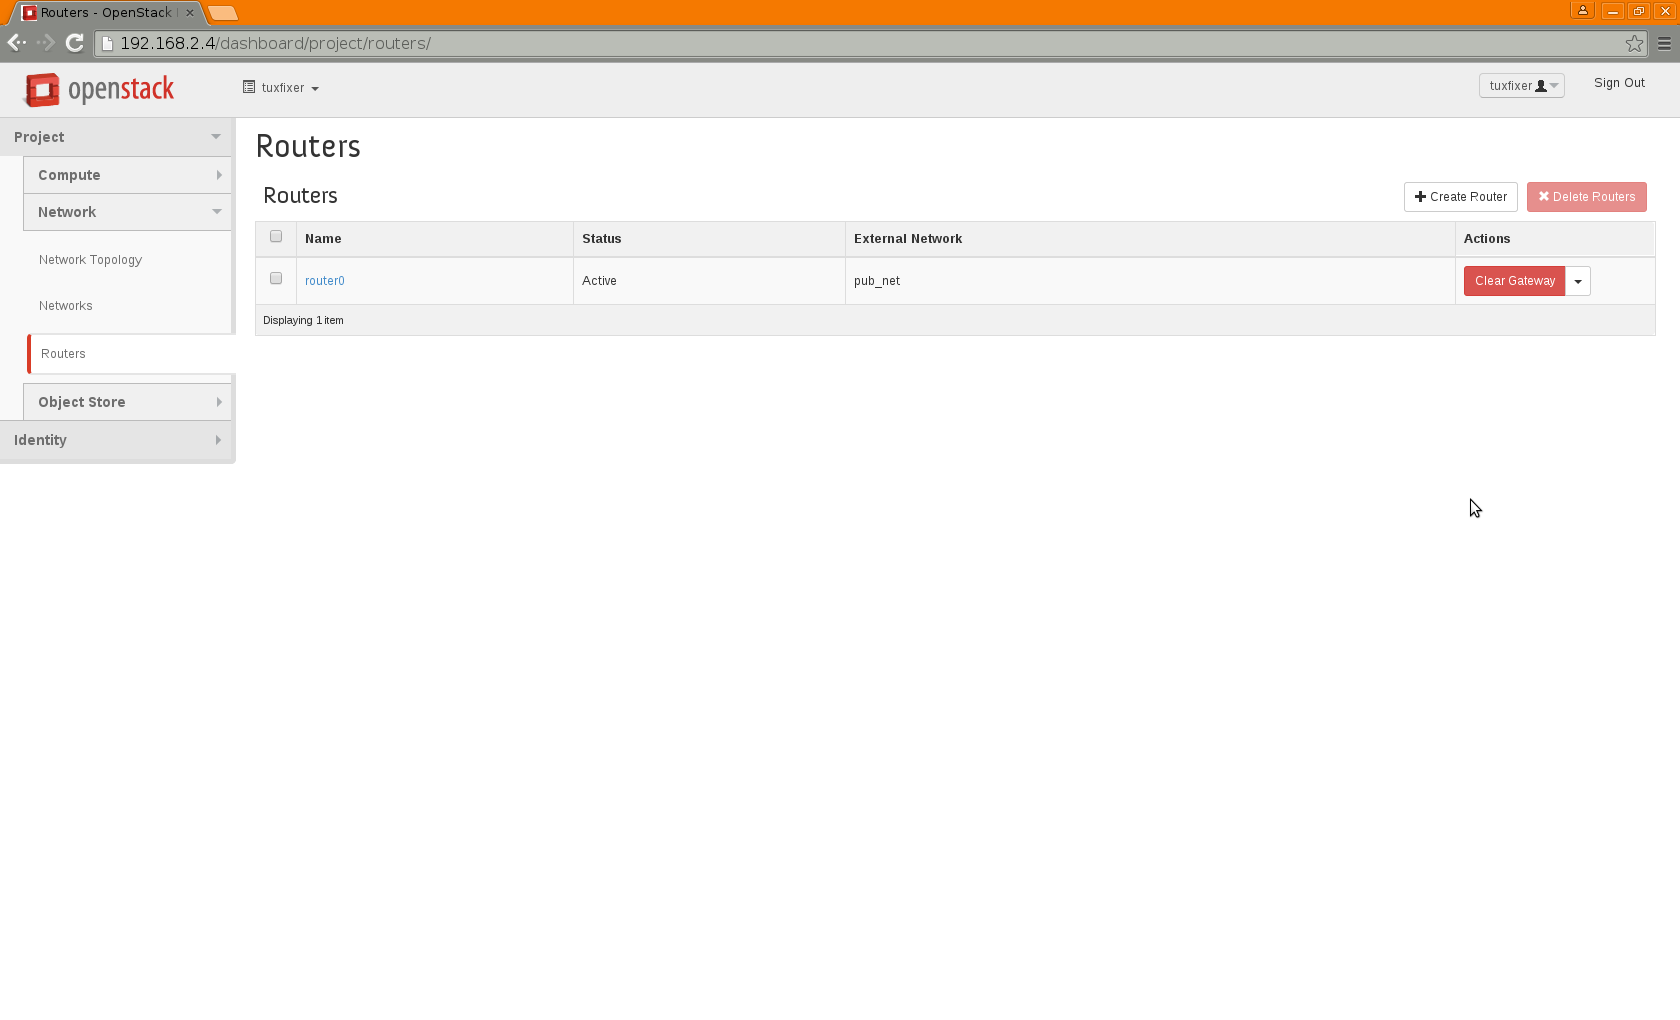
Go to: Project -> Network -> Routers -> Create Router:
Router Name: router0
Click Set Gateway for router0:
External Network: pub_net
In the dashboard we should see now our router0 with external Network set for pub_net:
Now click on the router0, then click Add Interface:
Subnet: priv_net: 192.168.20.0/24 (priv_subnet)
IP Address: 192.168.20.1
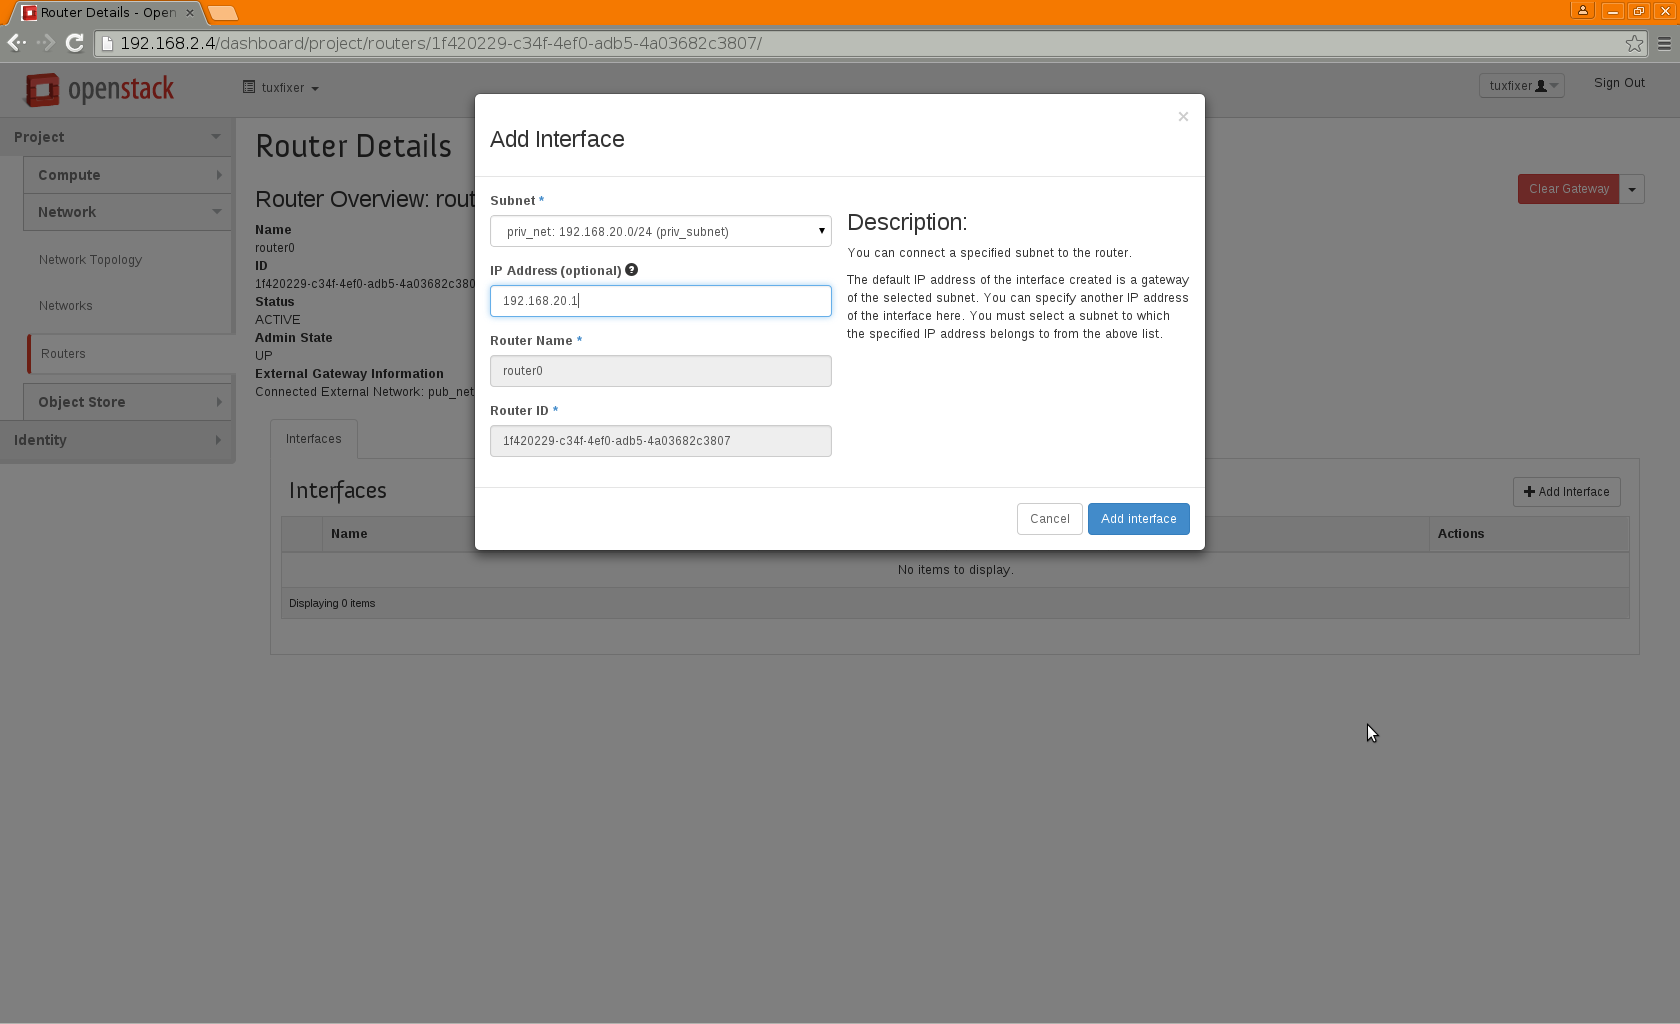
Note: Status of the newly created interface initially appears as DOWN, but it should become ACTIVE, when we refresh dashboard after a couple of seconds.
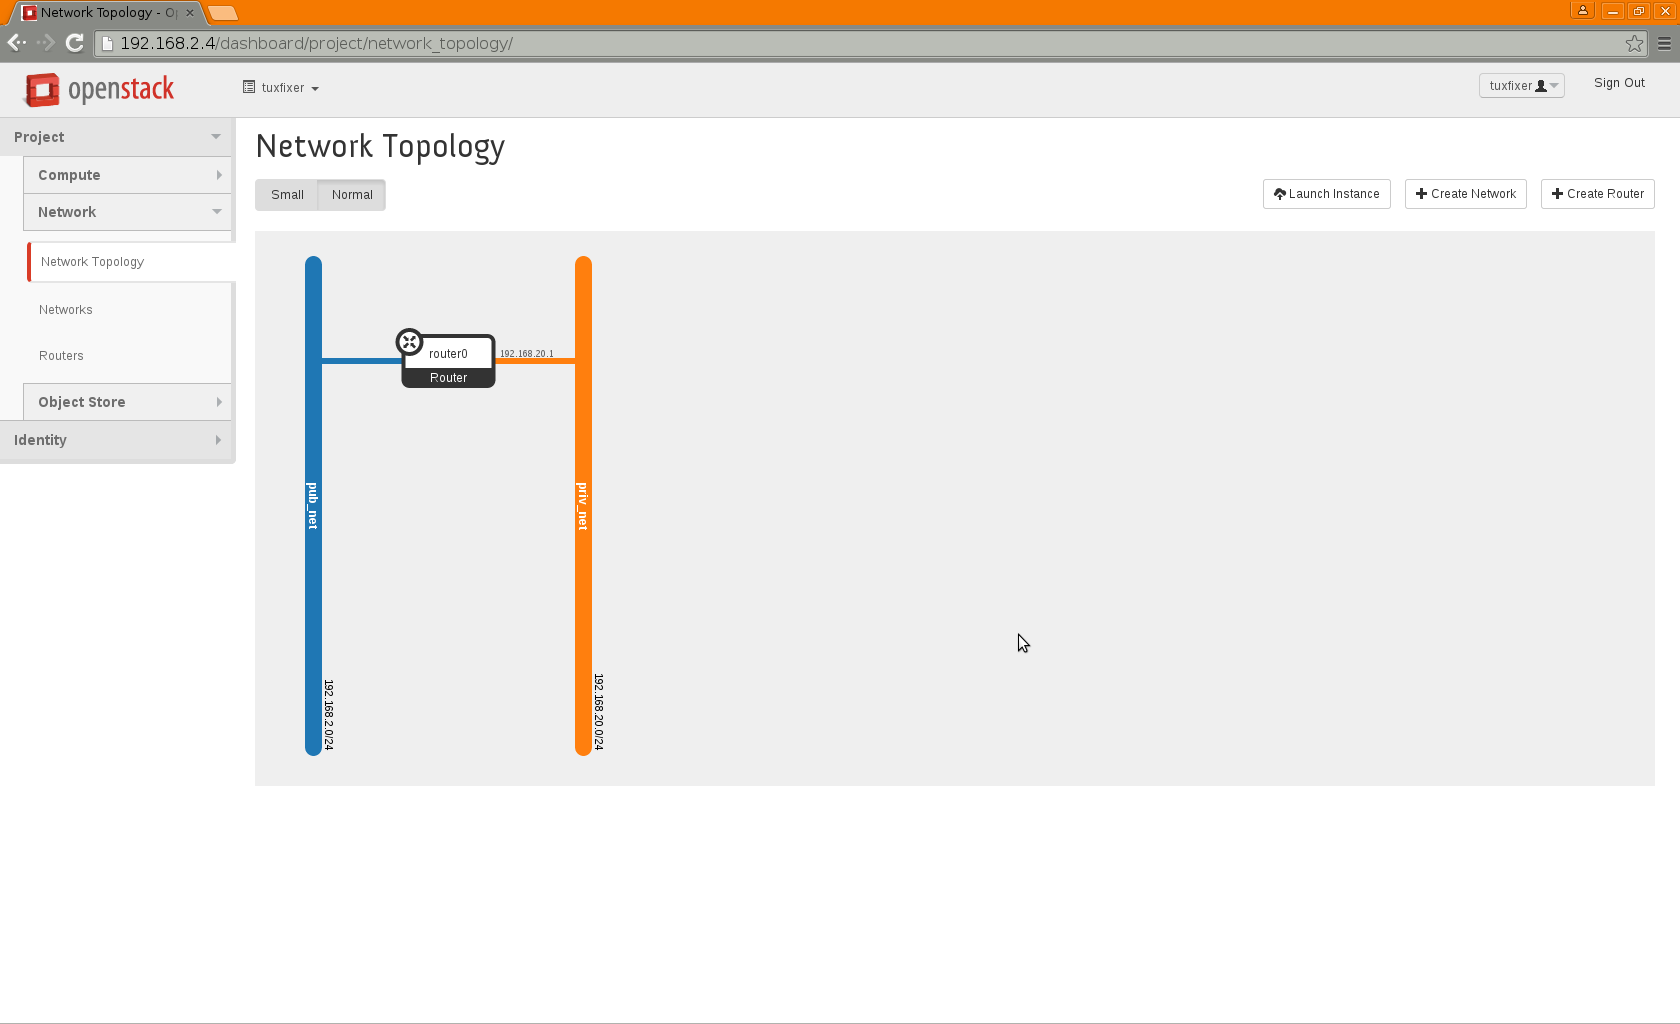
Let’s check now the network connections in our OpenStack cloud. Go to: Project -> Network -> Network Topology. We should see the below structure:
4. Few words about flavors
Flavors are virtual hardware profiles/templates used for instances (virtual machines) creation in OpenStack.
Flavors describe the virtual hardware used for building instances, such us:
– Virtual CPUs
– RAM
– disk size
– swap size
OpenStack comes with couple of predefined flavors for use with newly created instances.
To see available flavors, log in to the dashboard as admin and go to: Admin -> System -> Flavors:
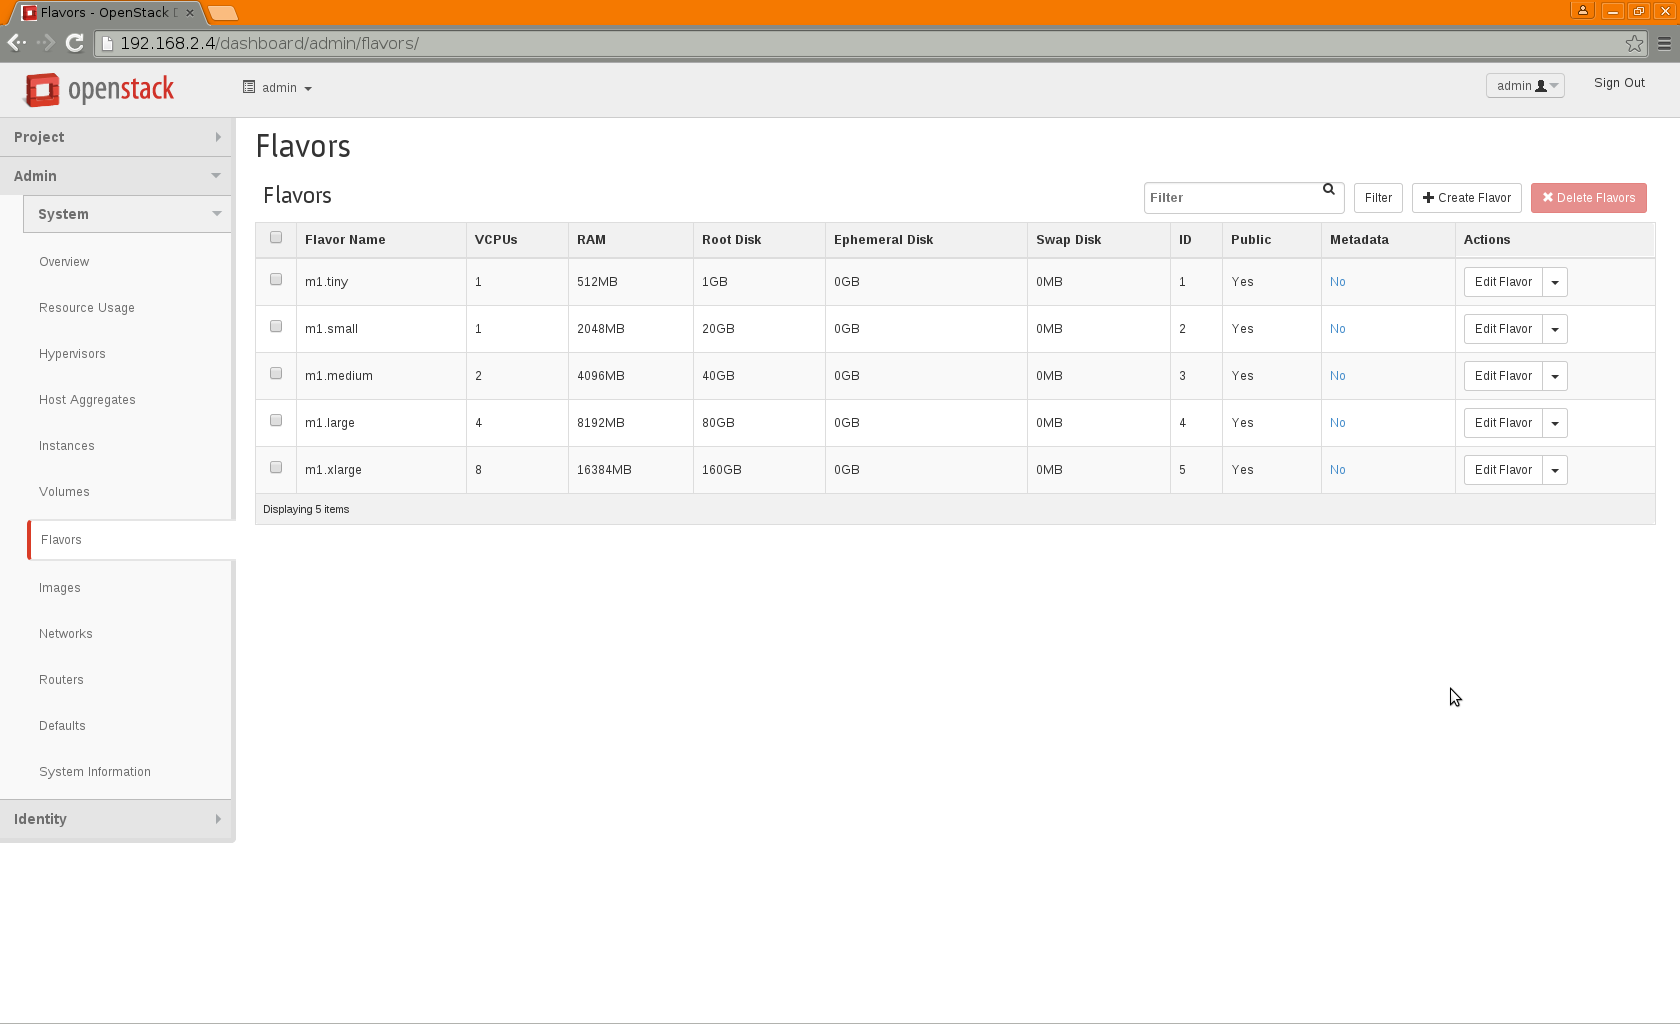
In this tutorial we will use one of the existing flavors, if you feel that these don’t meet hardware requirements for your future instances, click on Create Flavor button and create additional flavors suitable for you.
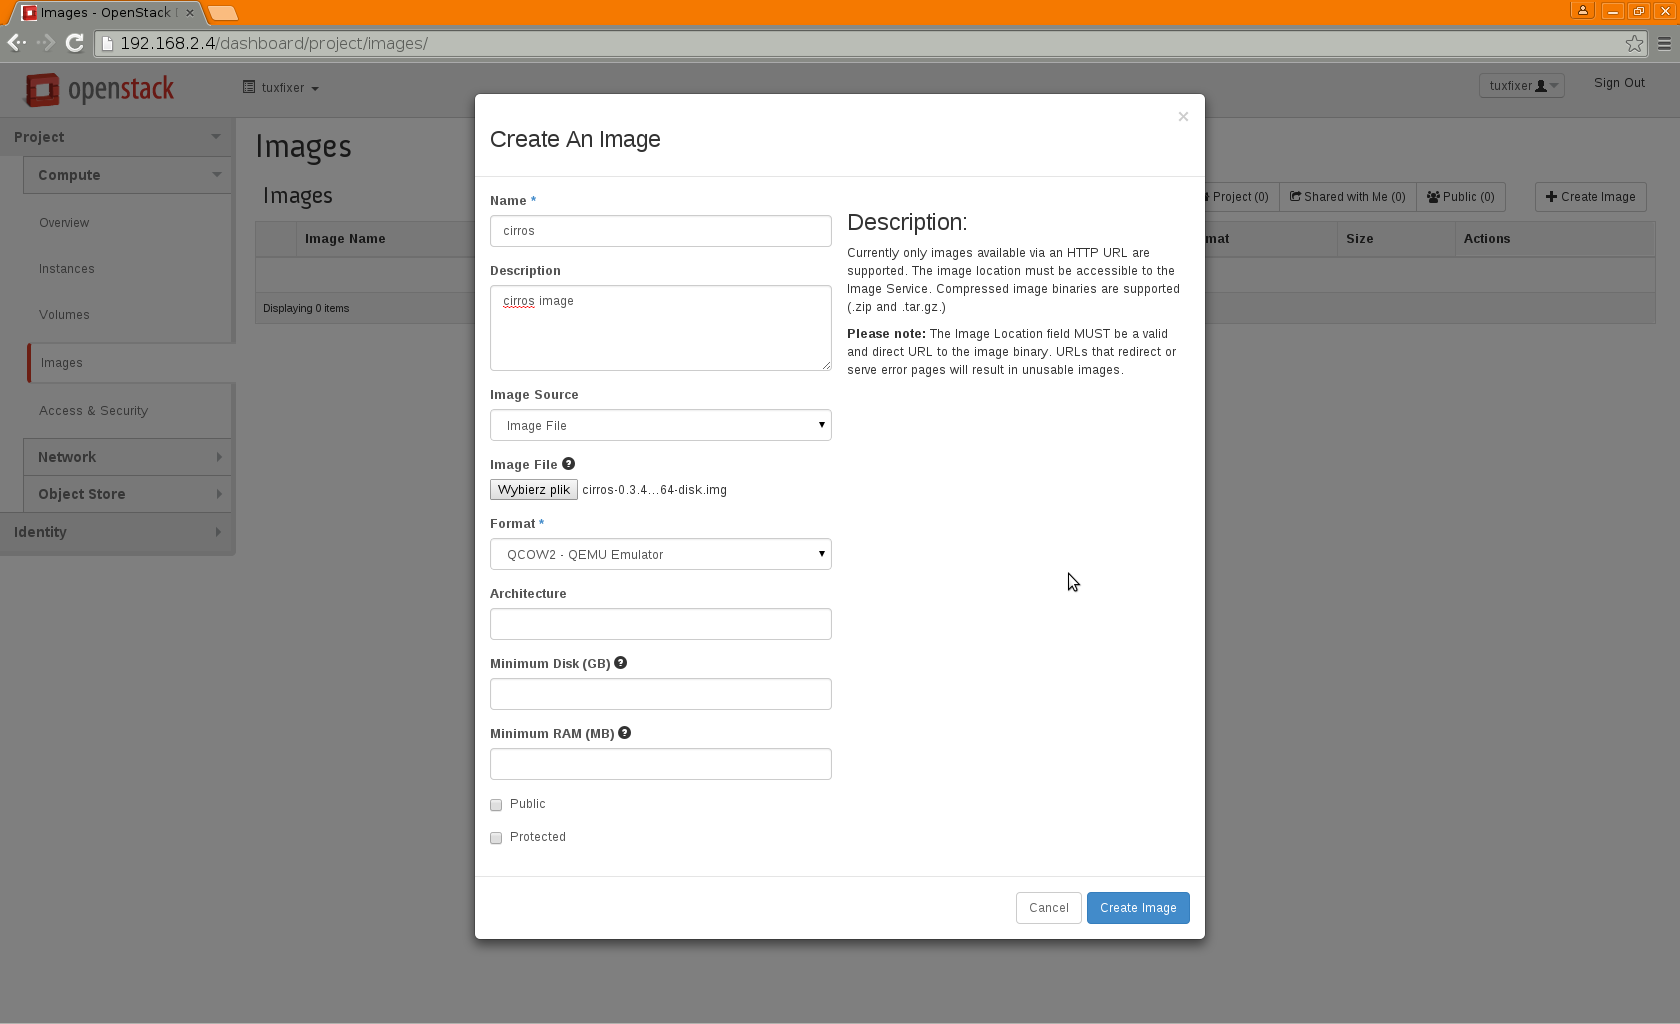
5. Upload Image
In OpenStack you can create Instances based on ready to use Images of different formats: QCOW2, ISO, VDI, VMDK, etc…
We will use Cirros Image, which is perfect for cloud testing due to its small size.
Current Cirros Image (cirros-0.3.4-x86_64-disk.img) available at: http://download.cirros-cloud.net.
Image details:
Name: cirros
Description: cirros image
Image Source: Image File
Image File: cirros-0.3.4-x86_64-disk.img
Architecture: (leave blank)
Minimum Disk: (leave blank)
Minimum RAM: (leave blank)
Public: No
Protected: No
6. Create Security Groups
Security Groups control network access to / from instances inside the tenant.
Let’s create new security group and add security rules to the group.
Go to: Project -> Compute -> Access & Security -> Create Security Group.
Security Group details:
Name: tuxfixer_sec_group
Description: tuxfixer security group
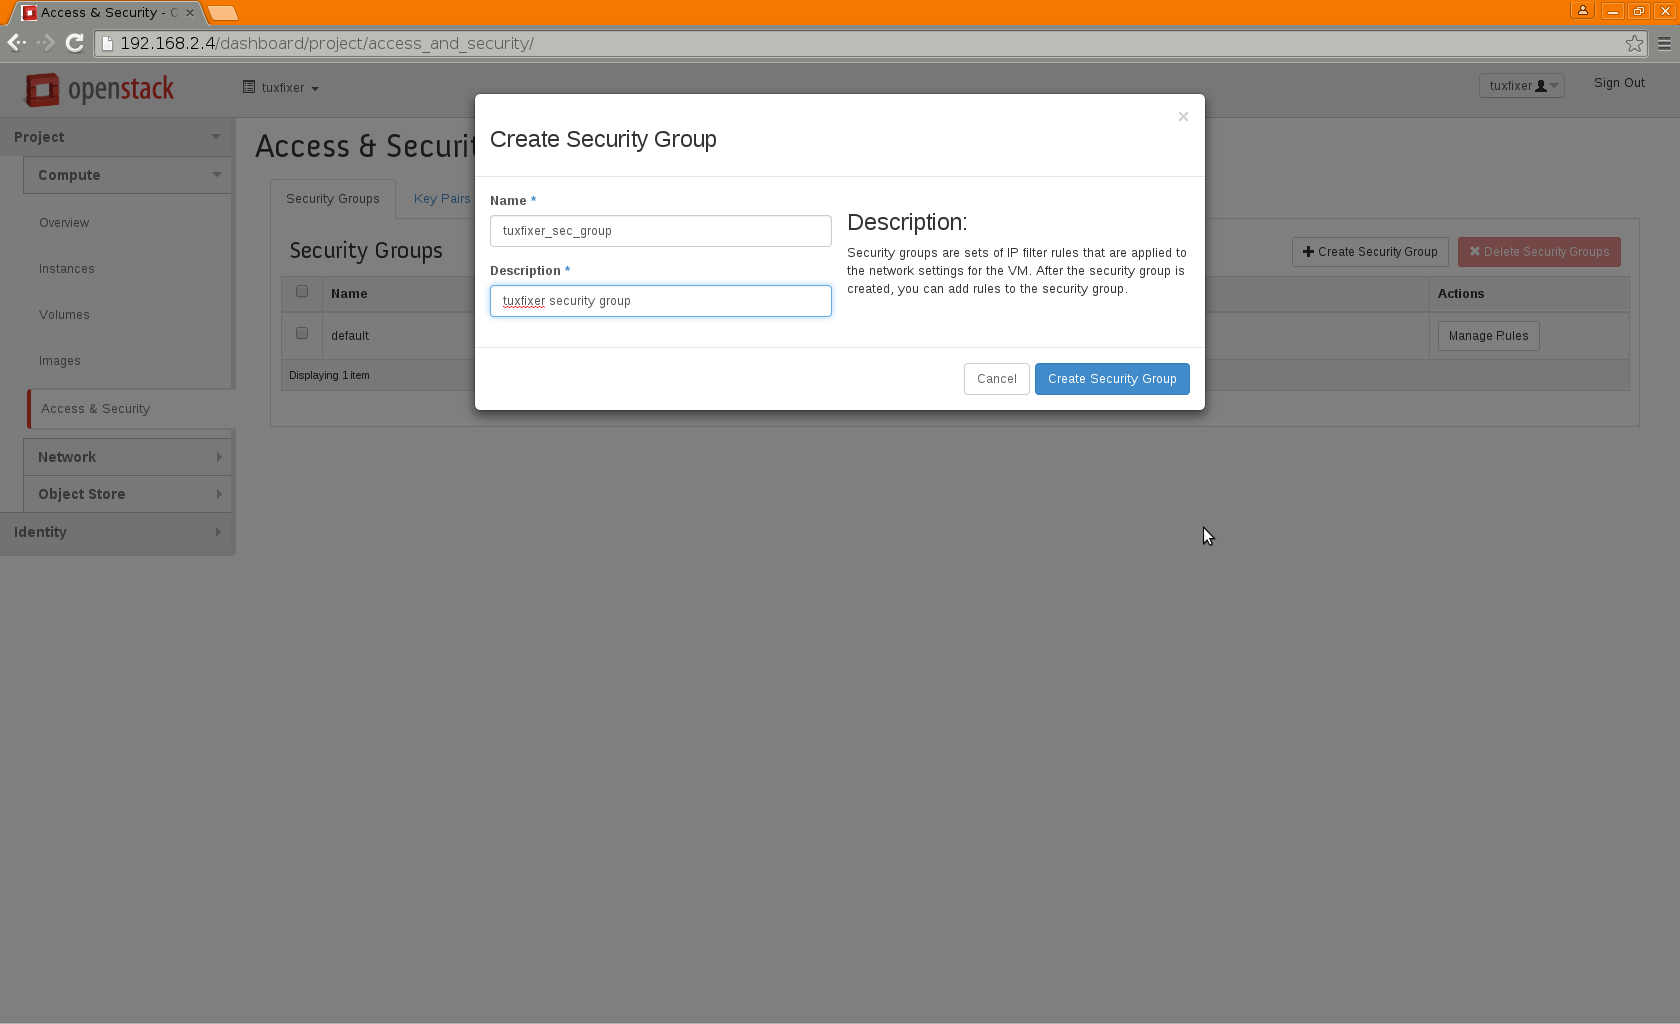
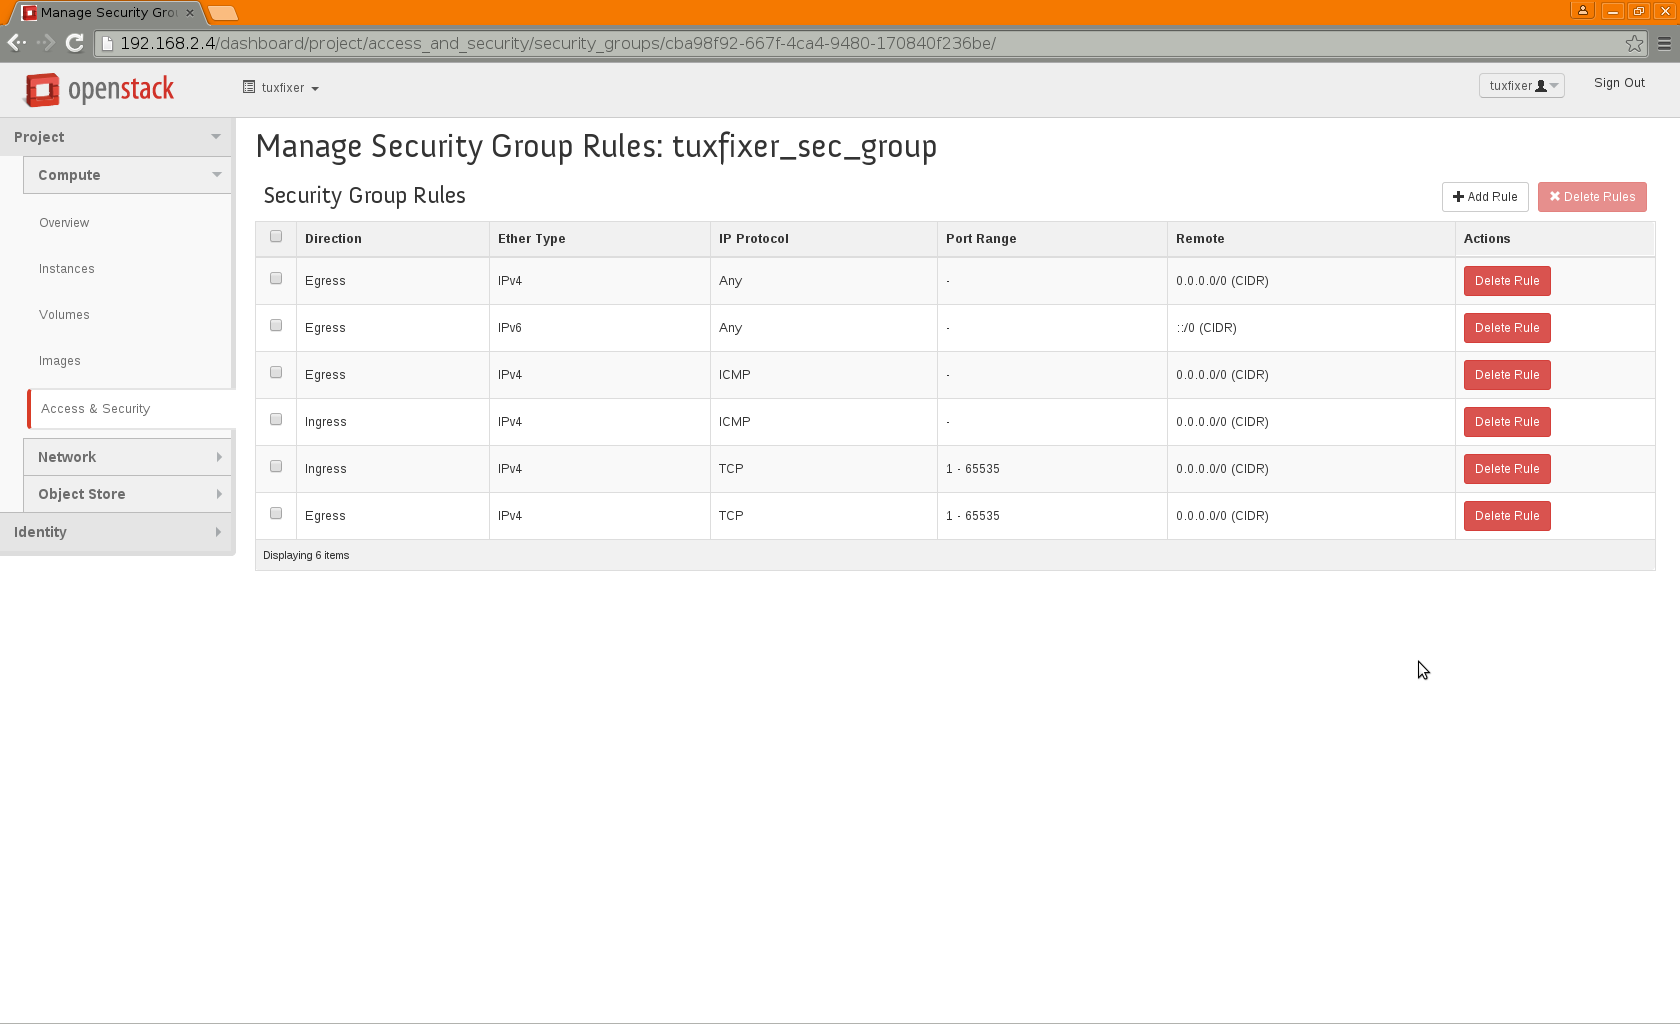
In the tuxfixer_sec_group row click Manage Rules:
Add following rules:
Egress IPv4 ICMP – 0.0.0.0/0 (CIDR)
Ingress IPv4 ICMP – 0.0.0.0/0 (CIDR)
Ingress IPv4 TCP 1 – 65535 0.0.0.0/0 (CIDR)
Egress IPv4 TCP 1 – 65535 0.0.0.0/0 (CIDR)
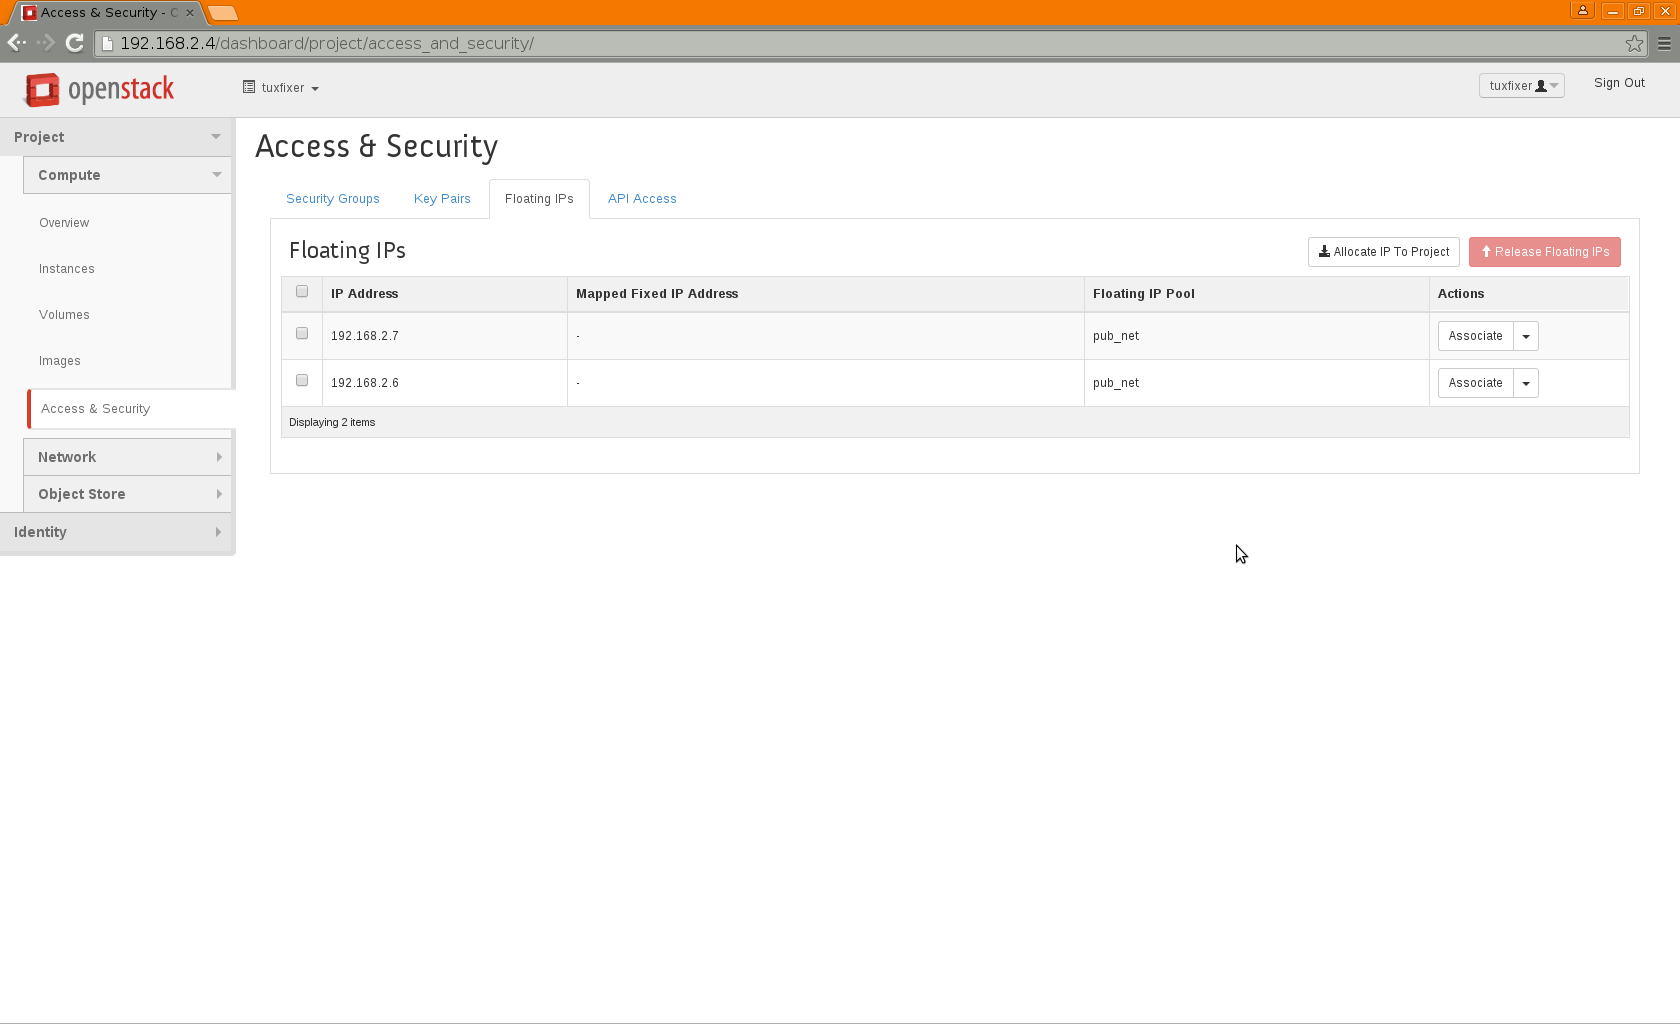
7. Assign Floating IPs to the Project Tenant
Floating IPs allow access to Instances from public network and WAN.
To assign new IPs to the Project Tanant go to: Project -> Compute -> Access & Security -> Floating IPs -> Allocate IP to The Project
Allocate 2 Floating IPs:
Pool: pub_net
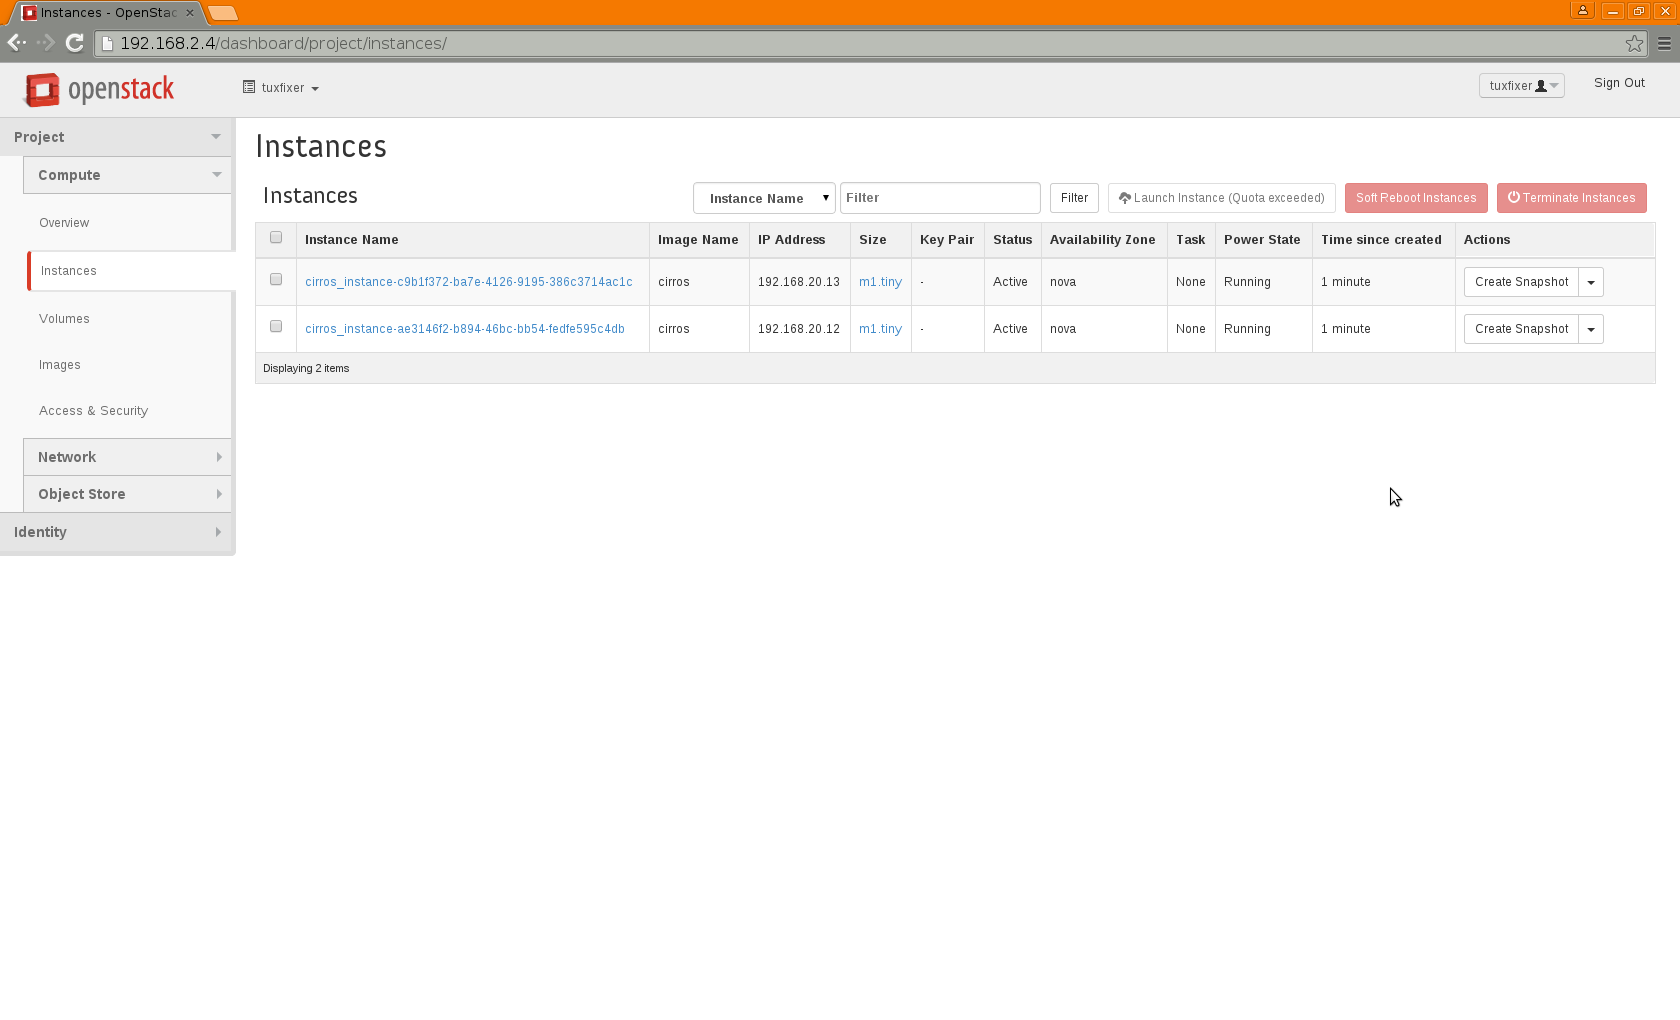
8. Create Instances
Now when we have all the need components, we can create Instances (virtual machines running inside cloud).
Let’s create 2 Instances, go to: Project -> Compute -> Instances -> Launch Instance
Details Tab:
Availability Zone: nova
Instance Name: cirros_instance
Flavor: m1.tiny
Instance Count: 2
Instance Boot Source: Boot from image
Image Name: cirros
Access & Security Tab:
Key Pair: No key pairs available
Security Groups: tuxfixer_sec_group
Networking Tab:
Selected networks: priv_net
Post-Creation Tab: leave as it is
Advanced Options Tab: leave as it is
Note: Process of creating Instances may take couple of minutes.
View of created instances:
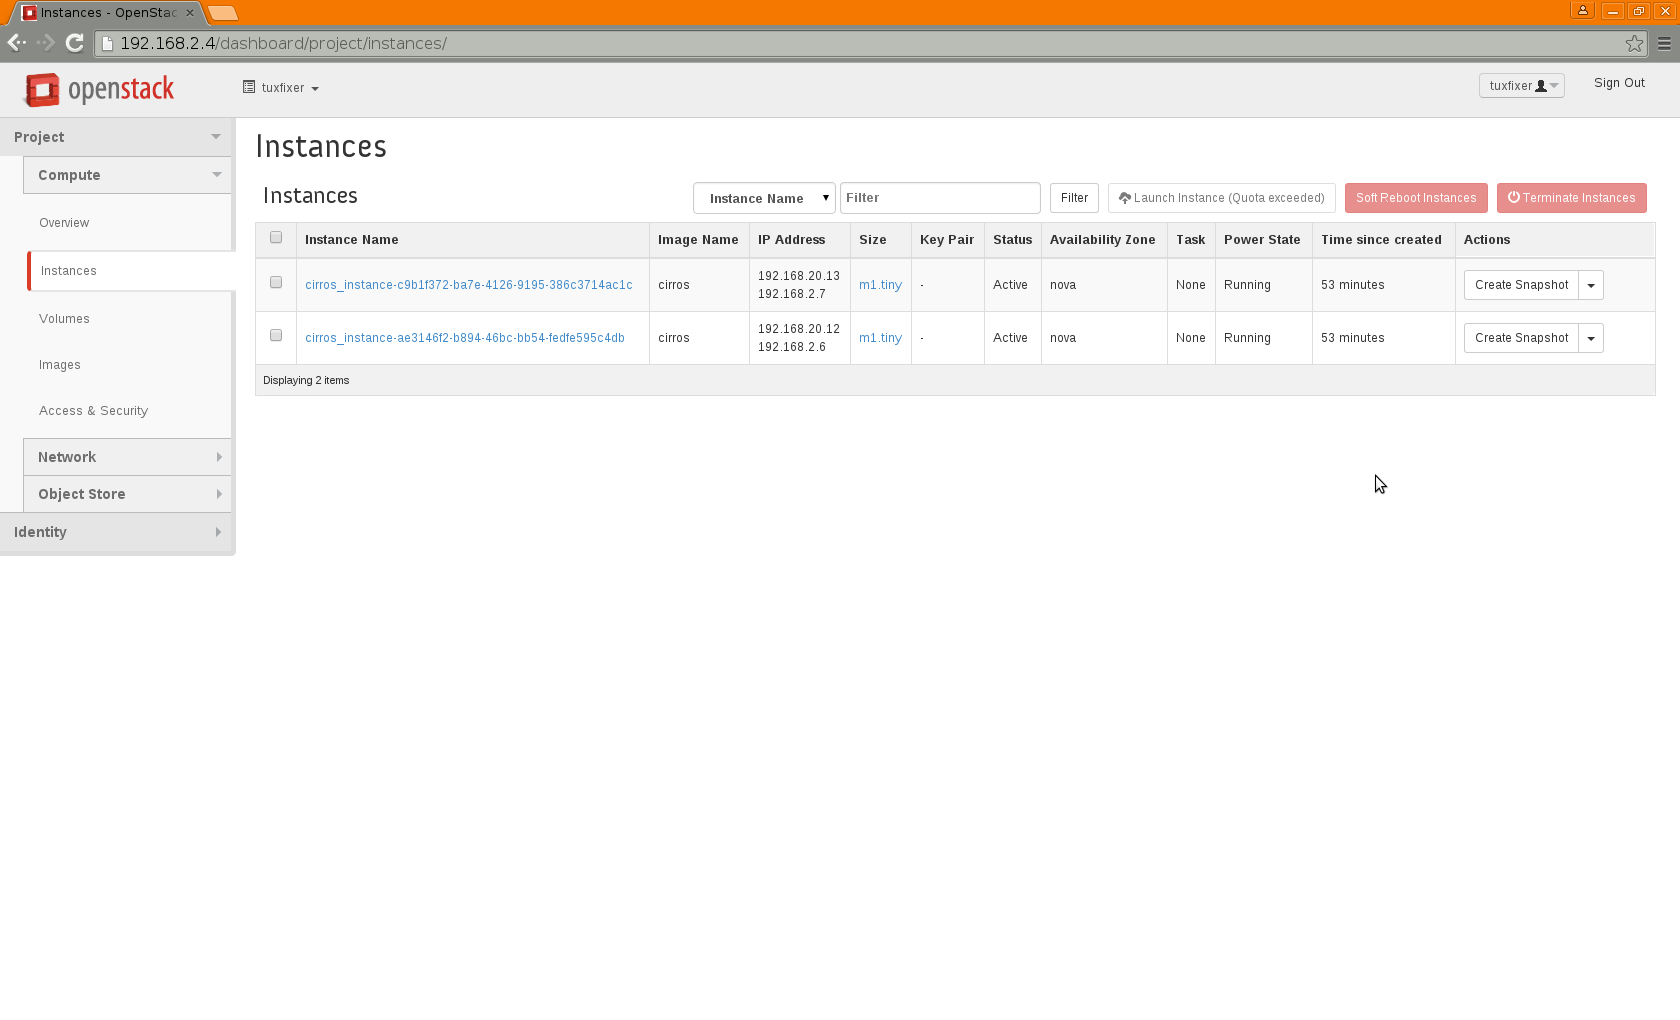
Now when we have running instances and floating IPs assigned to the project, we can assign them to particular instances to let them communicate with public network. For each instance in Actions column choose Associate Floating IP from drop down menu.
View of instances with assigned floating IPs:
You can access instance console by clicking on Instance Name, then on Console tab.
Login to instance console:
instance login: cirros
instance password: cubswin:)

9. Instance internal / external connectivity testing
Test connectivity of instances from public network, you can connect from controller or compute node to instance via ssh.
instance login: cirros
instance password: cubswin:)
[root@controller ~]# ping 192.168.2.6
PING 192.168.2.6 (192.168.2.6) 56(84) bytes of data.
64 bytes from 192.168.2.6: icmp_seq=1 ttl=63 time=17.0 ms
64 bytes from 192.168.2.6: icmp_seq=2 ttl=63 time=1.08 ms
64 bytes from 192.168.2.6: icmp_seq=3 ttl=63 time=0.707 ms
64 bytes from 192.168.2.6: icmp_seq=4 ttl=63 time=0.666 ms
^C
--- 192.168.2.6 ping statistics ---
4 packets transmitted, 4 received, 0% packet loss, time 3003ms
rtt min/avg/max/mdev = 0.666/4.872/17.030/7.021 ms
[root@controller ~]# ping 192.168.2.7
PING 192.168.2.7 (192.168.2.7) 56(84) bytes of data.
64 bytes from 192.168.2.7: icmp_seq=1 ttl=63 time=14.8 ms
64 bytes from 192.168.2.7: icmp_seq=2 ttl=63 time=1.08 ms
64 bytes from 192.168.2.7: icmp_seq=3 ttl=63 time=0.730 ms
64 bytes from 192.168.2.7: icmp_seq=4 ttl=63 time=0.943 ms
^C
--- 192.168.2.7 ping statistics ---
4 packets transmitted, 4 received, 0% packet loss, time 3001ms
rtt min/avg/max/mdev = 0.730/4.411/14.886/6.049 ms
[root@controller ~]# ssh cirros@192.168.2.6
The authenticity of host '192.168.2.6 (192.168.2.6)' can't be established.
RSA key fingerprint is ce:44:d8:7b:0d:a2:30:8c:a0:c7:76:43:d4:d7:5c:d7.
Are you sure you want to continue connecting (yes/no)? yes
Warning: Permanently added '192.168.2.6' (RSA) to the list of known hosts.
cirros@192.168.2.6's password:
$ uname -a
Linux cirros-instance-ae3146f2-b894-46bc-bb54-fedfe595c4db 3.2.0-80-virtual #116-Ubuntu SMP Mon Mar 23 17:28:52 UTC 2015 x86_64 GNU/Linux
$ ip a
1: lo:  mtu 16436 qdisc noqueue
    link/loopback 00:00:00:00:00:00 brd 00:00:00:00:00:00
    inet 127.0.0.1/8 scope host lo
    inet6 ::1/128 scope host
       valid_lft forever preferred_lft forever
2: eth0:  mtu 1500 qdisc pfifo_fast qlen 1000
    link/ether fa:16:3e:b1:5b:ca brd ff:ff:ff:ff:ff:ff
    inet 192.168.20.12/24 brd 192.168.20.255 scope global eth0
    inet6 fe80::f816:3eff:feb1:5bca/64 scope link
       valid_lft forever preferred_lft forever
$ ping 192.168.20.13
PING 192.168.20.13 (192.168.20.13): 56 data bytes
64 bytes from 192.168.20.13: seq=0 ttl=64 time=11.759 ms
64 bytes from 192.168.20.13: seq=1 ttl=64 time=0.903 ms
64 bytes from 192.168.20.13: seq=2 ttl=64 time=0.926 ms
64 bytes from 192.168.20.13: seq=3 ttl=64 time=1.088 ms
^C
--- 192.168.20.13 ping statistics ---
4 packets transmitted, 4 packets received, 0% packet loss
round-trip min/avg/max = 0.903/3.669/11.759 ms
$ exit
Connection to 192.168.2.6 closed.
[root@controller ~]# ssh cirros@192.168.2.7
The authenticity of host '192.168.2.7 (192.168.2.7)' can't be established.
RSA key fingerprint is 5f:33:88:7d:61:60:e2:25:d2:7a:ad:40:2d:e4:d9:87.
Are you sure you want to continue connecting (yes/no)? yes
Warning: Permanently added '192.168.2.7' (RSA) to the list of known hosts.
cirros@192.168.2.7's password:
$ ip a
1: lo:  mtu 16436 qdisc noqueue
    link/loopback 00:00:00:00:00:00 brd 00:00:00:00:00:00
    inet 127.0.0.1/8 scope host lo
    inet6 ::1/128 scope host
       valid_lft forever preferred_lft forever
2: eth0:  mtu 1500 qdisc pfifo_fast qlen 1000
    link/ether fa:16:3e:1f:a9:b6 brd ff:ff:ff:ff:ff:ff
    inet 192.168.20.13/24 brd 192.168.20.255 scope global eth0
    inet6 fe80::f816:3eff:fe1f:a9b6/64 scope link
       valid_lft forever preferred_lft forever
$ uname -a
Linux cirros-instance-c9b1f372-ba7e-4126-9195-386c3714ac1c 3.2.0-80-virtual #116-Ubuntu SMP Mon Mar 23 17:28:52 UTC 2015 x86_64 GNU/Linux
$ ping 192.168.20.12
PING 192.168.20.12 (192.168.20.12): 56 data bytes
64 bytes from 192.168.20.12: seq=0 ttl=64 time=16.324 ms
64 bytes from 192.168.20.12: seq=1 ttl=64 time=0.917 ms
64 bytes from 192.168.20.12: seq=2 ttl=64 time=13.342 ms
64 bytes from 192.168.20.12: seq=3 ttl=64 time=1.181 ms
^C
--- 192.168.20.12 ping statistics ---
4 packets transmitted, 4 packets received, 0% packet loss
round-trip min/avg/max = 0.917/7.941/16.324 ms
$ exit
Connection to 192.168.2.7 closed.
[root@controller ~]#
Our project tenant is now configured and instances ready to work.
Hi,
Very useful post !!!
Is it possible to configure the router in order to use DHCP to assign “leased” IP addresses to the instances ?
Thx,
Regards,
J.P.
Hi jribeauv
Assuming that by “leased IP” you meant “Floating IP” it is possible of course. You just need to have working DHCP server in your public/provider network (the network where tenant router has gateway interface connected to). Please note that tenant router can only provide DHCP for internal noetwork IPs, so if You want to assign Floating IPs via DHCP, then your public network router has to provide it.
Hi,
Thx for your quick update.
So, to use my external DHCP server instead reserving an address-range , I have to make these changes :
– no more pool allocation setting for external network
– enable DHCP in pub_subnet
and that’s it ?
Regards,
J.P.
not exactly…
For external DHCP server, yous should do the following:
– no more pool allocation setting for external network
– DISABLE DHCP in pub_subnet
For OpenStack-made DHCP server on public/provider network, you should do the following:
– no more pool allocation setting for external network
– enable DHCP in pub_subnet (new port will be created in pub_subnet for DHCP server – verify it in Networks View in Horizon)
…and to be honest – both configurations will work for you, but:
– in first case you use external DHCP server (i.e. on your home router)
– in second case you use OpenStack built-in router running as port in external/provider pub_net
Hi,
I notice that I’m able to ping my “external” DNS server but nslookup fails with following error :
;; connection timed out; trying next origin
;; connection timed out; no servers could be reached
BTW , nslookup works fine on the compute node hosting these instances.
Any hint to fix this issue ?
I’m using external DHCP server.
Thx for help.
Regards,
J.P.
Hello,
Same problem !
Any hint to fix this issue ?
Regards
Hi
Do you have DNS servers defined on Instances?
In Red Hat derived distributions DNS servers are usually defined in /etc/resolv.conf or /etc/sysconfig/network-scripts/ifcfg- as DNS1, DNS2…
Ohhh it’s my fault
Everything is okay thank you !
Hi,
I assignment is failing, hence VM’s are not reachable. I can see following information in console-log.
[root@openstck-controller IMAGES(keystone_admin)]# nova console-log 94228c5c-2ea6-4333-bc26-34344308f7f6 | grep eth0
Bringing up interface eth0:
Determining IP information for eth0… failed.
Unable to obtain IPv4 DHCP address eth0.
ci-info: | eth0 | True | . | . | fa:16:3e:21:1c:89 |
[root@openstck-controller IMAGES(keystone_admin)]#
Could you please help
Hi Shailendra
My guess is that Instance is not getting IP address because something is wrong with OpenStack Neutron DHCP service.
Check Neutron DHCP service status on Controller/Network node (depends where you installed Neutron):
[root@network ~]# systemctl status neutron-dhcp-agent.service
if status is failed then restart service:
[root@network ~]# systemctl restart neutron-dhcp-agent.service
then restart Instance.
Hello,
Have managed to create 2 instances with your help, but:
But no one of them is pingable. Floating IP allocated OK.
How to solve it? Please advise. Should i add some route?
Hi Kostyanius
I have no idea what is going on in your installation, but troubleshooting of SDNs inside OpenStack can be pretty problematic. If you see that traffic is dropped somewhere then I would start analysing with tcpdump/wireshark the interfaces one by one in your installation. Start from instance’s interfaces like qvo, qbr,tap and then go deeper and check each interface where traffic is dropped.
Thanks ..works perfectly for me.
Very very helpful.
Hi,
I am trying to configure the Mirantis Fuel 11 for OpenStack deployment.
On my Test Server I have installed the ProxMox on that I have created Fuel 11 Master VM and 1 Compute ,1 controller ,1 Cinder.
But I am getting error when I have tried to test Network verification.
Can you assist me for this.
Thanks,
Tushar
I think you should contact Mirantis technical support.