![]()
GRUB2 Linux Boot Loader provides few customization options, that can transform it into an attention drawing eye candy. It’s main feature is the possibility to customize the splash screen being displayed with GRUB 2 menu entries upon system boot. This feature can be used not only in GRUB2 installed on hard disk for already installed operating systems, but also in GRUB2 Boot Loader placed on ISO image when booting from ISO/CD/DVD. This is pretty useful as well, when we want to create customized ISO image with the company logo based on some Linux Distro, which provides a company product.
In this tutorial we present how to create:
- GRUB2 custom splash screen on RHEL 7 / CentOS 7 ISO image for UEFI Boot
- GRUB2 custom splash screen on RHEL 7 / CentOS 7 ISO image for Legacy BIOS Boot
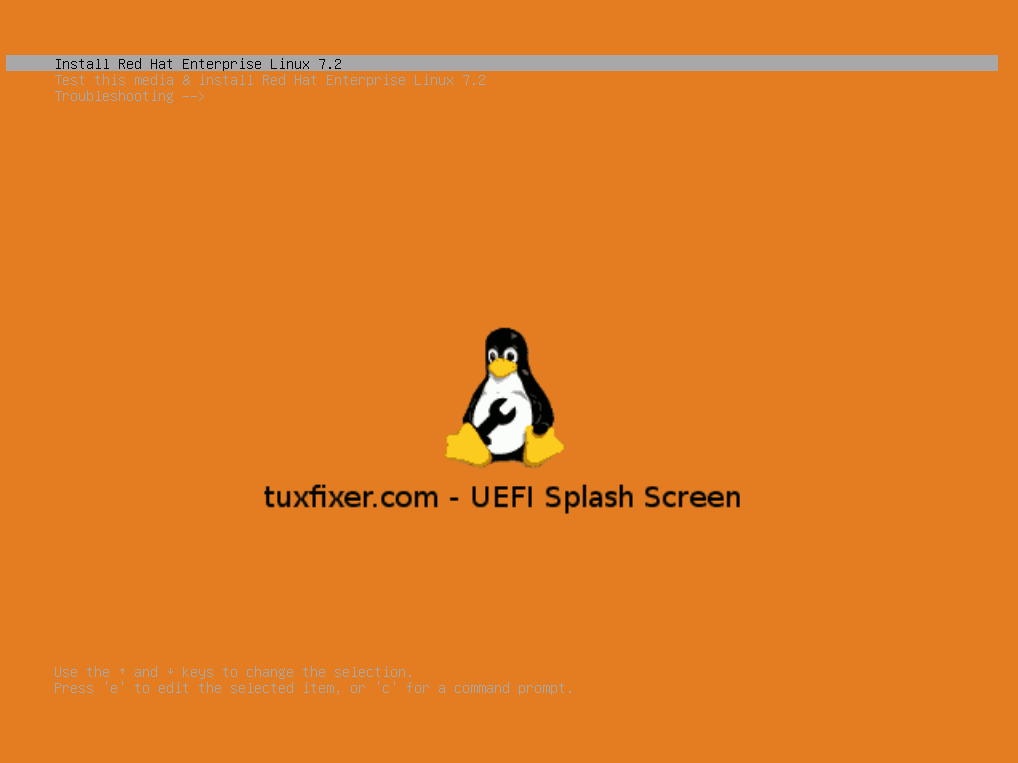
1. GRUB2 custom splash screen on RHEL 7 / CentOS 7 ISO image for UEFI Boot
1.1 Prepare GRUB2 Splash Screen Image for UEFI Boot
Create 640×480 14 color .png image (you can use GIMP) for splash screen, example:

GIMP menu hints (how to create 14 color indexed image):
- Go to: Image > Mode > Indexed… in the menus along the top of the image
- The Indexed color conversion window will appear. Under the colormap section towards the top, select the Generate optimum palette option and type in 14 for the Maximum number of colors value
Save UEFI splash screen file as: uefi_splash.png
1.2 Mount ISO image in your Linux system
Mount the image read-only and copy it’s contents to the new working directory. To find out how to mount ISO image in Linux file system, please refer to this tutorial: Mount / Modify / Edit / Repack / Create UEFI ISO with Kickstart File inside.
1.3 Copy GRUB2 Splash Screen to ISO directory
Place previously prepared splash screen file uefi_splash.png in EFI/BOOT/ of your ISO working directory:
[root@tuxfixer ~]# ls -l /mnt/custom_rhel72/EFI/BOOT/
total 3532
-r--r--r--. 1 root root 1295704 Jul 20  2015 BOOTX64.EFI
dr-xr-xr-x. 2 root root    4096 Oct 30  2015 fonts
-rw-r--r--. 1 root root    1588 Nov 17 22:36 grub.cfg
-r-xr-xr-x. 1 root root 1008080 Oct 12  2015 grubx64.efi
-r--r--r--. 1 root root 1282496 Jul 20  2015 MokManager.efi
-r--r--r--. 1 root root     892 Oct 30  2015 TRANS.TBL
-rw-rw-r--. 1 root root    2715 Nov 17 22:44 uefi_splash.png
drwxr-xr-x. 2 root root    4096 Nov 18 00:16 x86_64-efi
1.4 Install GRUB2 EFI modules in your Linux system
This package contains gfxterm_background.mod module file needed to display background images in GRUB2:
[root@tuxfixer ~]# dnf install grub2-efi-modulesAfter package installation gfxterm_background.mod file is located in /usr/lib/grub/x86_64-efi/ directory.
Now copy gfxterm_background.mod file to /EFI/BOOT/x86_64-efi folder of your UEFI ISO image:
[root@tuxfixer ~]# mkdir /mnt/custom_rhel72/EFI/BOOT/x86_64-efi
[root@tuxfixer ~]# cp /usr/lib/grub/x86_64-efi/gfxterm_background.mod /mnt/custom_rhel72/EFI/BOOT/x86_64-efi/
1.5 Edit GRUB2 config file
Since we are setting up splash screen on UEFI type ISO image, we need to edit EFI/BOOT/grub.cfg file and add the following code to the module section:
insmod gfxterm
terminal_output gfxterm
insmod gfxterm_background
insmod png
loadfont /EFI/BOOT/fonts/unicode.pf2
background_image -m stretch /EFI/BOOT/uefi_splash.png
After our modifications grub.cfg file looks like below:
set default="1"

function load_video {
  insmod efi_gop
  insmod efi_uga
  insmod video_bochs
  insmod video_cirrus
  insmod all_video
}

load_video
set gfxpayload=keep
insmod gzio
insmod part_gpt
insmod ext2
insmod gfxterm
terminal_output gfxterm
insmod gfxterm_background
insmod png
loadfont /EFI/BOOT/fonts/unicode.pf2
background_image -m stretch /EFI/BOOT/uefi_splash.png

set timeout=60
### END /etc/grub.d/00_header ###

search --no-floppy --set=root -l 'RHEL-7.2 Server.x86_64'

### BEGIN /etc/grub.d/10_linux ###
menuentry 'Install Red Hat Enterprise Linux 7.2' --class fedora --class gnu-linux --class gnu --class os {
        linuxefi /images/pxeboot/vmlinuz inst.stage2=hd:LABEL=RHEL-7.2\x20Server.x86_64 quiet
        initrdefi /images/pxeboot/initrd.img
}
menuentry 'Test this media & install Red Hat Enterprise Linux 7.2' --class fedora --class gnu-linux --class gnu --class os {
        linuxefi /images/pxeboot/vmlinuz inst.stage2=hd:LABEL=RHEL-7.2\x20Server.x86_64 rd.live.check quiet
        initrdefi /images/pxeboot/initrd.img
}
submenu 'Troubleshooting -->' {
        menuentry 'Install Red Hat Enterprise Linux 7.2 in basic graphics mode' --class fedora --class gnu-linux --class gnu --class os {
                linuxefi /images/pxeboot/vmlinuz inst.stage2=hd:LABEL=RHEL-7.2\x20Server.x86_64 xdriver=vesa nomodeset quiet
                initrdefi /images/pxeboot/initrd.img
        }
        menuentry 'Rescue a Red Hat Enterprise Linux system' --class fedora --class gnu-linux --class gnu --class os {
                linuxefi /images/pxeboot/vmlinuz inst.stage2=hd:LABEL=RHEL-7.2\x20Server.x86_64 rescue quiet
                initrdefi /images/pxeboot/initrd.img
        }
}
1.6 Create ISO image from ISO working directory
Now, when splash screen is configured, it’s time to recreate custom ISO image from the extracted ISO working directory. To recreate/build ISO image refer again to the tutorial (point 5,6): Mount / Modify / Edit / Repack / Create UEFI ISO with Kickstart File inside
1.7 Test ISO Image with Custom Splash Screen
After recreating/rebuilding ISO image, burn it to DVD or mount it in server’s iLO, enable UEFI Boot Mode on your server (make sure your server supports UEFI/EFI Boot), then boot from ISO:
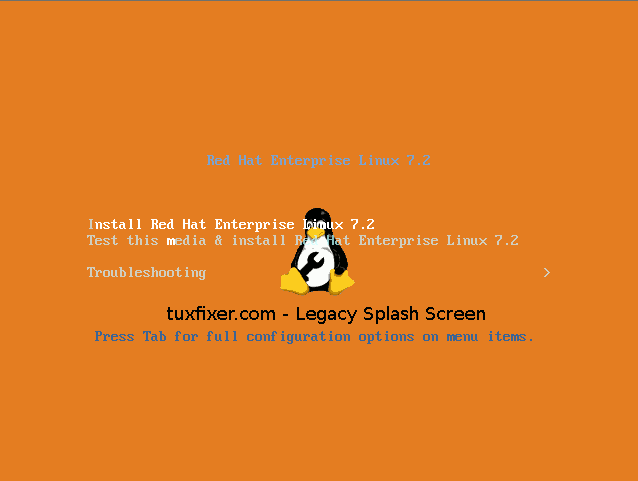
2. GRUB2 custom splash screen on RHEL 7 / CentOS 7 ISO image for Legacy BIOS Boot
2.1 Prepare GRUB2 Splash Screen Image for Legacy BIOS Boot
Create 640×480 14 color .png image (you can use GIMP) for splash screen, example:

Save Legacy BIOS splash screen file as: splash.png
2.2 Copy GRUB2 Splash Screen to ISO directory
Place prepared splash screen file splash.png in isolinux/ of your ISO working directory (replace the original existing splash.png file):
[root@fixxxer ~]# ls -l /mnt/custom_rhel72/isolinux/
total 88332
-r--r--r--. 1 root root     2048 Oct 30  2015 boot.cat
-r--r--r--. 1 root root       84 Oct 30  2015 boot.msg
-r--r--r--. 1 root root      321 Oct 30  2015 grub.conf
-r--r--r--. 1 root root 39725808 Oct 30  2015 initrd.img
-r--r--r--. 1 root root    24576 Nov 18 00:21 isolinux.bin
-r--r--r--. 1 root root     3166 Oct 30  2015 isolinux.cfg
-r--r--r--. 1 root root   176500 Sep  5  2014 memtest
-rw-r--r--. 1 root root     2551 Dec  4 21:01 splash.png
-r--r--r--. 1 root root     2438 Oct 30  2015 TRANS.TBL
-r--r--r--. 1 root root 45180680 Oct 30  2015 upgrade.img
-r--r--r--. 1 root root   153104 Sep 26  2014 vesamenu.c32
-r-xr-xr-x. 1 root root  5154912 Oct 29  2015 vmlinuz
2.3 Verify GRUB2 config file
Edit isolinux/grub.conf file and make sure it includes splashimage parameter:
#debug --graphics
default=1
splashimage=@SPLASHPATH@
timeout 60
hiddenmenu
title Install Red Hat Enterprise Linux 7.2
        findiso
        kernel @KERNELPATH@ @ROOT@ quiet
        initrd @INITRDPATH@
title Test this media & install Red Hat Enterprise Linux 7.2
        findiso
        kernel @KERNELPATH@ @ROOT@ rd.live.check quiet
        initrd @INITRDPATH@
2.4 Create ISO image from ISO working directory
Recreate/repack custom ISO image from the extracted ISO working directory.
2.5 Test ISO Image with Custom Splash Screen
After repacking/recreating ISO image, burn it to DVD or mount it in server’s iLO, then boot from ISO in Legacy BIOS Boot mode: