![]()
Nowadays Packstack based OpenStack installations are used for proof-of-concept and demonstration purposes only. The official RDO community points TripleO (OpenStack On OpenStack) as a recommended OpenStack deployment method for production cloud. TripleO is an automated installation tool, based on Ironic OpenStack node provisioning software, intended for deployments on bare metal servers, that is, on physical hardware. TripleO generally requires using servers equipped with BMC (Baseboard Management Controller) or IPMI (Intelligent Platform Management Interface) modules, like HPE iLO (integrated Lights Out) in order to be able to manage and controll servers during OpenStack deployment, maintenance and node introspection procedures.
If you cannot afford such a luxury like physical servers with BMC/IPMI module, you can try to deploy using virtual machines in combination with VirtualBMC tool, which allows to manage virtual machines using the IPMI protocol, however VirtualBMC based deployment is not covered in this article.
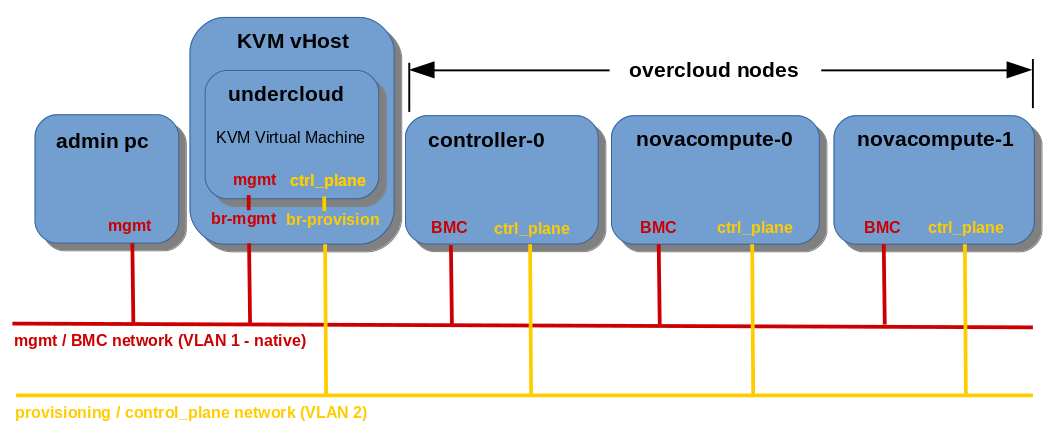
The TripleO concept introduces the Undercloud server, used for deployment, updating and managing the main OpenStack nodes called Overcloud servers.
In this article I am deploying OpenStack Pike release Undercloud server on KVM Hypervisor and Overcloud nodes using TripleO method on three bare metal servers (controller-0, compute-0, compute-1) with IPMI/iLO modules.
In the default (basic) TripleO configuration Undercloud becomes a single point of access for Overcloud nodes from external network. Undercloud can be deployed either on bare metal server or virtual machine. It’s generally a good idea to deploy Undercloud as a virtual machine, since it usually gives us the opportunity to easily backup and restore Undercloud OS and it’s configuration files at any time, for example during critical cloud deployment or upgrade stages. For the Overcloud nodes I gathered a bunch of old servers: HP ProLiant SE316M1R2 G6, HP Proliant DL320 G5p and Oracle/Sun Fire X4270 M2, all of them equipped with the remote management modules: iLO or IPMI.
In this tutorial I am using KVM Hypervisor to host Undercloud virtual machine equipped with two NICs, first one for management and external connectivity, second one for control plane (provisioning network) to provision Overcloud bare metal nodes.
Demo Environment
undercloud:
platform: KVM Virtual Machine
OS: CentOS 7 64bit
HDD: 80GB/~75GiB
RAM: 14GB
vCPU: 4×2.5GHz
mgmt IP (ens3): 192.168.2.20
provisioning/ctrl_plane IP (ens4): 192.168.24.1
controller-0:
HW: HP Proliant DL320 G5p (pluto)
HDD: 160GB
RAM: 8GB
CPU: 2.4 GHz (2 cores)
BMC/iLO IP: 192.168.2.11
provisioning/ctrl_plane IP: 192.168.24.12
novacompute-0:
HW: Oracle/Sun Fire X4270 M2 (venus)
HDD: 160GB
RAM: 20GB
CPU: 2.4 GHz (16 cores)
BMC/iLO IP: 192.168.2.13
provisioning/ctrl_plane IP: 192.168.24.14
novacompute-1:
HW: HP Proliant SE316M1R2 G6
HDD: 160GB
RAM: 32GB
CPU: 2.4 GHz (16 cores)
BMC/iLO IP: 192.168.2.12
provisioning/ctrl_plane IP: 192.168.24.15
managed network switch:
HW: 3Com SuperStack 3 Switch 4200 3C17300A
mgmt net: VLAN 1 – native (access ports)
provisioning / ctrl_plane net: VLAN 2 (access ports)
Note: according to the RDO documentation the minimum RAM required for the undercloud is 16GB or even 32GB if you are going to deploy the large scale overcloud environment. However, since I can’t afford even 16GB of RAM, because that’s the amount my KVM Hypervisor is working with, all I can assign for my undercloud machine is 14GB. Luckily, for three bare metal servers deployment, it should still work fairly smoothly.
1. Undercloud Installation on KVM
Login as root on undercloud machine and create user stack:
[root@undercloud ~]# useradd stackSet password for user stack:
[root@undercloud ~]# passwd stackAdd user stack to sudoers:
[root@undercloud ~]# echo "stack ALL=(root) NOPASSWD:ALL" | tee -a /etc/sudoers.d/stack[root@undercloud ~]# chmod 0440 /etc/sudoers.d/stackSet FQDN (Fully Qualified Domain Name) of the undercloud machine:
[root@undercloud ~]# hostnamectl set-hostname undercloud.home[root@undercloud ~]# hostnamectl set-hostname --transient undercloud.homeVerify hostname of the undercloud machine:
[root@undercloud ~]# hostnamectl status
Static hostname: undercloud.home
Icon name: computer-vm
Chassis: vm
Machine ID: f7f9da92da744142a62af949b5d0c993
Boot ID: 6abc935c906b4a4b96a6e0dfa4399dd6
Virtualization: kvm
Operating System: CentOS Linux 7 (Core)
CPE OS Name: cpe:/o:centos:centos:7
Kernel: Linux 3.10.0-862.3.2.el7.x86_64
Architecture: x86-64
Add above undercloud machine hostname to /etc/hosts file:
127.0.0.1 localhost localhost.localdomain localhost4 localhost4.localdomain4 undercloud.home undercloud
::1 localhost localhost.localdomain localhost6 localhost6.localdomain6
Verify that undercloud responds for ping on loopback interface:
[root@undercloud ~]# ping undercloud
PING localhost (127.0.0.1) 56(84) bytes of data.
64 bytes from localhost (127.0.0.1): icmp_seq=1 ttl=64 time=0.040 ms
64 bytes from localhost (127.0.0.1): icmp_seq=2 ttl=64 time=0.072 ms
64 bytes from localhost (127.0.0.1): icmp_seq=3 ttl=64 time=0.071 ms
^C
[root@undercloud ~]# ping undercloud.home
PING localhost (127.0.0.1) 56(84) bytes of data.
64 bytes from localhost (127.0.0.1): icmp_seq=1 ttl=64 time=0.069 ms
64 bytes from localhost (127.0.0.1): icmp_seq=2 ttl=64 time=0.077 ms
64 bytes from localhost (127.0.0.1): icmp_seq=3 ttl=64 time=0.078 ms
^CSwitch to user stack and from now on execute all the commands as stack:
[root@undercloud ~]# su - stack
[stack@undercloud ~]$
Install current python2-tripleo-repos RPM package from the RDO repository:
[stack@undercloud ~]# sudo yum install https://trunk.rdoproject.org/centos7/current/python2-tripleo-repos-0.0.1-0.20180703201956.25962a1.el7.noarch.rpmNote: of course the version of the above package will change with time, check the RDO repo for valid version before you try to install the package.
Enable the current OpenStack Pike repositories:
[stack@undercloud ~]$ sudo -E tripleo-repos -b pike current cephNote: I am going to use the same undercloud machine for further overcloud deployments, also that ones, which include Ceph storage, so at this point I enable also Ceph repos, although I don’t need them for this particular article. I can’t enable Ceph later, because tripleo-repos command removes any repositories that it manages before each run. If you are planning to make deployments with Ceph in the future, you should include Ceph too.
Install the TripleO CLI with all the dependencies:
[stack@undercloud ~]$ sudo yum install python-tripleoclientI intend to deploy Ceph with the overcloud in future, so I need to install ceph-ansible on the undercloud:
[stack@undercloud ~]$ sudo yum install ceph-ansibleNow we need to prepare undercloud.conf configuration file. We can copy the file from sample and edit it manually (not recommended):
[stack@undercloud ~]$ cp /usr/share/python-tripleoclient/undercloud.conf.sample ~/undercloud.confBut IMHO the better option is to generate the file using WebGUI Undercloud Configuration Wizard – http://ucw.tripleo.org.
Mandatory parameters we need to customize here are: Provisioning Interface, Overcloud Node Count and Hostname. The rest of the parameters are set automatically after clicking on Generate Advanced button.
The below picture presents the configuration I use:

For the provisioning / control-plane network I am going to use the second ens4 interface, since my first interface ens3 is used for undercloud management from the external network:
[stack@undercloud ~]$ ip a
1: lo: <loopback,up,lower_up> mtu 65536 qdisc noqueue state UNKNOWN group default qlen 1000
link/loopback 00:00:00:00:00:00 brd 00:00:00:00:00:00
inet 127.0.0.1/8 scope host lo
valid_lft forever preferred_lft forever
inet6 ::1/128 scope host
valid_lft forever preferred_lft forever
2: ens3: <broadcast,multicast,up,lower_up> mtu 1500 qdisc pfifo_fast state UP group default qlen 1000
link/ether 52:54:00:8a:27:b2 brd ff:ff:ff:ff:ff:ff
inet 192.168.2.20/24 brd 192.168.2.255 scope global noprefixroute dynamic ens3
valid_lft 77520sec preferred_lft 77520sec
inet6 fe80::5054:ff:fe8a:27b2/64 scope link noprefixroute
valid_lft forever preferred_lft forever
3: ens4: <broadcast,multicast,up,lower_up> mtu 1500 qdisc pfifo_fast state UP group default qlen 1000
link/ether 52:54:00:df:b2:8f brd ff:ff:ff:ff:ff:ff
</broadcast,multicast,up,lower_up></broadcast,multicast,up,lower_up></loopback,up,lower_up>
I have set Overcloud node Count parameter to 8, since I am planning to extend my overcloud deployment up to 8 nodes in the future.
The Hostname parameter must correspond with the FQDN of the undercloud machine, in my case undercloud.home.
Once we are done with the parameter setup, press Generate Configuration to generate undercloud.conf file content:
# Config generated by undercloud wizard
# Use these values in undercloud.conf
[DEFAULT]
undercloud_hostname = undercloud.home
local_interface = ens4
local_mtu = 1500
network_cidr = 192.168.24.0/24
masquerade_network = 192.168.24.0/24
local_ip = 192.168.24.1/24
network_gateway = 192.168.24.1
undercloud_public_host = 192.168.24.2
undercloud_admin_host = 192.168.24.3
undercloud_service_certificate =
generate_service_certificate = False
scheduler_max_attempts = 10
dhcp_start = 192.168.24.4
dhcp_end = 192.168.24.21
inspection_iprange = 192.168.24.22,192.168.24.29
# Deprecated names for compatibility with older releases
discovery_iprange = 192.168.24.22,192.168.24.29
undercloud_public_vip = 192.168.24.2
undercloud_admin_vip = 192.168.24.3
Copy and save the content in /home/stack/undercloud.conf file.
Once our undercloud.conf file is in place, we can launch undercloud installation:
[stack@undercloud ~]$ openstack undercloud installInstallation takes a while (~30 min), after successfull installation the installation log gives us some information about newly created files:
...
2018-06-15 20:18:01,209 INFO: Configuring Mistral workbooks
2018-06-15 20:18:32,464 INFO: Mistral workbooks configured successfully
2018-06-15 20:21:45,872 INFO: Configuring an hourly cron trigger for tripleo-ui logging
2018-06-15 20:21:48,766 INFO:
#############################################################################
Undercloud install complete.

The file containing this installation's passwords is at
/home/stack/undercloud-passwords.conf.

There is also a stackrc file at /home/stack/stackrc.

These files are needed to interact with the OpenStack services, and should be
secured.

#############################################################################
File undercloud-passwords.conf contains passwords for the individual services included in undercloud OpenStack, while stackrc file includes environment variables for undercloud OpenStack.
Undercloud installation is complete, now we will use the OpenStack installed on our undercloud to deploy OpenStack on target nodes, called overcloud.
1a. (optional) Launch NTP service on Undercloud node
Ironic utilizes NTP (Network Time Protocol) for Overcloud nodes synchronization. Providing NTP server’s IP during the deployment is not obligatory unless you deploy OpenStack in HA (High Availability). However, during standard deployment without HA (using one Controller node only) I noticed, that if you don’t provide NTP server IP, ansible script is looking for pool.ntp.org host by default:
TASK [Ensure system is NTP time synced] ****************************************
fatal: [localhost]: FAILED! => {"changed": true, "cmd": ["ntpdate", "-u", "pool.ntp.org"], "delta": "0:00:00.018900", "end": "2018-07-12 21:03:38.231149", "msg": "non-zero return code", "rc": 1, "start": "2018-07-12 21:03:38.212249", "stderr": "Error resolving pool.ntp.org: Name or service not known (-2)\n12 Jul 21:03:38 ntpdate[12928]: Can't find host pool.ntp.org: Name or service not known (-2)\n12 Jul 21:03:38 ntpdate[12928]: no servers can be used, exiting", "stderr_lines": ["Error resolving pool.ntp.org: Name or service not known (-2)", "12 Jul 21:03:38 ntpdate[12928]: Can't find host pool.ntp.org: Name or service not known (-2)", "12 Jul 21:03:38 ntpdate[12928]: no servers can be used, exiting"], "stdout": "", "stdout_lines": []}
to retry, use: --limit @/var/lib/heat-config/heat-config-ansible/76fad6ee-7bda-489e-9d3d-bdb33c03bc2d_playbook.retry
If you are deploying OpenStack in provisioning / control plane network (just like me in this tutorial), Overcloud nodes are not able to resolve pool.ntp.org, because the images they are deployed from, contain local DNS server in their resolv.conf, however that server is not caching from global DNS servers.
To fix the issue, the fastest way for me is to quickly setup NTP server on Undercloud node and provide it’s IP during Overcloud deployment command as a paremater. As an alternative, you can try to forward traffic on Undercloud node by manipulating firewall to let Overcloud nodes reach pool.ntp.org server, but I prefer the first option, because it’s safer.
NTP configuration on Undercloud node is fairly easy since the node has the NTP service already installed and firewall is configured to allow NTP queries on port 123/UDP.
Here are the steps to configure NTP on Undercloud:
Make sure NTP service is running:
(undercloud) [stack@undercloud ~]$ sudo systemctl status ntpd
● ntpd.service - Network Time Service
Loaded: loaded (/usr/lib/systemd/system/ntpd.service; enabled; vendor preset: disabled)
Active: active (running) since Sat 2018-07-14 15:34:18 CEST; 3h 13min ago
Process: 695 ExecStart=/usr/sbin/ntpd -u ntp:ntp $OPTIONS (code=exited, status=0/SUCCESS)
Main PID: 837 (ntpd)
Tasks: 1
CGroup: /system.slice/ntpd.service
└─837 /usr/sbin/ntpd -u ntp:ntp -g
Add global NTP servers to your NTP config file and restrict access to localhost and provisioning/control plane subnet, which is: 192.168.24.0/24.
My /etc/ntp.conf file after modifications looks like below:
tinker panic 0
disable monitor
restrict 127.0.0.1
restrict 192.168.24.0 netmask 255.255.255.0 nomodify notrap
driftfile /var/lib/ntp/drift
server 0.pl.pool.ntp.org
server 1.pl.pool.ntp.org
server 2.pl.pool.ntp.org
server 3.pl.pool.ntp.org
Ensure 123/UDP port for NTP is open:
(undercloud) [stack@undercloud ~]$ sudo iptables -vn -L INPUT | grep ntp
8 608 ACCEPT udp -- * * 0.0.0.0/0 0.0.0.0/0 multiport dports 123 state NEW /* 105 ntp ipv4 */
Restart NTP service:
(undercloud) [stack@undercloud ~]$ sudo systemctl restart ntpdTest NTP on Undercloud node:
(undercloud) [stack@undercloud ~]$ ntpq -np
remote refid st t when poll reach delay offset jitter
==============================================================================
193.219.28.147 229.30.220.210 2 u 34 64 1 30.146 -6.256 0.000
5.226.101.254 194.29.130.252 2 u 33 64 1 38.456 -5.752 0.000
193.70.94.182 194.29.130.252 2 u 32 64 1 30.104 -5.875 0.000
195.189.85.132 .PPS. 1 u 31 64 1 31.960 -5.977 0.000
2. Overcloud deployment
In order to use CLI commands we need to source stackrc file including OpenStack environment variables:
[stack@undercloud ~]$ source stackrc
(undercloud) [stack@undercloud ~]$
Before we start the installation, we need to build the images required for the overcloud nodes:
- ironic-python-agent.initramfs
- ironic-python-agent.kernel
- overcloud-full.initrd
- overcloud-full.qcow2
- overcloud-full.vmlinuz
Before we proceed, make sure the delorean and ceph repositories have been installed:
(undercloud) [stack@undercloud ~]$ sudo yum repolist
Loaded plugins: fastestmirror, priorities
Loading mirror speeds from cached hostfile
* base: mirror-pl.kielcetechnologypark.net
* extras: mirror-pl.kielcetechnologypark.net
* updates: centos.hitme.net.pl
1766 packages excluded due to repository priority protections
repo id repo name status
base/7/x86_64 CentOS-7 - Base 9,911
delorean-pike delorean-openstack-nova-966a5a21544fe453a36cf5215d890d2c0b5ed82f 672+290
delorean-pike-testing/x86_64 dlrn-pike-testing 1,220+1,766
extras/7/x86_64 CentOS-7 - Extras 314
rdo-qemu-ev/x86_64 RDO CentOS-7 - QEMU EV 59
tripleo-centos-ceph-jewel tripleo-centos-ceph-jewel 93
updates/7/x86_64 CentOS-7 - Updates 946
repolist: 13,215
Export environment variables:
(undercloud) [stack@undercloud ~]$ export DIB_YUM_REPO_CONF="/etc/yum.repos.d/delorean*"(undercloud) [stack@undercloud ~]$ export DIB_YUM_REPO_CONF="$DIB_YUM_REPO_CONF /etc/yum.repos.d/tripleo-centos-ceph-jewel.repo"Build the images:
(undercloud) [stack@undercloud ~]$ openstack overcloud image buildThe above command creates overcloud-full images (*.qcow2, *.initrd, *.vmlinuz) and ironic-python-agent images (*.initramfs, *.kernel). Building the images on my undercloud VM takes approximately 1 hour.
After successfull build, import the images to the undercloud Glance image base:
(undercloud) [stack@undercloud ~]$ openstack overcloud image upload
Image "overcloud-full-vmlinuz" was uploaded.
+--------------------------------------+------------------------+-------------+---------+--------+
| ID | Name | Disk Format | Size | Status |
+--------------------------------------+------------------------+-------------+---------+--------+
| a6956b2e-94f6-4a66-b89e-8b3d36cf1754 | overcloud-full-vmlinuz | aki | 6233824 | active |
+--------------------------------------+------------------------+-------------+---------+--------+
Image "overcloud-full-initrd" was uploaded.
+--------------------------------------+-----------------------+-------------+----------+--------+
| ID | Name | Disk Format | Size | Status |
+--------------------------------------+-----------------------+-------------+----------+--------+
| e8fa7a3f-1b04-4b51-ae8d-5c6e3fd2ea08 | overcloud-full-initrd | ari | 53389582 | active |
+--------------------------------------+-----------------------+-------------+----------+--------+
Image "overcloud-full" was uploaded.
+--------------------------------------+----------------+-------------+------------+--------+
| ID | Name | Disk Format | Size | Status |
+--------------------------------------+----------------+-------------+------------+--------+
| 30128c63-3a0d-4cf0-a1fc-fb7be30ab6cb | overcloud-full | qcow2 | 1434001408 | active |
+--------------------------------------+----------------+-------------+------------+--------+
Image "bm-deploy-kernel" was uploaded.
+--------------------------------------+------------------+-------------+---------+--------+
| ID | Name | Disk Format | Size | Status |
+--------------------------------------+------------------+-------------+---------+--------+
| f6de3fac-ff3f-45e8-be36-40c415dbc7a7 | bm-deploy-kernel | aki | 6233824 | active |
+--------------------------------------+------------------+-------------+---------+--------+
Image "bm-deploy-ramdisk" was uploaded.
+--------------------------------------+-------------------+-------------+-----------+--------+
| ID | Name | Disk Format | Size | Status |
+--------------------------------------+-------------------+-------------+-----------+--------+
| c6f04a1d-217c-48e7-ba70-0ec2551f67fc | bm-deploy-ramdisk | ari | 423512423 | active |
+--------------------------------------+-------------------+-------------+-----------+--------+
Verify uploaded images:
(undercloud) [stack@undercloud ~]$ openstack image list
+--------------------------------------+------------------------+--------+
| ID | Name | Status |
+--------------------------------------+------------------------+--------+
| f6de3fac-ff3f-45e8-be36-40c415dbc7a7 | bm-deploy-kernel | active |
| c6f04a1d-217c-48e7-ba70-0ec2551f67fc | bm-deploy-ramdisk | active |
| 30128c63-3a0d-4cf0-a1fc-fb7be30ab6cb | overcloud-full | active |
| e8fa7a3f-1b04-4b51-ae8d-5c6e3fd2ea08 | overcloud-full-initrd | active |
| a6956b2e-94f6-4a66-b89e-8b3d36cf1754 | overcloud-full-vmlinuz | active |
+--------------------------------------+------------------------+--------+
Now, undercloud needs to know what hardware it has for its disposal to determine where to deploy particular Overcloud nodes (Controller, Computes). It’s time to prepare instackenv.json file, which contains the list of Overcloud bare metal servers available for the deployment along with their hardware parameters. The file in fact includes a JSON object with one field called nodes containing list of node parameters and descriptions.
There are three approaches to defining Overcloud nodes in the JSON file:
-
- undefined list – list of available nodes without assigned profiles. Using this approach we don’t have any control over nodes placement on particular servers, in other words, Ironic script will deploy Controller and Compute nodes on random servers. The worst possible option IMHO.
-
- list with profiles – list of available nodes with assigned capabilities with defined Compute and Controller profiles. In this option we define which servers can be used for Controller nodes and which of them for Compute nodes.
The example capabilities parameter including Compute profile:"capabilities": "profile:compute,boot_option:local"
- list with profiles – list of available nodes with assigned capabilities with defined Compute and Controller profiles. In this option we define which servers can be used for Controller nodes and which of them for Compute nodes.
- list with node names – list of available nodes with assigned node names. In this option we define particular node names which will be assigned to particular capabilities (Controller, Compute) using additional YAML file with node mapping:
"capabilities": "node:controller-0,boot_option:local"This option requires additional config file hostnames.yaml including node names to profiles mapping.
IMO the best option is the third one, but in this tutorial, for the sake of simplicity and clarity of deployment, I am using second option: list with profiles. My complete and ready to use instackenv.json looks like so:
{
        "nodes":[
        {
            "capabilities": "profile:compute,boot_option:local",
            "name": "Oracle_Sun_Fire_X4270_venus",
            "pm_type": "ipmi",
            "pm_user": "admin",
            "pm_password": "password",
            "pm_addr": "192.168.2.13"
        },
        {
            "capabilities": "profile:control,boot_option:local",
            "name": "HP_Proliant_DL320_G5p_pluto",
            "pm_type": "ipmi",
            "pm_user": "Administrator",
            "pm_password": "password",
            "pm_addr": "192.168.2.11"
        },
        {
            "capabilities": "profile:compute,boot_option:local",
            "name": "HP_Proliant_SE316M1R2_mars",
            "pm_type": "ipmi",
            "pm_user": "admin",
            "pm_password": "password",
            "pm_addr": "192.168.2.12"
        }
    ]
}
Parameters brief description:
- capabilities: describes node preferences (controller, compute) to be used by Ironic script
- name: common name of the node
- pm_type: driver type to be used for IPMI queries (iLO, IPMI, iRMC, SNMP, etc…)
- pm_user: username for BMC/iLO
- pm_password: password for BMC/iLO
- pm_addr: IP address of BMC/iLO in mgmt network
There is a number of Ironic drivers to be used with baremetal servers from different vendors to handle IPMI commands. Two of my nodes are old HP Proliant Gen5 and Gen6 servers. Generally HP Proliant servers are handled by Ironic pxe_ilo driver in TripleO, however, it applies to Proliant versions from Gen8 to Gen10. Older HP Proliant versions, as well as my Oracle Sun Fire X4270 M2 server are all handled by generic ipmi driver only, and this is the driver I am using for my old hardware.
Register nodes:
(undercloud) [stack@undercloud ~]$ openstack overcloud node import instackenv.json
Started Mistral Workflow tripleo.baremetal.v1.register_or_update. Execution ID: 8029eb50-6fa3-4382-998b-6009cbfbff51
Waiting for messages on queue 'c3d21769-d3c5-48c4-8db9-bc7a27767283' with no timeout.

Nodes set to managed.
Successfully registered node UUID e9ac2171-10d4-4ae7-8bf1-ea563f42d13c
Successfully registered node UUID 63d73cb0-a36a-4273-bb5f-4c63b3facae0
Successfully registered node UUID fde1a2cd-59c6-47de-86f4-8ff01ce28e04
All nodes are now in manageable Provisioning State:
(undercloud) [stack@undercloud ~]$ openstack baremetal node list
+--------------------------------------+-----------------------------+---------------+-------------+--------------------+-------------+
| UUID | Name | Instance UUID | Power State | Provisioning State | Maintenance |
+--------------------------------------+-----------------------------+---------------+-------------+--------------------+-------------+
| e9ac2171-10d4-4ae7-8bf1-ea563f42d13c | Oracle_Sun_Fire_X4270_venus | None | power off | manageable | False |
| 63d73cb0-a36a-4273-bb5f-4c63b3facae0 | HP_Proliant_DL320_G5p_pluto | None | power off | manageable | False |
| fde1a2cd-59c6-47de-86f4-8ff01ce28e04 | HP_Proliant_SE316M1R2_mars | None | power off | manageable | False |
+--------------------------------------+-----------------------------+---------------+-------------+--------------------+-------------+
Introspect the nodes to let Ironic discover their hardware attributes:
(undercloud) [stack@undercloud ~]$ openstack overcloud node introspect --all-manageable
Waiting for introspection to finish...
Started Mistral Workflow tripleo.baremetal.v1.introspect_manageable_nodes. Execution ID: 19e015ae-34e8-495d-9820-ea1b1629cd00
Waiting for messages on queue 'ee23732e-4018-48fc-9599-48b43deaba05' with no timeout.
Introspection of node 63d73cb0-a36a-4273-bb5f-4c63b3facae0 completed. Status:SUCCESS. Errors:None
Introspection of node e9ac2171-10d4-4ae7-8bf1-ea563f42d13c completed. Status:SUCCESS. Errors:None
Introspection of node fde1a2cd-59c6-47de-86f4-8ff01ce28e04 completed. Status:SUCCESS. Errors:None
Successfully introspected nodes.
Nodes introspected successfully.
Introspection completed.
Introspection takes about 15-20 minutes, during this time ipmitool sets boot order on each node to boot from PXE, then it powers on the nodes, nodes get the IP addressess on their provisioning / control plane interfaces from Undercloud DHCP service using PXE boot. Linux image is uploaded to the nodes using TFTP, the nodes then boot from the image, which gathers hardware information about those nodes. Once the introspection is completed, all nodes are powered off.
Nodes must be in the available Provisioning state in order to be deployed to by Ironic. Let’s provide the nodes to set them to available state using the below command:
(undercloud) [stack@undercloud ~]$ openstack overcloud node provide --all-manageable
Started Mistral Workflow tripleo.baremetal.v1.provide_manageable_nodes. Execution ID: 80142c88-8bb8-49a8-b7c4-fc0cf9a77f6e
Waiting for messages on queue 'c9070517-ef28-4054-9e36-94365d3b9a40' with no timeout.

Successfully set nodes state to available.
Check nodes status once again, they should be all now in available state:
(undercloud) [stack@undercloud ~]$ openstack baremetal node list
+--------------------------------------+-----------------------------+---------------+-------------+--------------------+-------------+
| UUID | Name | Instance UUID | Power State | Provisioning State | Maintenance |
+--------------------------------------+-----------------------------+---------------+-------------+--------------------+-------------+
| e9ac2171-10d4-4ae7-8bf1-ea563f42d13c | Oracle_Sun_Fire_X4270_venus | None | power off | available | False |
| 63d73cb0-a36a-4273-bb5f-4c63b3facae0 | HP_Proliant_DL320_G5p_pluto | None | power off | available | False |
| fde1a2cd-59c6-47de-86f4-8ff01ce28e04 | HP_Proliant_SE316M1R2_mars | None | power off | available | False |
+--------------------------------------+-----------------------------+---------------+-------------+--------------------+-------------+
And finally we have reached the point, where we can deploy the Overcloud nodes. I am deploying Overcloud nodes using profiles, so I have to point how many nodes I am planning to deploy with each profile/flavor, in my case these are 1 x Controller and 2 x Compute. Additionally I am using local Undercloud based NTP server, as mentioned before.
Let’s deploy the Overcloud using the below command:
(undercloud) [stack@undercloud ~]$ openstack overcloud deploy --control-flavor control --control-scale 1 --compute-flavor compute --compute-scale 2 --templates --ntp-server 192.168.24.1The deployment takes approximately 1,5-2h, during this time the servers/nodes are rebooted. We can monitor the deployment procedure using ironic conductor log as root:
[root@undercloud ~]# tail -f /var/log/ironic/ironic-conductor.logEach Overcloud deployment is actually a stack created in OpenStack, installed on Undercloud node (hence the name OpenStack On OpenStack – TripleO), therefore it’s creation can be monitored as any other stack creation, for example using command:
(undercloud) [stack@undercloud ~]$ openstack stack list --nestedSuccessfull Overcloud deployment final message contains information about Controller’s IP:
...
2018-07-14 22:15:11Z [overcloud.AllNodesDeploySteps]: CREATE_COMPLETE Stack CREATE completed successfully
2018-07-14 22:15:12Z [overcloud.AllNodesDeploySteps]: CREATE_COMPLETE state changed
2018-07-14 22:15:12Z [overcloud]: CREATE_COMPLETE Stack CREATE completed successfully

Stack overcloud CREATE_COMPLETE

Host 192.168.24.6 not found in /home/stack/.ssh/known_hosts
Overcloud Endpoint: http://192.168.24.6:5000/v2.0
Overcloud Deployed
Now let’s make a short test of our deployment. Because our Overcloud is deployed using provisioning / control plane network, all the nodes are accessible via Undercloud node only, which actually acts as a gateway to Overcloud area.
Check provisioning / control plane IP addresses and names of the Overcloud nodes using the below command:
(undercloud) [stack@undercloud ~]$ nova list
+--------------------------------------+-------------------------+--------+------------+-------------+------------------------+
| ID | Name | Status | Task State | Power State | Networks |
+--------------------------------------+-------------------------+--------+------------+-------------+------------------------+
| fe6057bb-3c3a-41f6-bcb6-7bc0e070310b | overcloud-controller-0 | ACTIVE | - | Running | ctlplane=192.168.24.12 |
| 47c6fadc-b236-4b7a-a41e-dd1e5d76efae | overcloud-novacompute-0 | ACTIVE | - | Running | ctlplane=192.168.24.14 |
| 2cb3530b-f3d7-4442-bb04-3f87f9afb4da | overcloud-novacompute-1 | ACTIVE | - | Running | ctlplane=192.168.24.15 |
+--------------------------------------+-------------------------+--------+------------+-------------+------------------------+
We can SSH to Overcloud nodes from Undercloud node, using key based passwordless authentication, as heat-admin user, for example:
(undercloud) [stack@undercloud ~]$ ssh heat-admin@192.168.24.12Right after the deployment the Overcloud environment credentials file /home/stack/overcloudrc is created, containing environmnent variables needed to maintain the Overcloud.
overcloudrc file contains credentials required to log in to the OpenStack dashboard (Horizon):
(undercloud) [stack@undercloud ~]$ cat overcloudrc
# Clear any old environment that may conflict.
for key in $( set | awk '{FS="="} /^OS_/ {print $1}' ); do unset $key ; done
export OS_USERNAME=admin
export OS_BAREMETAL_API_VERSION=1.34
export NOVA_VERSION=1.1
export OS_PROJECT_NAME=admin
export OS_PASSWORD=ZgpEW6pQr72d63dBJ3ZANkY6s
export OS_NO_CACHE=True
export COMPUTE_API_VERSION=1.1
export no_proxy=,192.168.24.6,192.168.24.6
export OS_VOLUME_API_VERSION=3
export OS_CLOUDNAME=overcloud
export OS_AUTH_URL=http://192.168.24.6:5000/v2.0
export IRONIC_API_VERSION=1.34
export OS_IMAGE_API_VERSION=2
export OS_AUTH_TYPE=password
export PYTHONWARNINGS="ignore:Certificate has no, ignore:A true SSLContext object is not available"

# Add OS_CLOUDNAME to PS1
if [ -z "${CLOUDPROMPT_ENABLED:-}" ]; then
export PS1=${PS1:-""}
export PS1=\${OS_CLOUDNAME:+"(\$OS_CLOUDNAME)"}\ $PS1
export CLOUDPROMPT_ENABLED=1
fi
Logging to the Horizon in this environmnet is possible only via/from Undercloud node. The fastest way to get to the Horizon is to install web browser on Undercloud and connect using that browser:
(undercloud) [stack@undercloud ~]$ sudo yum groupinstall "server with GUI"(undercloud) [stack@undercloud ~]$ sudo yum install firefoxEnsure you have X11 Forwarding enabled in your /etc/ssh/sshd_config file on Undercloud:
X11Forwarding yesCheck, if xauth is installed on Undercloud:
[root@undercloud ~]# which xauth
/usr/bin/xauth
Open a new console session and log in to Undercloud node as root user with X forwarding enabled:
(undercloud) [stack@undercloud ~]$ ssh -X root@192.168.2.20Launch Firefox web browser on Undercloud node as root:
[root@undercloud ~]# firefox &
[1] 32044
In the web browser in address bar enter Horizon dashboard IP:
http://192.168.24.6/dashboardYou should see the Horizon splash screen:

Use credentials from /home/stack/overcloudrc file to log in (admin/ZgpEW6pQr72d63dBJ3ZANkY6s).
3. How to delete the deployment
If you decide to remove your Overcloud stack and decommission all the nodes, the procedure is as easy as deleteing the stack. First of all, verify your current stack:
(undercloud) [stack@undercloud ~]$ openstack stack list
+--------------------------------------+------------+----------------------------------+-----------------+----------------------+--------------+
| ID | Stack Name | Project | Stack Status | Creation Time | Updated Time |
+--------------------------------------+------------+----------------------------------+-----------------+----------------------+--------------+
| 7396a8ea-a1fd-49ae-b0a3-24d15b57c786 | overcloud | c52fd78c2a89437b8fbb1a64c7238448 | CREATE_COMPLETE | 2018-07-14T20:37:19Z | None |
+--------------------------------------+------------+----------------------------------+-----------------+----------------------+--------------+
Execute the below command to delete the stack:
(undercloud) [stack@undercloud ~]$ openstack stack delete overcloudMonitor stack deletion:
(undercloud) [stack@undercloud ~]$ watch openstack stack listAfter stack removal, the nodes will remain in available state, ready for the next Overcloud deployment.
4. Conclusions
The Overcloud deployed in this tutorial is actually a basic demo deployment. And, as you have probably noticed, this deployment has a few disadvantages. At first glance it has pretty safe network architecture, since all the Overcloud nodes are accessible via Undercloud VM only, separated from external world in their local, isolated provisioning / control plane network, so the Undercloud acts here as a kind of single point of access. But this single point of access may become suddenly a single point of failure, when Undercloud VM fails for some reason and the Overcloud nodes will become inaccessible and cut out from external network. Even, if they were accessible from management/external network, the only SSH access to the nodes has been configured using heat-admin user with key based passwordless authentication, where private key is stored on Undercloud only, what makes Controller and Computes inaccessible from any other machine, connected even to the same network. Moreover, the Overcloud inter-node data traffic is running in provisioning / control plane network, what can be quite problematic to diagnose in case of network issues between nodes.
The Overcloud network isolation concept seems to be a reliable solution for above problems. It allows Controller node obtain external IP address, what makes it accessible from external network. Additionally, it separates different types of data traffic between nodes using VLAN tagging, what makes them easier for diagnose in case of potential connectivity issues.
Here is the link for OpenStack TripleO deployment using network isolation concept:
OpenStack Pike TripleO Overcloud Deployment using VLAN based Network Isolation
According to the documentation Undercloud machine should be equipped with at least 16GB RAM (preferrably 32GB RAM). I noticed that during the deployment of my 3 baremetal nodes, the Undercloud node utilized merely about 6GB of RAM memory. Also the Overcloud nodes should have at least 8-core CPU and 16GB of RAM according to the documentation, my controller-0 is running on 2-core CPU and 8GB RAM memory, although the cloud is not loaded right now. Will check and let you know how it performs under a heavy load.
We absolutely love your blog and find a lot of your
post’s to be what precisely I’m looking for. Would you offer guest writers to write content for
you? I wouldn’t mind creating a post or elaborating on some of the subjects you write concerning
here. Again, awesome web site!
getting error during overcloud deploy
overcloud-Controller-4xrrnb772n2w]: UPDATE_FAILED Resource UPDATE failed: resources[0]: Resource CREATE failed: ResourceInError: resources.Controller: Went to status ERROR due to “Message: No valid host was found
I encountered this error many times during my tests, mainly in three cases:
– ironic conductor sends ipmi message to the server to power on, but the server for some reason isn’t up on time, check this post:
http://212.127.73.129/extending-minimum-time-between-ipmi-operations-in-openstack-ironic/
– something wrong with your node profiles in instackenv.json file
– or you simply don’t have a connectivity between undercloud and overcloud iLO/BMC interfaces