Jenkins is a popular and open source automation server written in Java, which helps automate the non-human part of the whole software development process. Jenkins supports BASH shell scripts, can be integrated with version control systems and it’s builds can be scheduled via a cron-like mechanism.
In this tutorial we are installing Jenkins stable version from RPM package via Jenkins dedicated repository using DNF package manager.
Steps:
1. Download Jenkins stable version repository
Download repo file:
[root@tuxfixer ~]# wget -O /etc/yum.repos.d/jenkins.repo http://pkg.jenkins-ci.org/redhat-stable/jenkins.repoImport key:
[root@tuxfixer ~]# rpm --import https://jenkins-ci.org/redhat/jenkins-ci.org.key2. Install Jenkins stable version RPM package
In this tutorial we are installing Jenkins version 2.32.1
Verify Jenkins RPM package from Jenkins repository:
[root@tuxfixer ~]# dnf info jenkins
Last metadata expiration check: 0:00:47 ago on Wed Jan 25 23:09:49 2017.
Available Packages
Name        : jenkins
Arch        : noarch
Epoch       : 0
Version     : 2.32.1
Release     : 1.1
Size        : 67 M
Repo        : jenkins
Summary     : Jenkins Continuous Integration Server
URL         : http://jenkins.io/
License     : MIT/X License, GPL/CDDL, ASL2
Description : Jenkins monitors executions of repeated jobs, such as building a software
            : project or jobs run by cron. Among those things, current Jenkins focuses on the
            : following two jobs:
            : - Building/testing software projects continuously, just like CruiseControl or
            :   DamageControl. In a nutshell, Jenkins provides an easy-to-use so-called
            :   continuous integration system, making it easier for developers to integrate
            :   changes to the project, and making it easier for users to obtain a fresh
            :   build. The automated, continuous build increases the productivity.
            : - Monitoring executions of externally-run jobs, such as cron jobs and procmail
            :   jobs, even those that are run on a remote machine. For example, with cron,
            :   all you receive is regular e-mails that capture the output, and it is up to
            :   you to look at them diligently and notice when it broke. Jenkins keeps those
            :   outputs and makes it easy for you to notice when something is wrong.
Install Jenkins RPM package:
[root@tuxfixer ~]# dnf install jenkins3. Verify Java package
Jenkins requires Java installed on the host in order to run, however Fedora release 23 comes with OpenJDK installed out of the box, so we don’t need to install Java package.
Verify Java on the host:
[root@tuxfixer ~]# rpm -qa | grep openjdk
java-1.8.0-openjdk-1.8.0.111-1.b16.fc23.x86_64
java-1.8.0-openjdk-headless-1.8.0.111-1.b16.fc23.x86_64
[root@tuxfixer ~]# java -version
openjdk version "1.8.0_111"
OpenJDK Runtime Environment (build 1.8.0_111-b16)
OpenJDK 64-Bit Server VM (build 25.111-b16, mixed mode)
4. Reconfigure firewall for Jenkins
Jenkins by default listens on port 8080/TCP, so we need to open this port on our host.
First of all, let’s find out what firewall zone our listening interface (i.e. br0p37p1) belongs to:
[root@tuxfixer ~]# firewall-cmd --get-zone-of-interface br0p37p1
FedoraWorkstation
Unlock port 8080/TCP and allow http service in firewalld:
[root@tuxfixer ~]# firewall-cmd --zone=FedoraWorkstation --add-port=8080/tcp --permanent
success
[root@tuxfixer ~]# firewall-cmd --zone=FedoraWorkstation --add-service=http --permanent
success
[root@tuxfixer ~]# firewall-cmd --reload
successNote: if SELinux is preventing firewalld from relabelling your listening interface (i.e. br0p37p1), you can create local policy module:
[root@tuxfixer ~]# ausearch -c 'firewalld' --raw | audit2allow -M my-firewalld
******************** IMPORTANT ***********************
To make this policy package active, execute:

semodule -i my-firewalld.pp

[root@tuxfixer ~]# semodule -X 300 -i my-firewalld.pp
5. Enable Jenkins service
Enable Jenkins server:
[root@tuxfixer ~]# systemctl enable jenkins.service
jenkins.service is not a native service, redirecting to systemd-sysv-install
Executing /usr/lib/systemd/systemd-sysv-install enable jenkins
Launch Jenkins server:
[root@tuxfixer ~]# systemctl start jenkins.serviceVerify Jenkins service:
[root@tuxfixer ~]# systemctl status jenkins.service
● jenkins.service - LSB: Jenkins Continuous Integration Server
   Loaded: loaded (/etc/rc.d/init.d/jenkins)
   Active: active (running) since Wed 2017-01-25 23:42:12 CET; 2min 9s ago
     Docs: man:systemd-sysv-generator(8)
  Process: 9472 ExecStart=/etc/rc.d/init.d/jenkins start (code=exited, status=0/SUCCESS)
   CGroup: /system.slice/jenkins.service
           └─9495 /etc/alternatives/java -Dcom.sun.akuma.Daemon=daemonized -Djava.awt.headless=true -DJENKINS_HOME=/var/lib/jenkins -jar /usr/lib/jenkins/jenkins.war --logfile=/...

Jan 25 23:42:11 tuxfixer systemd[1]: Starting LSB: Jenkins Continuous Integration Server...
Jan 25 23:42:11 tuxfixer runuser[9479]: pam_unix(runuser:session): session opened for user jenkins by (uid=0)
Jan 25 23:42:12 tuxfixer runuser[9479]: pam_unix(runuser:session): session closed for user jenkins
Jan 25 23:42:12 tuxfixer jenkins[9472]: Starting Jenkins [  OK  ]
Jan 25 23:42:12 tuxfixer systemd[1]: Started LSB: Jenkins Continuous Integration Server.
6. Unlock Jenkins server
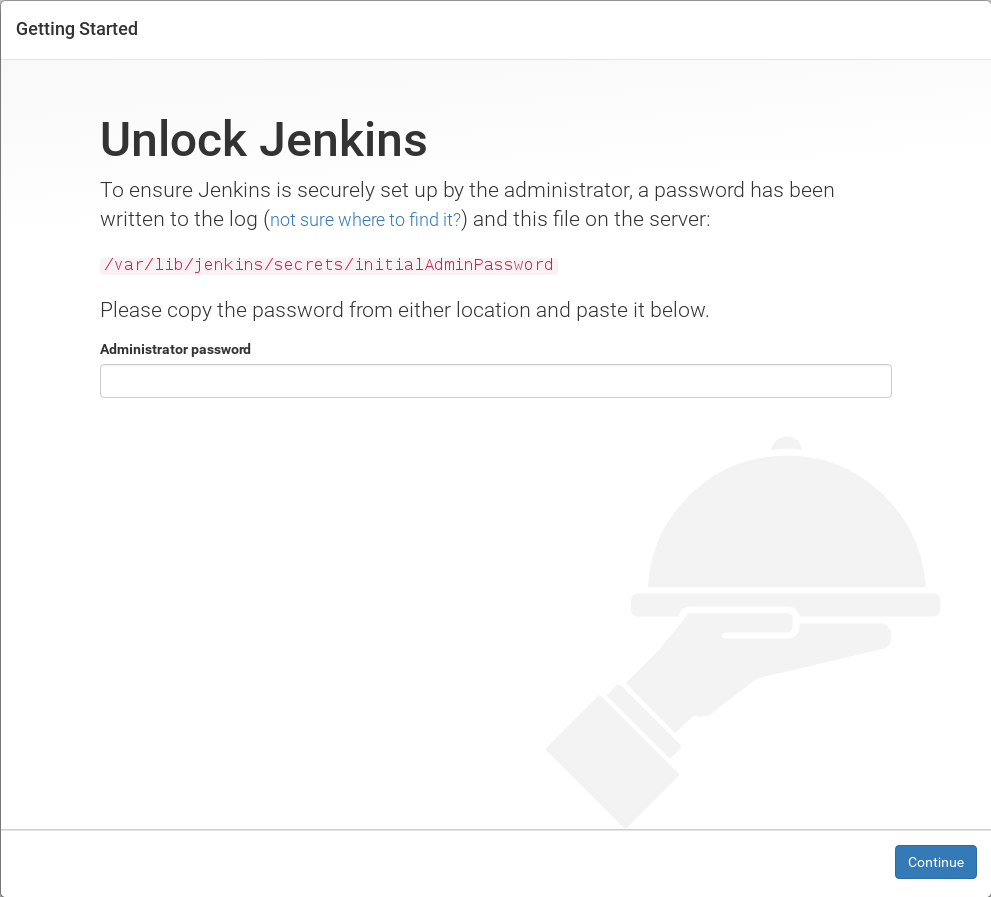
Now access Jenkins via web browser using your IP:
http://192.168.2.9:8080The following screen should appear:

Check initial admin password in mentioned file:
[root@tuxfixer ~]# cat /var/lib/jenkins/secrets/initialAdminPassword
2955f444ae52449db69f5e78464509c0
Type in initial admin password in the web browser to grant Jenkins access.
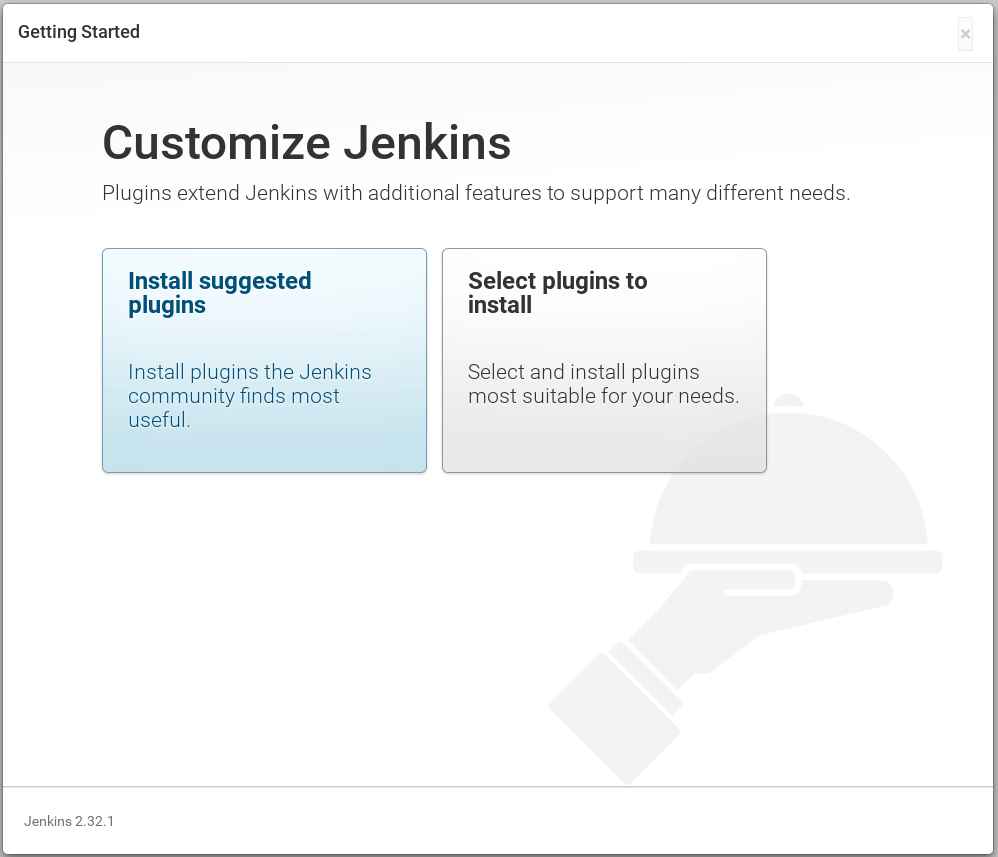
7. Customize Jenkins
Install Plugins according to your preferences:

… and last but not least at the very end – create new admin account.
Nice Article. In short description good explanation about the DevOps. Thanks For sharing the informative news.