
SSH allows users to establish secure connections over untrusted networks by encrypting the communication between client and server. SSH tunnels offer an array of benefits, including secure remote access, bypassing firewalls, and establishing secure communications between multiple network segments.
SSH tunneling has been widely used to secure remote connections, but the concept of multi-hop takes it to the next level. By leveraging multiple intermediary hosts, multi-hop SSH tunneling allows for enhanced security and flexibility when accessing resources across different networks.
In this article we are using a Virtual Data Center account, created on CinderCloud.com hosting, to set up example one-hop and multi-hop (multi-host) SSH tunnels.
Network Setup
The below picture presents a network setup, we are going to use in the below SSH tunneling examples:
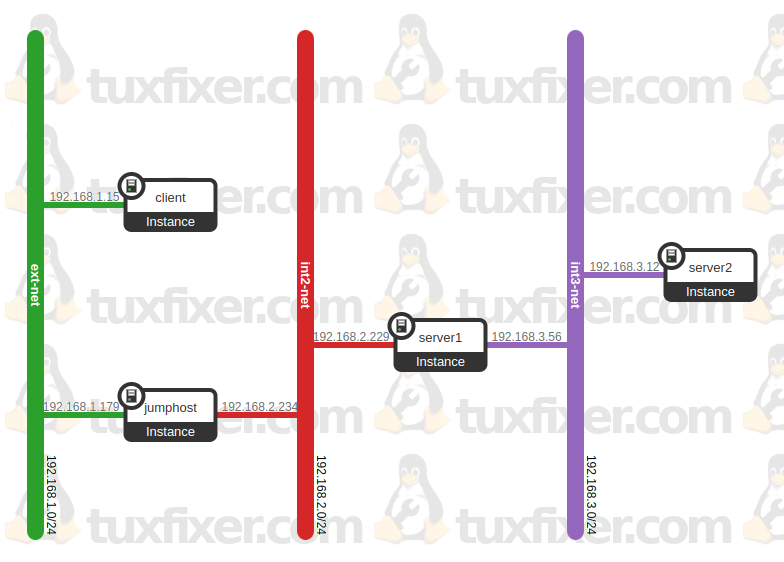
IP configuration of the hosts:
client: 192.168.1.15 (ext-net)
jumphost: 192.168.1.179 (ext-net), 192.168.2.234 (int2-net)
server1: 192.168.2.229 (int2-net), 192.168.3.56 (int3-net)
server2: 192.168.3.12 (int3-net)
Multi-host SSH connectivity check
First of all, let’s check the end-to-end SSH connectivity from the client machine to the server2:
user@client:~$ ssh user@192.168.1.179
Last login: Sun Sep 29 12:15:30 2024 from 192.168.1.15
user@jumphost:~$ ssh user@192.168.2.229
Last login: Sun Sep 29 12:17:03 2024 from 192.168.2.234
user@server1:~$ ssh user@192.168.3.12
Last login: Sun Sep 29 12:18:07 2024 from 192.168.3.56
user@server2:~$
1. Forwarding SSH connections from client machine to server1 through the jumphost
We are on the client (192.168.1.15) and we want to SSH to server1 (192.168.2.229) through the jumphost (192.168.1.179):
user@client:~$ ssh -A -J user@192.168.1.179 user@192.168.2.229where:
-A: Enables forwarding of connections from an authentication agent
-J: Connect to the target host by first making a ssh connection to the jump host
2. Forwarding HTTP connections from client machine to server1 through the jumphost
We are on the client (192.168.1.15) and we want to connect to HTTP service running on server1 (192.168.2.229) through the jumphost (192.168.1.179) using local port 65535 on our client machine:
user@client:~$ ssh -L 65535:192.168.2.229:80 user@192.168.1.179where:
-L: Specifies that connections to the given TCP port or Unix socket on the local (client) host are to be forwarded to the given host and port, or Unix socket, on the remote side
Once the tunnel is established, we can now reach HTTP service running on server1 via our local port 65535 on the client machine using the preferred web browser:
user@client:~# lynx http://localhost:655353. Multi-hop forwarding HTTP connections from client machine to server2 through the jumphost and server1
We are on the client (192.168.1.15) and we want to connect to HTTP service running on server2 (192.168.3.12) through the jumphost (192.168.1.179) and server1 (192.168.2.229) using local port 65535 on our client machine:
user@client:~$ ssh -v -N user@192.168.2.229 -J user@192.168.1.179 -L 65535:192.168.3.12:80where:
-L: Specifies that connections to the given TCP port or Unix socket on the local (client) host are to be forwarded to the given host and port, or Unix socket, on the remote side
-J: Connect to the target host by first making a ssh connection to the jump host
-v: Verbose mode
-N: Do not execute a remote command, this is useful for for further port forwarding
Once the tunnel is established, we can now reach HTTP service running on server2 via our local port 65535 on the client machine using the preferred web browser:
user@client:~# lynx http://localhost:655354. Setting aliases for SSH tunnels
If we use our SSH tunnels frequently, it is convenient to set aliases for particular SSH tunnels in ~/.bashrc file:
alias ssh-to-server1='ssh -A -J user@192.168.1.179 user@192.168.2.229'
alias http-on-server1='ssh -L 65535:192.168.2.229:80 user@192.168.1.179'
alias http-on-server2='ssh -v -N user@192.168.2.229 -J user@192.168.1.179 -L 65535:192.168.3.12:80'
To open a tunnel, type alias name in command line, i.e:
user@client:~# http-on-server2