![]()
CentOS 7 may offer us a possibility of automatic RAID configuration in Anaconda installer, that is during OS installation, once it detects more than one physical device attached to the computer. Mentioned RAID is generally the LVM-RAID setup, based on well known mdadm – Linux Software RAID. It’s a pretty convenient solution, since we don’t need to setup RAID manually after installation, on already running system.
The below procedure presents CentOS 7 testing installation with LVM RAID 1 (Mirroring) on KVM based Virtual Machine with two attached 20GB virtual disks.
1. Boot from ISO
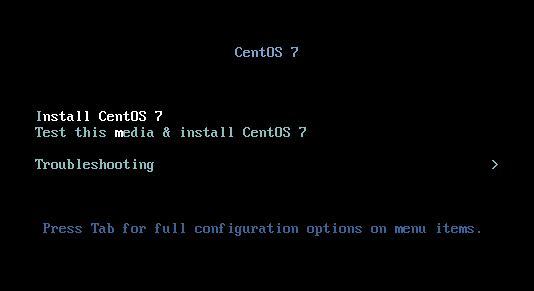
Boot the system from CentOS 7 installation media and launch installer:
2. Configure LVM RAID
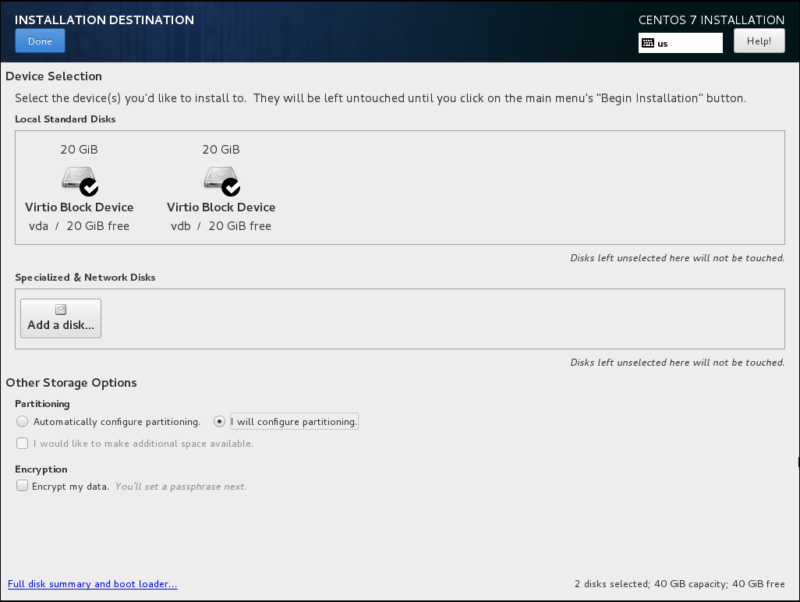
On INSTALLATION SUMMARY screen click on SYSTEM -> INSTALLATION DESTINATION to configure partitioning:

Select both disks from the available devices and choose “I will configure partitioning” option:
You will be redirected to MANUAL PARTITIONING screen.
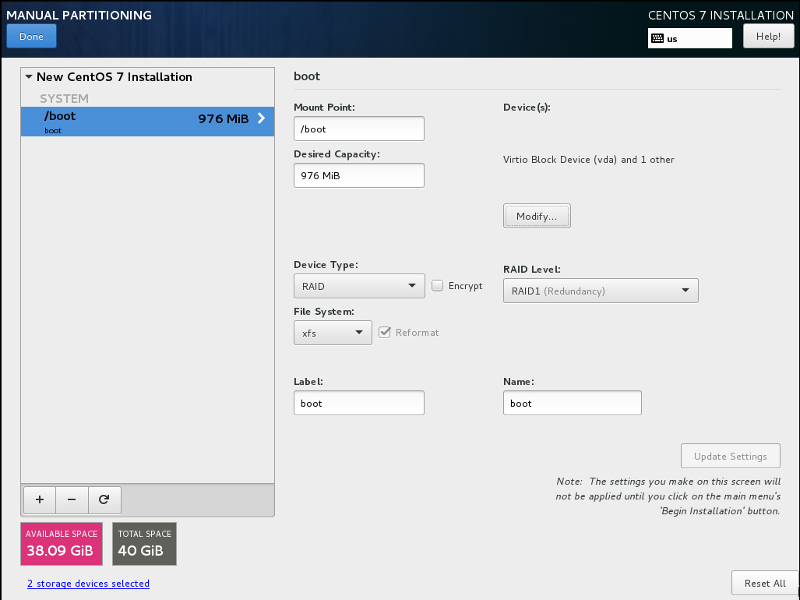
First create boot partition with the following parameters:
– mount point: /boot
– size: 1024MB
– device type: RAID
– RAID level: RAID 1 (Mirroring)
– file system: xfs
Now let’s create swap and root partitions. We will create them inside the volume group called centos which will be placed on top of RAID 1.
Let’s start from swap creation with the following parameters:
– mount point: swap
– device type: LVM
– files system: swap
During swap creation choose Device Type: LVM and click on Modify button in Volume Group area:
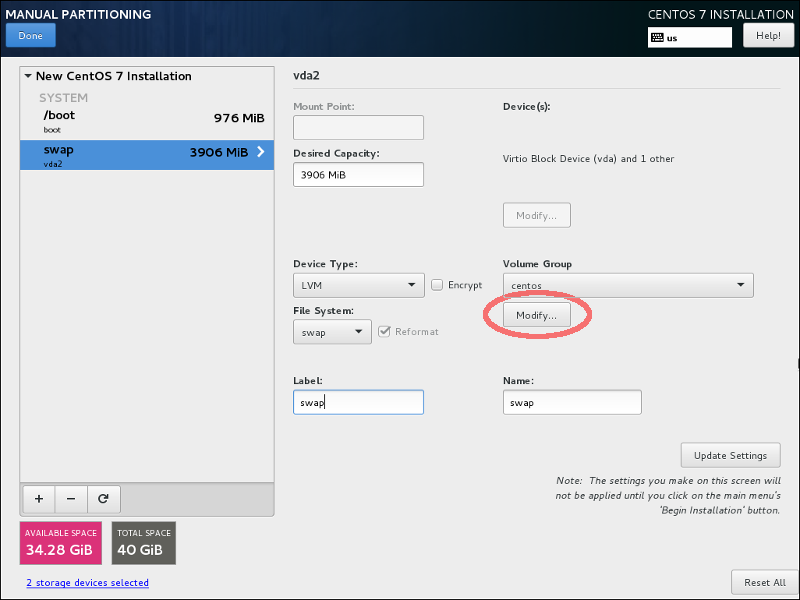
Now we need to create centos Volume Group on the top of RAID 1 (using automatic size policy):

swap partition is now created as a Logical Volume named centos-swap:
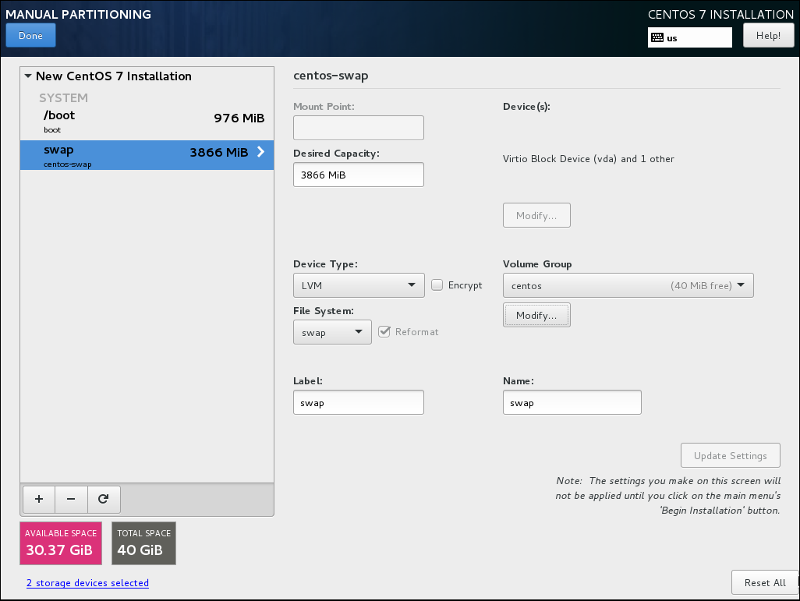
Now create root partition with the following parameters:
– mount point: /
– device type: LVM (use previously created centos VG on top of RAID 1)
– files system: xfs
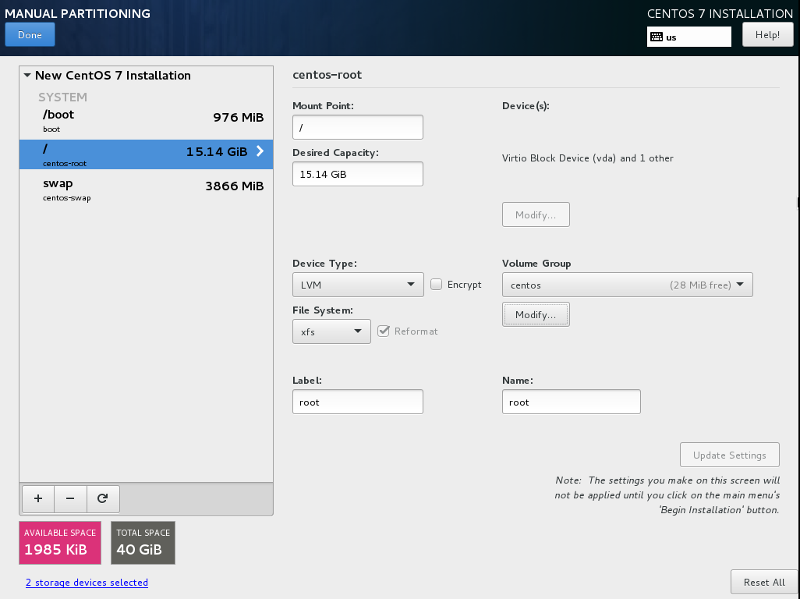
root partition is now created as a Logical Volume named centos-root.
Click on Done button, accept all the changes made to the partitions on SUMMARY OF CHANGES screen, return to INSTALLATION SUMMARY screen and continue installation as usual.
3. Verify RAID status and LVM configuration
After the installation is completed, make a brief verification of the disk layout and patitioning.
Check the RAID status:
[root@centos7 ~]# cat /proc/mdstat
Personalities : [raid1]
md126 : active raid1 vdb1[1] vda1[0]
      1000384 blocks super 1.0 [2/2] [UU]
      bitmap: 0/1 pages [0KB], 65536KB chunk

md127 : active raid1 vdb2[1] vda2[0]
      19953664 blocks super 1.2 [2/2] [UU]
      bitmap: 1/1 pages [4KB], 65536KB chunk

unused devices:
In the above code snippet the Personalities parameter informs us what RAID level the kernel currently supports, while md126 and md127 describe arrays of redundand disks.
md126 array consists of vdb1 and vda1 disks, while md127 consists of vdb2 and vda2.
Both arrays are in active state, the [UU] sign for each array means that both devices in the array are Up and running. A failed device would display (F) letter, the degraded array would be visible with one disk down marked with (_), for example [U_].
In our example /boot partition, which is a standard partition (not included in LVM), has been placed on md127 array:
root@centos7 ~]# blkid | grep boot
/dev/vda1: UUID="50be4267-a342-5f26-c1f7-01d9b6f2b3d8" UUID_SUB="3fe07c86-0b73-824c-5745-1f618eea02a6" LABEL="centos7:boot" TYPE="linux_raid_member"
/dev/vdb1: UUID="50be4267-a342-5f26-c1f7-01d9b6f2b3d8" UUID_SUB="30d9832a-15a8-68c2-fa75-772ea69e5a9d" LABEL="centos7:boot" TYPE="linux_raid_member"
/dev/md127: LABEL="boot" UUID="316dcb12-fa92-499f-8e19-8b7be8d15e0b" TYPE="xfs"
…while the LVM Physical Volume (PV), which is a base for centos Volume Group, has been placed on md126 array:
[root@centos7 ~]# blkid | grep LVM
/dev/md126: UUID="VegBA7-uMFl-Vp5C-EPOr-1jNg-PhoM-SYJraX" TYPE="LVM2_member"
[root@centos7 ~]# pvdisplay
--- Physical volume ---
PV Name /dev/md126
VG Name centos
PV Size 19.03 GiB / not usable 2.00 MiB
Allocatable yes
PE Size 4.00 MiB
Total PE 4871
Free PE 27
Allocated PE 4844
PV UUID VegBA7-uMFl-Vp5C-EPOr-1jNg-PhoM-SYJraX[root@centos7 ~]# vgdisplay
--- Volume group ---
VG Name centos
System ID
Format lvm2
Metadata Areas 1
Metadata Sequence No 3
VG Access read/write
VG Status resizable
MAX LV 0
Cur LV 2
Open LV 2
Max PV 0
Cur PV 1
Act PV 1
VG Size 19.03 GiB
PE Size 4.00 MiB
Total PE 4871
Alloc PE / Size 4844 / 18.92 GiB
Free PE / Size 27 / 108.00 MiB
VG UUID bG0UXj-4HBX-E1vN-kgeJ-WbsE-CXR9-SV3SRyOur centos Volume Group includes root and swap Logical Volumes, exactly as created during the installation:
[root@centos7 ~]# lvdisplay
  --- Logical volume ---
  LV Path                /dev/centos/swap
  LV Name                swap
  VG Name                centos
  LV UUID                dQwld2-AJKd-Mh1b-DJjc-v39Z-VT1r-W4Sry1
  LV Write Access        read/write
  LV Creation host, time centos7, 2018-04-02 01:13:34 +0200
  LV Status              available
  # open                 2
  LV Size                3.78 GiB
  Current LE             967
  Segments               1
  Allocation             inherit
  Read ahead sectors     auto
  - currently set to     8192
  Block device           253:1

  --- Logical volume ---
  LV Path                /dev/centos/root
  LV Name                root
  VG Name                centos
  LV UUID                vOhqKt-zAeL-dMG2-38cJ-LrfM-xbRq-cFMKOc
  LV Write Access        read/write
  LV Creation host, time centos7, 2018-04-02 01:13:36 +0200
  LV Status              available
  # open                 1
  LV Size                15.14 GiB
  Current LE             3877
  Segments               1
  Allocation             inherit
  Read ahead sectors     auto
  - currently set to     8192
  Block device           253:0
fdisk is another reliable tool in our case, capable of listing both physical and logical drives that create LVM-RAID structure:
[root@centos7 ~]# fdisk -l

Disk /dev/vda: 21.5 GB, 21474836480 bytes, 41943040 sectors
Units = sectors of 1 * 512 = 512 bytes
Sector size (logical/physical): 512 bytes / 512 bytes
I/O size (minimum/optimal): 512 bytes / 512 bytes
Disk label type: dos
Disk identifier: 0x00052c26

   Device Boot      Start         End      Blocks   Id  System
/dev/vda1   *        2048     2002943     1000448   fd  Linux raid autodetect
/dev/vda2         2002944    41943039    19970048   fd  Linux raid autodetect

Disk /dev/vdb: 21.5 GB, 21474836480 bytes, 41943040 sectors
Units = sectors of 1 * 512 = 512 bytes
Sector size (logical/physical): 512 bytes / 512 bytes
I/O size (minimum/optimal): 512 bytes / 512 bytes
Disk label type: dos
Disk identifier: 0x000c64ba

   Device Boot      Start         End      Blocks   Id  System
/dev/vdb1   *        2048     2002943     1000448   fd  Linux raid autodetect
/dev/vdb2         2002944    41943039    19970048   fd  Linux raid autodetect

Disk /dev/md127: 1024 MB, 1024393216 bytes, 2000768 sectors
Units = sectors of 1 * 512 = 512 bytes
Sector size (logical/physical): 512 bytes / 512 bytes
I/O size (minimum/optimal): 512 bytes / 512 bytes


Disk /dev/md126: 20.4 GB, 20432551936 bytes, 39907328 sectors
Units = sectors of 1 * 512 = 512 bytes
Sector size (logical/physical): 512 bytes / 512 bytes
I/O size (minimum/optimal): 512 bytes / 512 bytes


Disk /dev/mapper/centos-root: 16.3 GB, 16261316608 bytes, 31760384 sectors
Units = sectors of 1 * 512 = 512 bytes
Sector size (logical/physical): 512 bytes / 512 bytes
I/O size (minimum/optimal): 512 bytes / 512 bytes


Disk /dev/mapper/centos-swap: 4055 MB, 4055891968 bytes, 7921664 sectors
Units = sectors of 1 * 512 = 512 bytes
Sector size (logical/physical): 512 bytes / 512 bytes
I/O size (minimum/optimal): 512 bytes / 512 bytes
Hello! How about GPT disks that require a BIOS Boot partition on both hhd’s?
Hi, I am following you step by step, but after mdstat showing sync finished, I still cant boot os with one disk left, it will boot into emergency mode, which I believe it’s not what raid1 should do.
Hi
To me, it looks like you forgot to place /boot partition on RAID 1, and I guess /boot is placed on one (first) disk only, and when you remove it, there is no copy on the second one and the OS does not boot – this is the first thing that crossed my mind here.